Want to understand how to set up your own V Rising server? There are just a few very large advantages to operating a devoted server for V Rising, and fortunately the devs at Stunlock Studios have provided us with a wide range of choices and instruments when it comes to setting up our own multiplayer areas.
If you are aware of operating devoted servers for video games like Valheim, the method ought to be pretty simple. But if that is your first foray into the world of devoted servers, you’ve got come to the proper place.
Below I’m going to clarify precisely how to set up, configure, launch, and be a part of your own devoted server. The beneath walkthrough covers each single step from begin to end, and we’ll even go into element in regards to the small complicated steps like setting up Port-Forwarding, permitting your server via your Firewall, and turning your present non-public sport right into a devoted server to take pleasure in with your buddies.
On this web page:
How to set up a V Rising devoted server
There are three alternative ways to set up a V Rising devoted server:
- Rent a server from GPortal (prices cash).
- Set up a server with SteamCMD (free).
- Set up a server from Steam itself (free).
It sounds complicated, however don’t fret – I’ll clarify each in additional element beneath.
How to lease a server from GPortal
V Rising’s official servers are all hosted by GPortal, and in case you’re okay with paying cash to take away all the trouble of setting up your own devoted server, you’ll be able to lease your own private server from them too.
Head to the V Rising Server Hosting page on GPortal, after which select the server plan that most closely fits your wants – or create your own configuration. The advantages of utilizing GPortal are ease of use, and a excessive efficiency server.
The draw back, after all, is that you just want to pay for it. If you need to set up your own server free of charge, use one of many two choices beneath as a substitute.
Set up a server with SteamCMD
Lots of gamers of Steam video games like to use SteamCMD to host their own devoted servers, and V Rising isn’t any exception. If you need to use SteamCMD, this is what to do:
- Download SteamCMD.
- Extract the contents of the ZIP into a brand new folder on your fundamental drive known as “steamcmd”.
- Run “steamcmd.exe” within the folder and look forward to the startup course of to full.
- Type into the window “login nameless” and hit Enter. Wait for SteamCMD to log you in.
- Type “App_update 1829350” and hit Enter. Wait for the server information to be downloaded.
- Once the method is full, kind “exit” and hit Enter to exit the window.
- From your steamcmd folder, go to “steamapps/widespread/VRisingDedicatedServer” to discover your server information.
From right here you’ll be able to then observe the directions within the subsequent part: V Rising server settings explained.

Set up a server from Steam itself
Here’s one other means to arrive at precisely the identical level because the above, one which does not contain having to obtain SteamCMD.
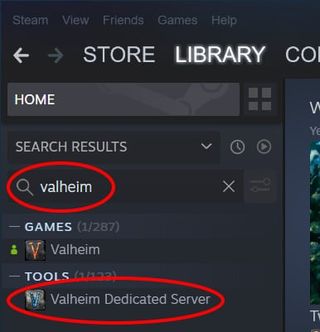
- Open your Steam Library and kind into the search bar “V Rising Dedicated Server”.
- Install the V Rising Dedicated Server device as you’ll usually set up a sport on Steam.
- Right-click the V Rising Dedicated Server device in your library checklist and go to “Manage -> Browse native information”.
Whichever of the above two strategies you employ, you will finish up with a folder crammed with server information prepared for setting up your own devoted server.
V Rising server settings defined
Most of the information you’ve got downloaded, you’ll be able to ignore. But just a few are essential for setting up your V Rising server precisely the way you need it.
First, right-click the “start_server_example.bat” file and click on Edit. In the ultimate line, change the next:
- Add a server title within the quotes after “-serverName”. This is the title that can seem within the V Rising server checklist in-game.
- Add a save title within the quotes after “-saveName”. This is the title that seems in your save information out of sport.
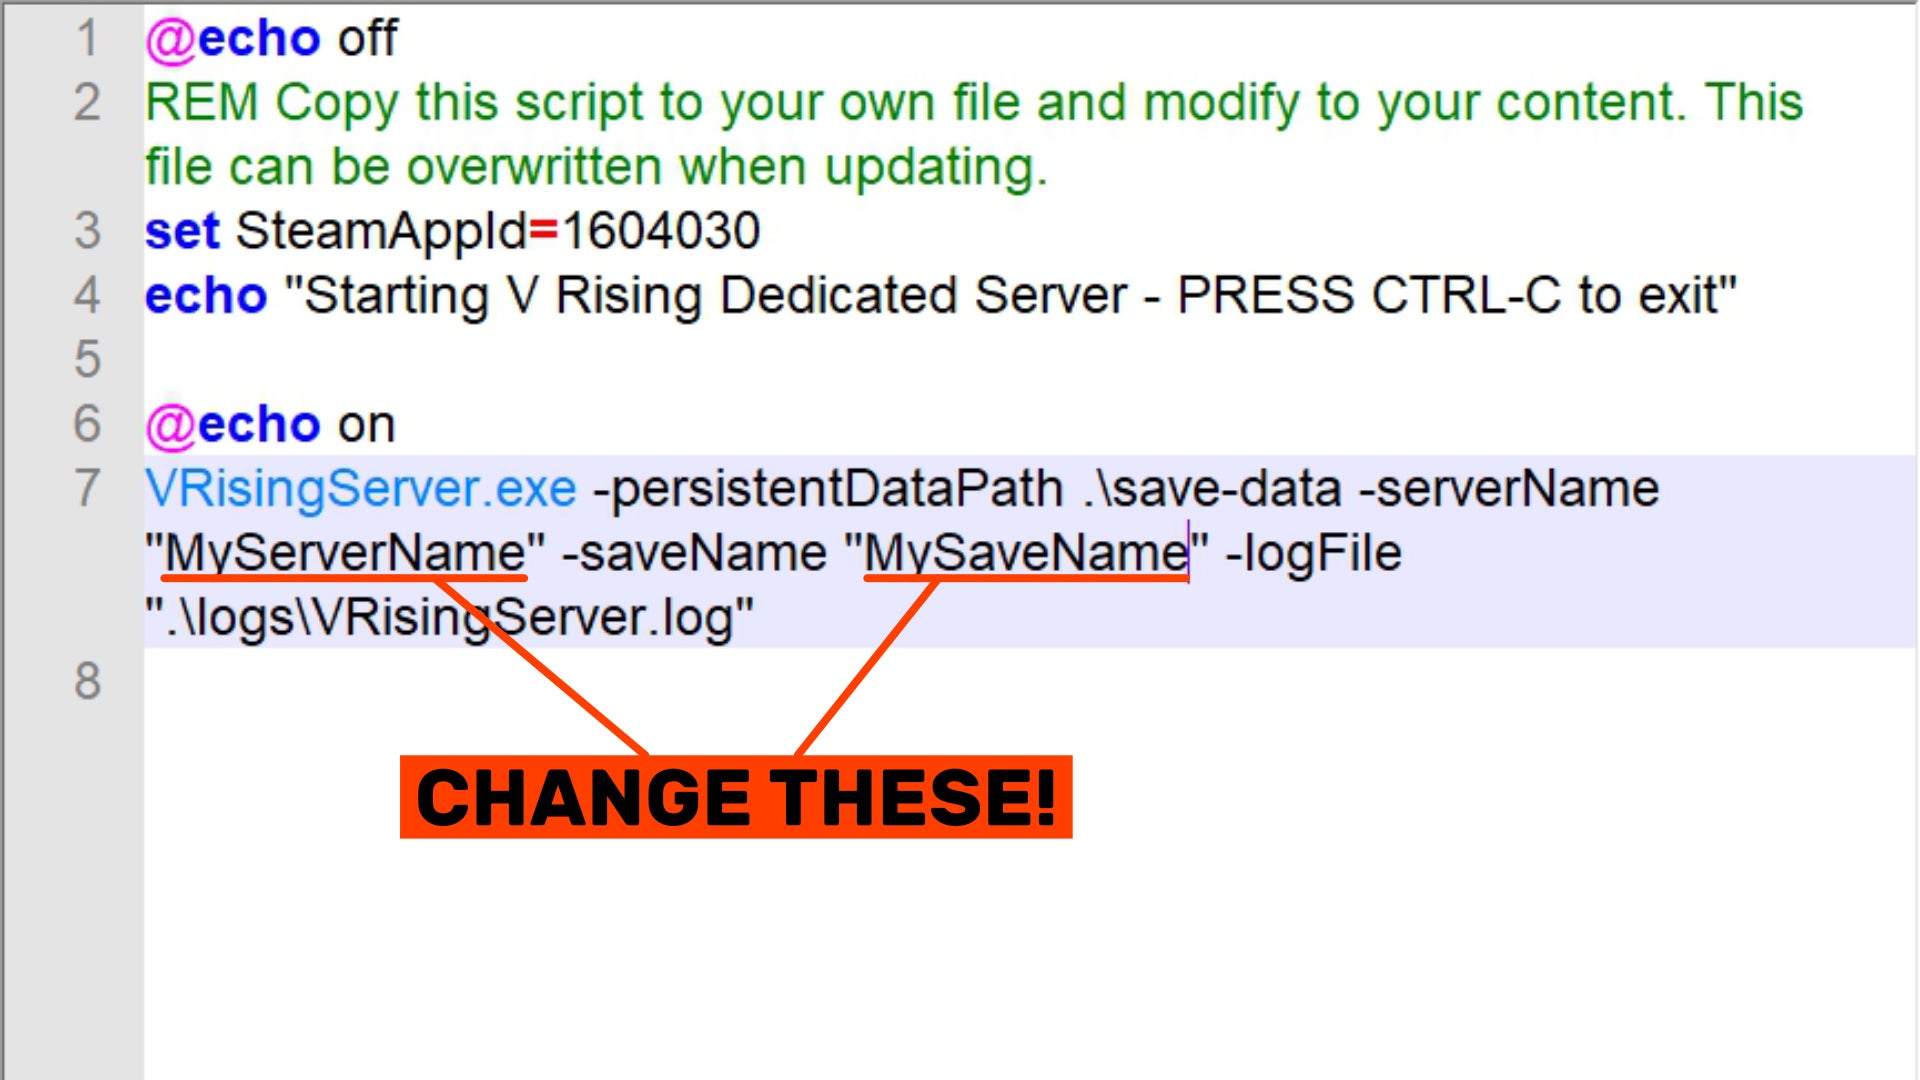
Now save and give up this file.
Next, navigate to “VRisingServer_Data/StreamingAssets/Settings”. In listed here are 4 essential information:
- “adminlist.txt”: Add participant names to this checklist to make them into admins on the server.
- “banlist.txt”: Add participant names to this checklist to ban them from the server.
- “ServerGameSettings.json”: Edit this file to change numerous sport settings inside your server.
- “ServerHostSettings.json”: Edit this file to change settings in regards to the server itself.
Open up “ServerHostSettings.json” and alter the “Name” and “SaveName” traces to match what you selected to be the server title and the save title respectively within the “start_server_example.bat” file earlier. You may also add a password right here in order that solely these you belief can be a part of your server, and an outline which is displayed with to your server in the principle server checklist in-game.
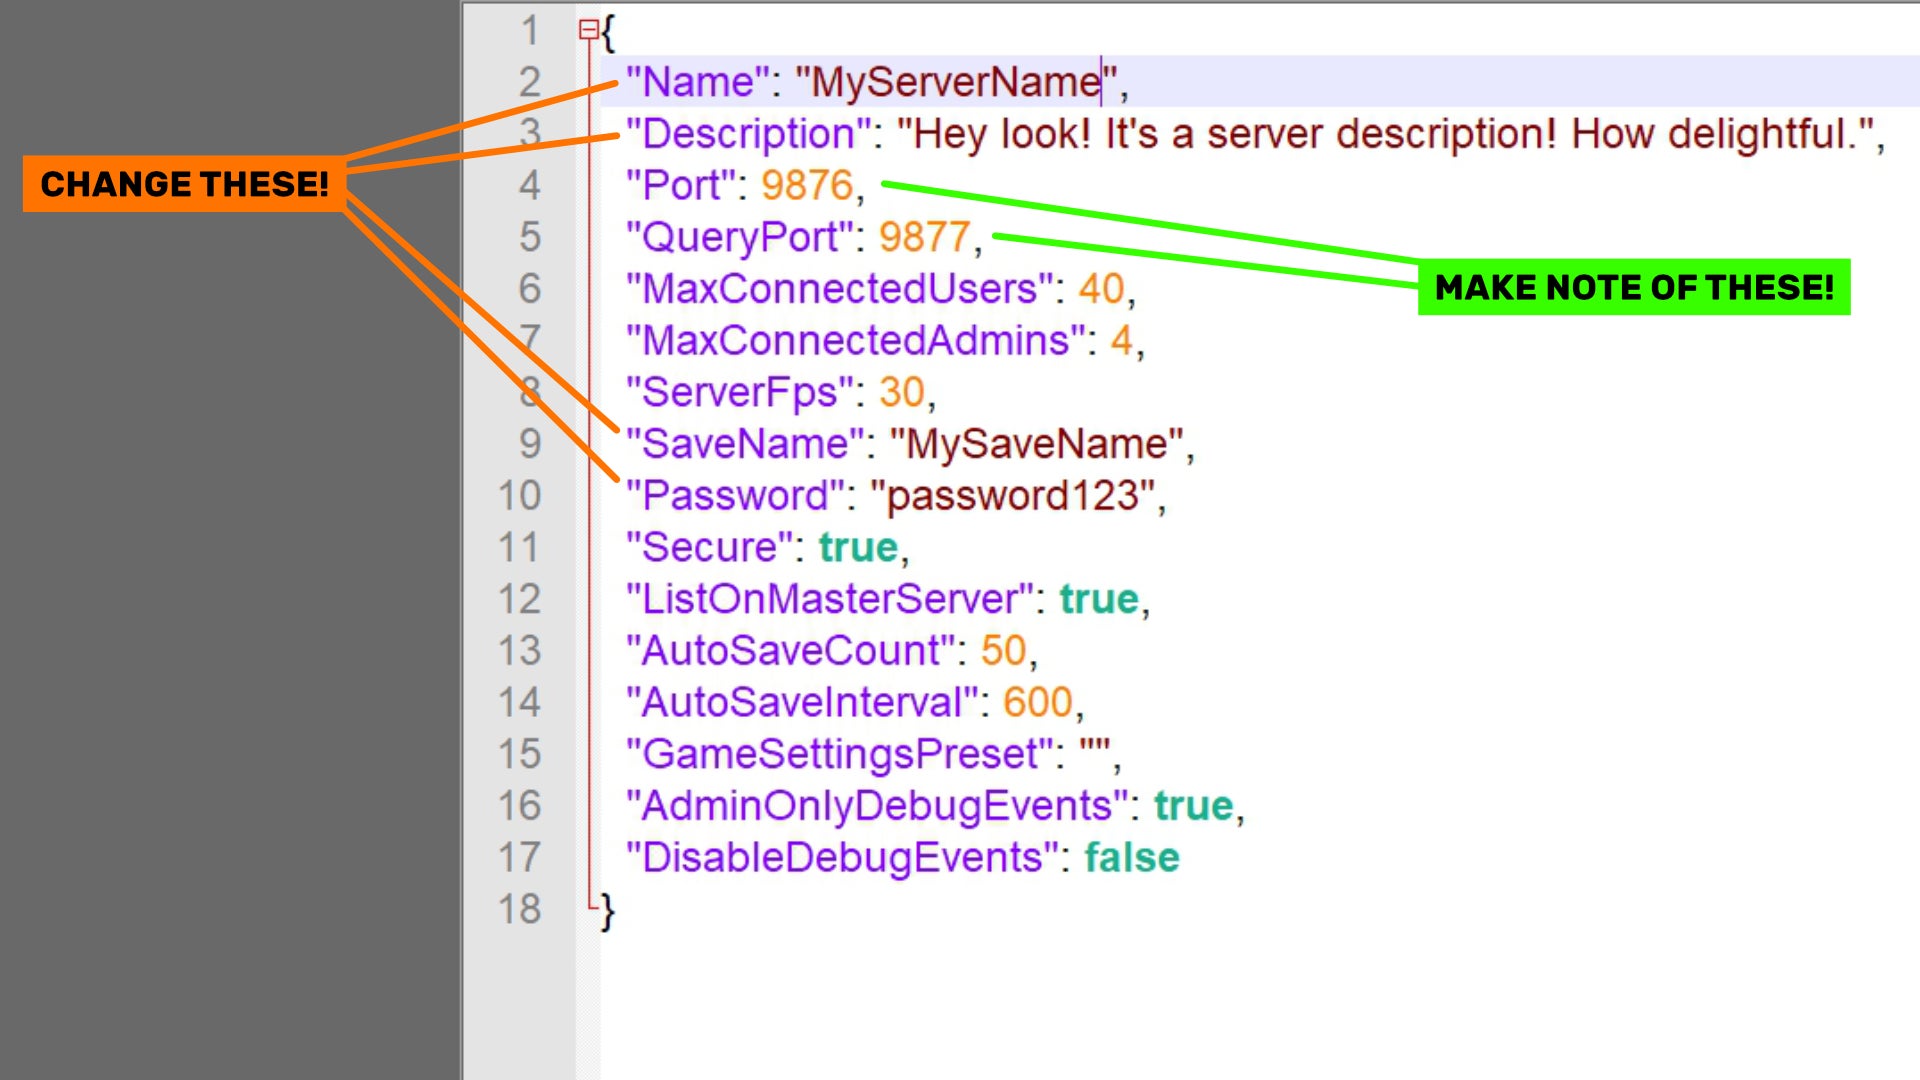
Also make an observation of the numbers subsequent to “Port” and “QuestionPort”, since you’ll want this numbers for the Port-Forwarding and Firewall sections shortly.
Save and exit this file whenever you’re carried out.
That’s all you want to change inside these information, however after all you’ll be able to go into the “ServerGameSettings” file to set up the server to be PvP or PvE, and alter numerous different issues about how the sport works on your server.
V Rising server settings checklist
Here are among the most essential server settings you’ll be able to customise throughout the “ServerGameSettings.json” file:
- “GameModeType”: set to both PvP or PvE as most popular.
- “CanLootEnemyContainers”: set to true to enable gamers to loot the containers of enemy gamers.
- “BloodBoundEquipment”: setting to true permits you to preserve your instruments and wearables on you after dying.
- “ClanSize”: determines the utmost variety of gamers in a clan.
- “SunDamageModifier”: dictates the quantity of harm the daylight offers to gamers. Defaults to 1.
- “CastleDecayRateModifier”: dictates the speed at which Castle Heart Decay happens.
- “DayDurationInSeconds”: how lengthy in seconds a full cycle of day/night time lasts. Defaults to 1080.
- “CastleRestrict”: determines what number of Castle Hearts can be found for every participant to place. Defaults to 2.
- “VSPlayerWeekdayTime” and “VSPlayerWeekendTime”: determines the instances of day when gamers can assault different gamers on PvP servers.
- “VSCastleWeekdayTime” and “VSCastleWeekendTime”: determines the instances of day when gamers can raid different gamers’ castles on PvP servers.
How to begin and shut down your V Rising server
Now that all the things is set up and prepared, you can begin your V Rising devoted server. To do that, simply click on the “start_server_example.bat” file to launch it. A black window will seem with a few traces of textual content – and that is it! Your server is now operating.
However, it’s possible you’ll run into points becoming a member of the server. To make sure that your server is joinable, have a learn of these Port-Forwarding and Firewall sections beneath.
To shut down your server, merely click on anyplace within the black server window, and hit “Ctrl+C”. After a second you will be prompted to “Terminate batch job (Y/N)?” – to which you need to simply kind “y” and hit Enter to shut the entire thing down.

How to flip your non-public V Rising sport right into a devoted server
If you need to take your non-public V Rising sport and switch it right into a devoted server, that is doable too – it simply takes a pair extra steps. Here’s what you want to do:
- Setup a brand new server with a brand new save file title, after which begin the server operating utilizing the above steps.
- Join the server, create a brand new character, after which give up the sport, and shut down the server.
- From your server information, navigate to “save-data/Saves/v1/[your server’s save name]”. Delete all of the autosave folders on this location, so that each one that’s left within the folder is the “SessionId.json”. file.
- Type the next into your Windows Explorer handle bar: “%Appdata%..LocalLowStunlock StudiosVRisingSavesv1”. Each of the folders on this location are your native V Rising saves. To discover out which is which, go into each and edit their “ServerHostSettings.json” file to view the save title.
- Once you’ve got discovered the folder of the sport you need to flip right into a devoted server, make a backup of your entire folder, simply in case. Then copy all of the autosave folders from right here into the placement in step 3, changing the information you deleted.
- Go again to the placement in step 4. This time, copy the “ServerGameSettings.json” and “ServerHostSettings.json” information.
- Navigate to “%Appdata%..LocalLowStunlock StudiosVRisingServer”. If there is not a folder known as “Settings” already there, create one. Then open up that “Settings” folder and paste within the two JSON information you simply copied.
Once all these steps are full, you’ll be able to shut all the things down, begin the server operating, and be a part of the server in-game to choose up precisely the place you left off in your non-public world. Only now it is a devoted server. Good stuff, eh?
How to set up Port-Forwarding for your V Rising server
The subsequent two steps are essential. If you run into issues setting up or becoming a member of your devoted server, it is in all probability since you did not correctly undergo these steps.
To enable your devoted server to be joinable, you want to set up Port-Forwarding on your router. Everyone’s router is completely different, so the method right here will probably be completely different for everybody. But the tough steps ought to be the identical for everybody. First, you will want to know your inner IP Address.
To discover out your Internal IP Address:
- Hit “Start+R”, then kind “cmd” and hit Enter.
- Type “ipconfig” into the window that seems, and hit Enter.
- Make a observe of the string of numbers subsequent to “Default Gateway”. For most individuals it will likely be both “192.168.0.1” or “192.168.1.1”.

Using this information, you’ll be able to login to your router device by opening your browser and typing your inner IP handle into the handle bar. Then observe the steps to set up Port-Forwarding for each the numbers that had been subsequent to “Port” and “QuestionPort” within the “ServerHostSettings.json” file.
You’ll possible want your IPv4 handle so as to set these up. To discover your IPv4 handle, observe the above steps for locating your inner IP Address, however this time make an observation of the quantity subsequent to “IPv4 Address”.
How to let your V Rising server via the Firewall
You’ll additionally want to let the above ports via your Firewall to ensure that your server to be joinable by others. To do that on Windows, observe the beneath steps:
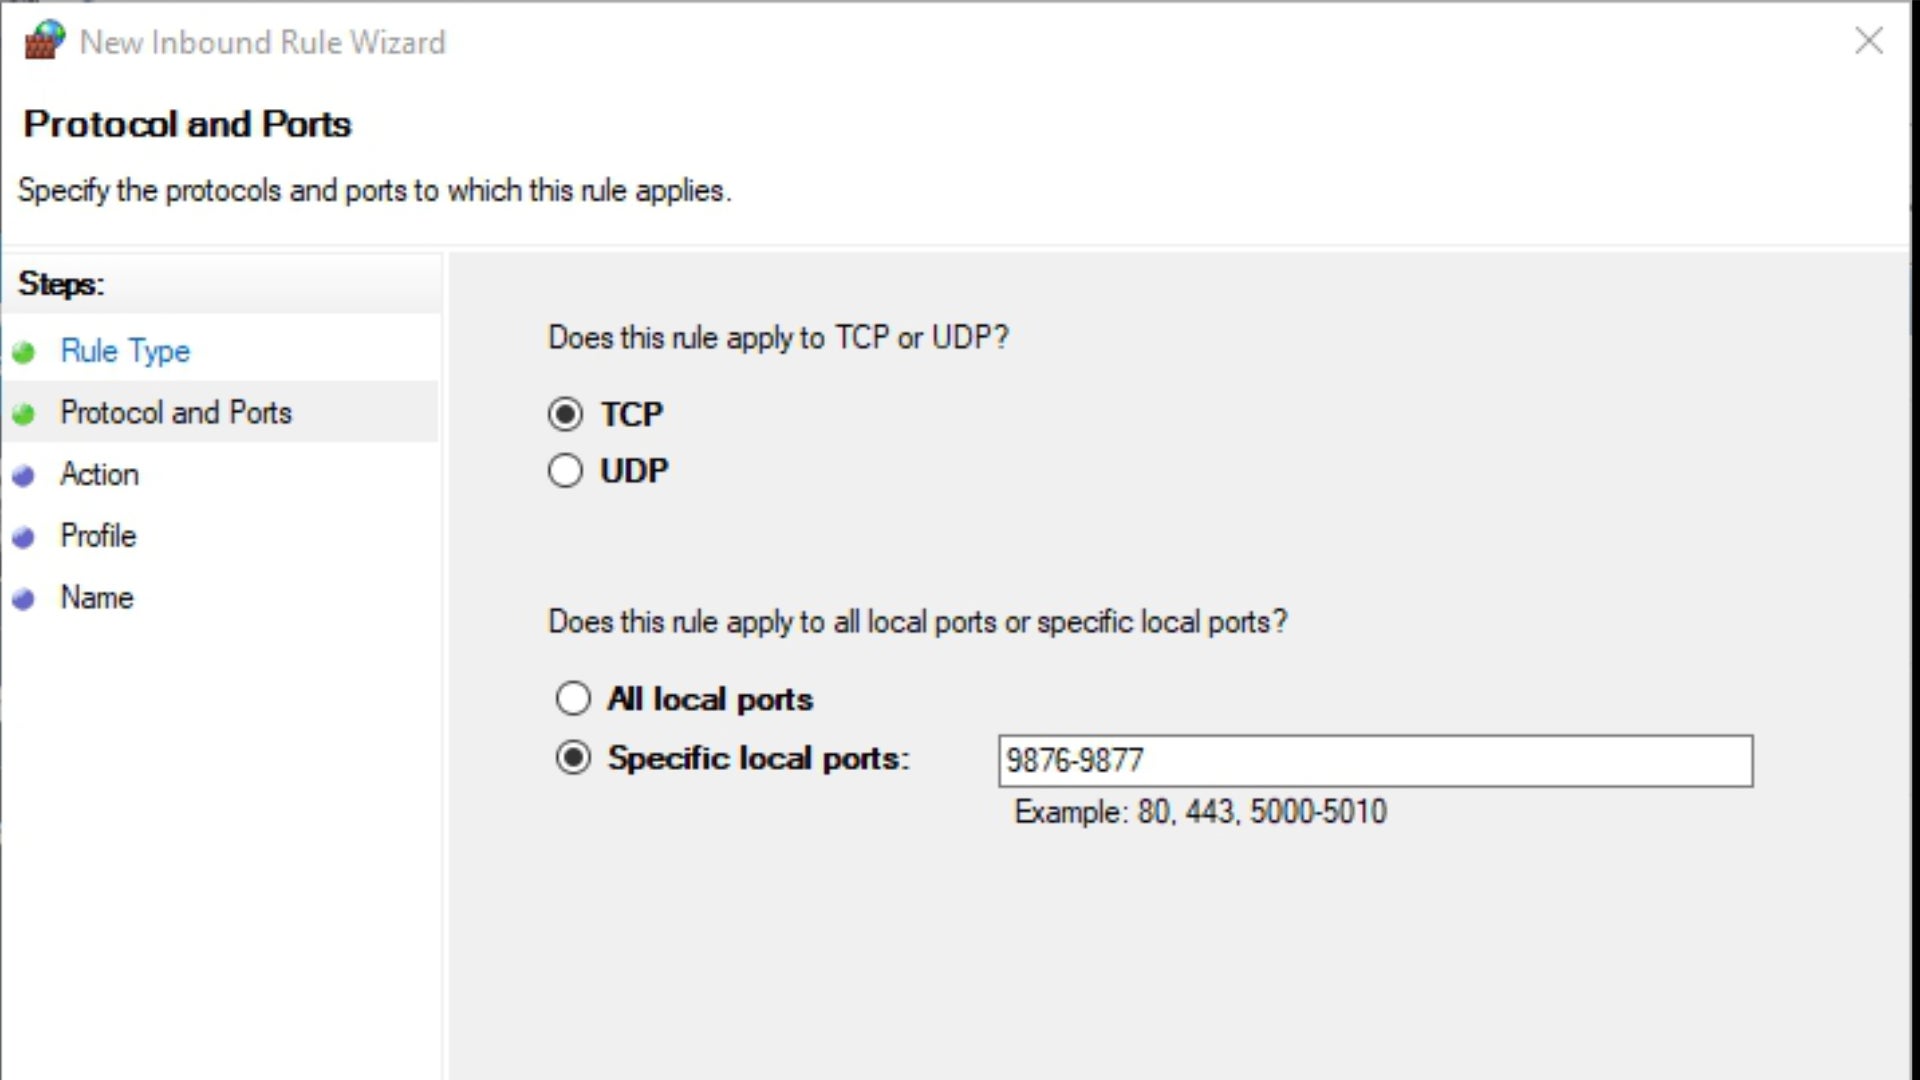
- Hit “Start+R”, kind in “wf.msc” and hit Enter to open your Firewall Advanced Settings.
- Click on “Inbound Rules”, and choose “New Rule”.
- Select “Port”, then “TCP”, and kind within the two Ports in query, separated by a comma.
- Select “Allow the Connection”, preserve all of the packing containers on the subsequent display ticked, then give the rule a reputation like “V Rising Dedicated Server Ports”, and click on “Finish”.
- Repeat the above steps to set up one other rule for a similar ports, however this time utilizing “UDP” as a substitute of “TCP”.
How to be a part of a V Rising devoted server
Joining your V Rising server ought to be a simple course of so long as you’ve got accurately adopted all of the above steps. Once the server is operating, launch V Rising, then click on “Play -> Online Play -> Find Servers -> Display all Servers & Settings”. Then kind in your server’s title into the search bar. If it does not seem, be sure you have all of the filter choices to the proper of the search bar set to their correct values. Once you’ve got discovered the server, click on “Join Game”.
If your server does not present up within the server checklist:
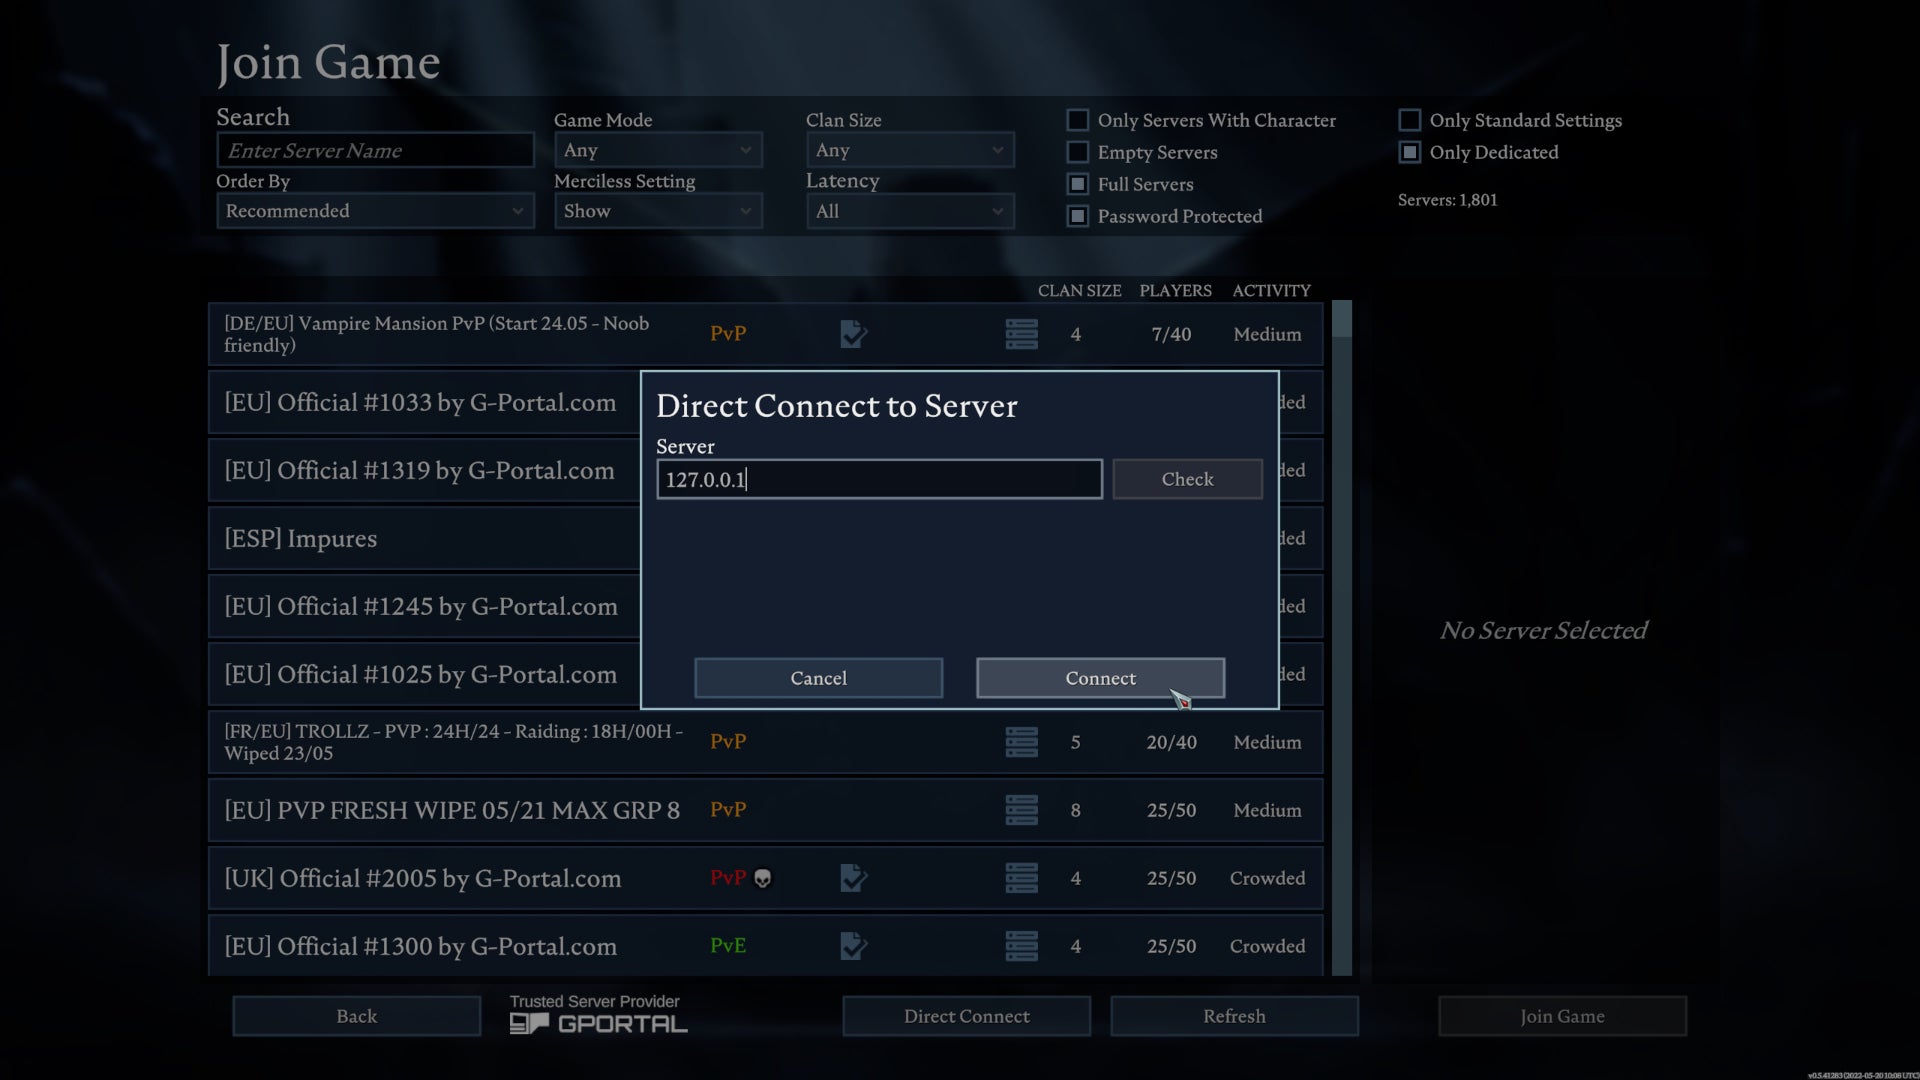
If your server does not present up within the server checklist, you’ll be able to nonetheless be a part of it utilizing the “Direct Connect” button. Click this button and you will have the choice of typing within the IP Address of the server. Here’s what to kind relying on your scenario:
If you are becoming a member of from the identical PC that you just’re operating the server on: kind in “127.0.0.1” to be a part of.
If you are becoming a member of from a PC on the identical community because the machine you are operating the server on: kind within the server machine’s IPv4 Address to be a part of.
If you are not on the identical community because the machine you are operating the server on: kind within the server machine’s exterior IP Address to be a part of.
To discover out your machine’s exterior IP Address, simply go to What Is My IP Address and use the handle it prints out for you.

Why set up a devoted server for V Rising?
There are two fundamental the reason why many gamers favor to use a devoted server for enjoying video games like V Rising. First: it does not require you to be taking part in so as to run the server. In an odd multiplayer sport of V Rising, the server is barely operating and joinable whereas the host is on the server taking part in the sport. With a devoted server, the host might be out of sport, and the server remains to be useable by different gamers.
The second cause is which you could run a devoted server on one machine, and play the sport on one other. This reduces the quantity of labor that every machine has to do, which may make each the sport and the server run higher.
How to play V Rising multiplayer with no devoted server
However, if you don’t need to hassle with any of this devoted server stuff, that is high-quality too. And it’s extremely, very straightforward in V Rising.
All you may have to do to play V Rising in multiplayer is begin a brand new sport, then open up the Steam overlay with “Shift+Tab” and invite your buddy(s) to play by clicking the arrow subsequent to their title and deciding on “Invite to Game”.
Your buddies may also be a part of your sport themselves by opening their Steam overlay, clicking the arrow subsequent to your title, and deciding on “Join Game”. This is price attempting if the above step does not work for any cause.
And that is all there’s to setting up your own multiplayer session of V Rising. It will not have the advantages of operating a devoted V Rising server, however in case you’re not inte.rested within the additional utility and efficiency advantages, then there isn’t any actual level in setting one up, is there?

How to play V Rising multiplayer offline
One last observe for individuals who want to play V Rising with others in the identical family with out an web connection: as of patch 0.5.41448, that is now doable.
Here are the steps for beginning an offline server in V Rising:
- Go into Steam, and within the top-left nook choose “Steam” -> “Go Offline”.
- Run V Rising.
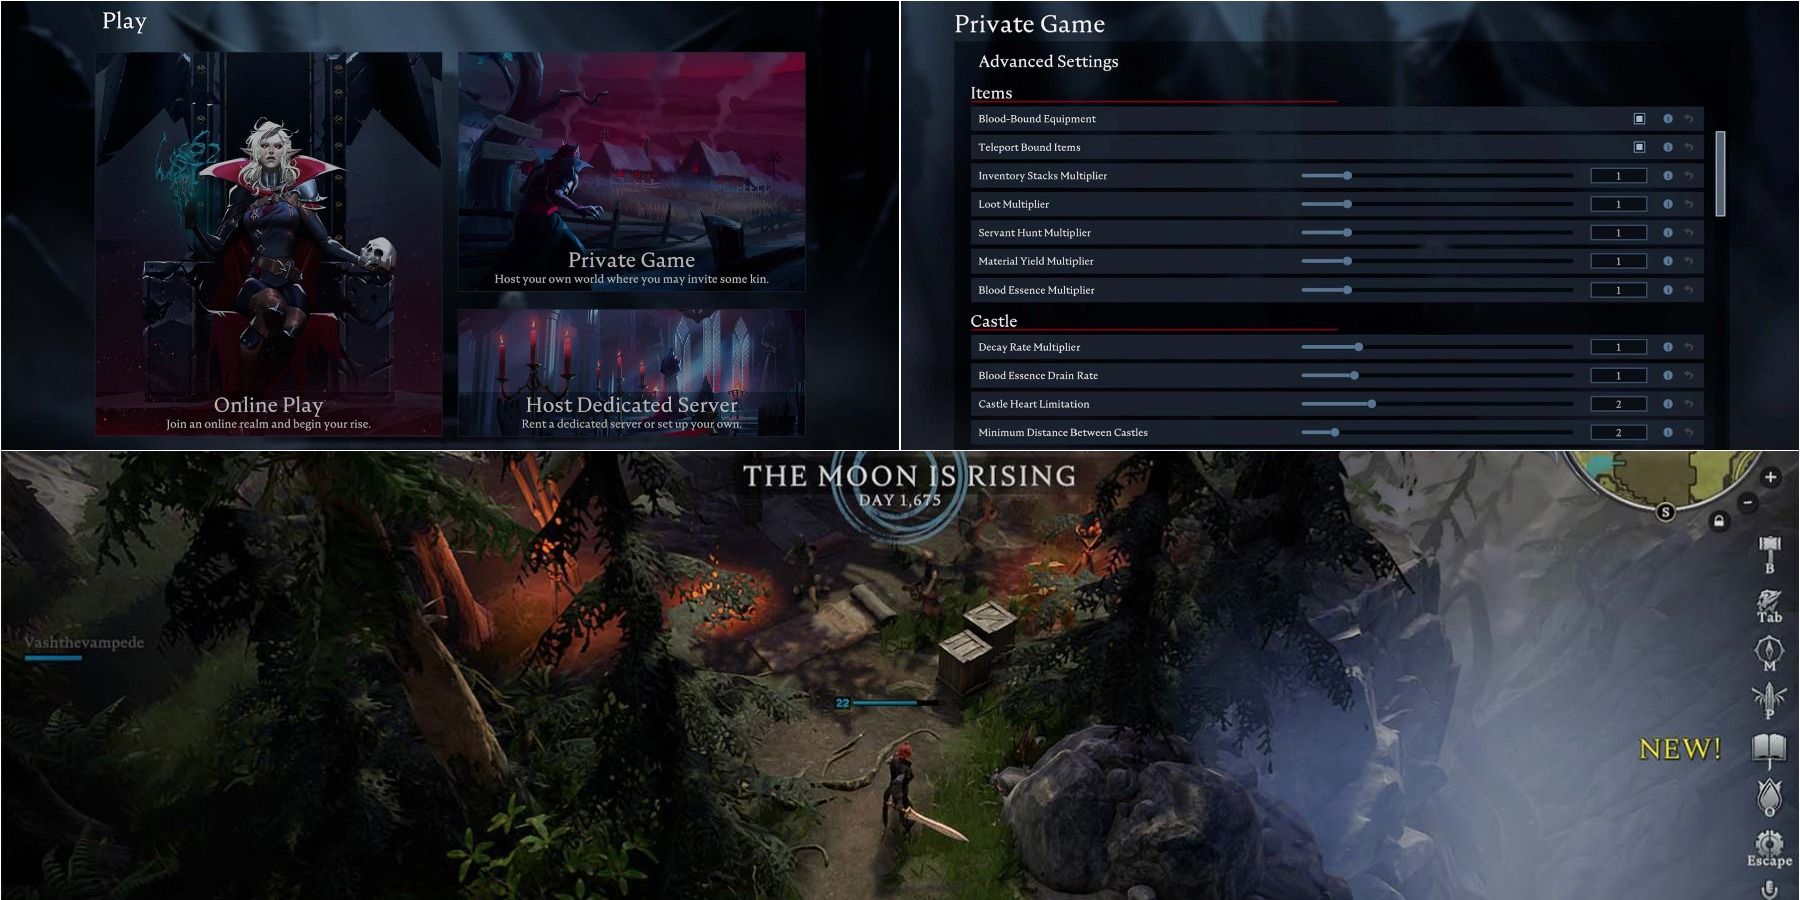
- Select “Play” -> “Private Game”, and examine the field subsequent to “LAN Server”. Then begin the sport.
To be a part of the offline LAN server, observe the steps in How to join a V Rising dedicated server above, however whenever you get to the Direct Connect window, examine the “LAN Server” field earlier than including the server IP Address.
That wraps up this in-depth and hopefully complete information to setting up and operating your own devoted server for V Rising. Now that you just’re getting to the precise taking part in stage, why not try our V Rising tips and tricks web page to get off to a roaring begin as a bloodsucking vampire? Elsewhere yow will discover our V Rising best weapons web page, and our information to building in V Rising.
https://information.google.com/__i/rss/rd/articles/CBMiMGh0dHBzOi8vd3d3LnJvY2twYXBlcnNob3RndW4uY29tL3YtcmlzaW5nLXNlcnZlctIBAA?oc=5