A complete information on how to set up a Valheim Dedicated Server, how to invite pals, in addition to how to host different worlds.
Setting up a Valheim Dedicated Server might be a tough course of. There are a lot of steps and a lot of locations the place one thing might go flawed. However, if you would like to keep away from paying somebody a month-to-month subscription simply to host a server, then setting up your individual is a nice thought. The following goals to be a complete information that ought to (hopefully) reply all questions you may have about creating a Valheim Dedicated Server setup.
Set up a Valheim Dedicated Server
Before you begin, ensure you have some form of notepad enhancing instrument like Notepad++ and that you simply’ve enabled the power to edit file extension varieties. You can allow file extensions by clicking View in Windows File Explorer after which checking the field that reads File title extensions. Here is a broad overview of the steps you need to take to set up a Valheim Dedicated Server:
- Forward ports by your router (Ports 2456, 2457, and 2458)
- Download Valheim Dedicated Server (by Steam Library or SteamCMD)
- Edit a file in the Valheim Dedicated Server with server title, world title, and password
- Add your inside IP tackle to Steam Server list so you possibly can be a part of your individual server
- Have friends join your server by inputing your exterior IP tackle into the Steam Server checklist
- Join the Valheim Dedicated Server after which, in the event you want to, troubleshoot any problems
Valheim ports to ahead
The very first thing you’ll need to do is ahead the proper ports. This permits your mates to join externally to your Valheim devoted server. Depending in your router and setup, this will probably be completely different for everybody. Find your router on PortForward.com and comply with the steps to ahead the next ports: 2456, 2457, and 2458. Depending in your setup, you might have the ability to ahead a vary of ports by getting into: 2456-2458. You ought to solely want it to be a UDP Protocol.
It’s additionally price noting that you will want to specify to your router which machine in your community will probably be internet hosting the server by choosing the machine’s inside IP tackle. You can discover your PC’s inside IP by opening Command Prompt and typing ipconfig and urgent Enter. Your PC’s inside IP tackle is listed beside IPv4 Address. Depending in your router, your machine’s title may seem as a substitute of its IP tackle. You can verify your PC’s title by looking out “About your PC” in Windows and on the lookout for “Device title” beneath “Device specs”.
Download Valheim Dedicated Server by way of Steam Library

The first manner you possibly can purchase the Valheim Dedicated Server is instantly out of your Steam Library. This is a good technique for people who don’t desire to use SteamCMD (extra on that within the subsequent part).
- Open Steam
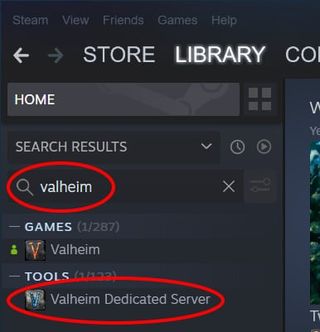
- Go to Library
- In the dropdown field on the top-left, be sure that Tools is chosen
- Search Valheim Dedicated Server and choose it
- Click Install
This will set up the Valheim Dedicated Server. At this level, you need to edit some information so as to truly set up a server in your pals to be a part of.
To discover these native information, carry out the next:
- Open Steam
- Go to Library
- Right-click Valheim Dedicated Server, choose Manage, after which Browse Local Files
You will now be taking a look at your Valheim Dedicated Server folder with a number of information, together with a .pdf from the builders, a valheim_server.exe (you’ll not be utilizing this), and the start_headless_server.bat (that is vital). Now, you’ll need to edit some information to correctly set up the server. But first, I’ll cowl how to obtain the Valheim Dedicated Server utilizing SteamCMD or you possibly can skip straight to editing the Valheim Dedicated Server file part under.
Download Valheim Dedicated Server by way of SteamCMD
The different manner to set up your Valheim Dedicated Server is by utilizing the SteamCMD. You can download SteamCMD from the Valve Software Developer web site. This is Valve’s command-line model of Steam. This will probably be used to obtain, replace, and create your Valheim Dedicated Server.
Credit to Steam person Gaston LeGume for a few of the following info.
Extract the contents of the zipped folder to the place you need SteamCMD to be saved. This might be anyplace in your PC.
Create a .bat file in your SteamCMD folder known as replace.bat. To do that, create a new Text Document and title it replace.bat. It ought to change from a regular notepad icon to an icon with some gears. Right-click the .bat file and choose Edit with Notepad++. Copy within the following code: C:UsersUSERNAMEDesktopSteamCMDsteamcmd +login nameless +force_install_dir C:Valheim +app_update 896660 validate +exit
You will want to change C:UsersUSERNAMEDesktopSteamCMDsteamcmd to wherever it’s you extracted SteamCMD. For instance: E:SteamCMDsteamcmd
Change +force_install_dir C:Valheim to wherever it’s you need to set up the server. For instance: +force_install_dir E:Valheim_servers
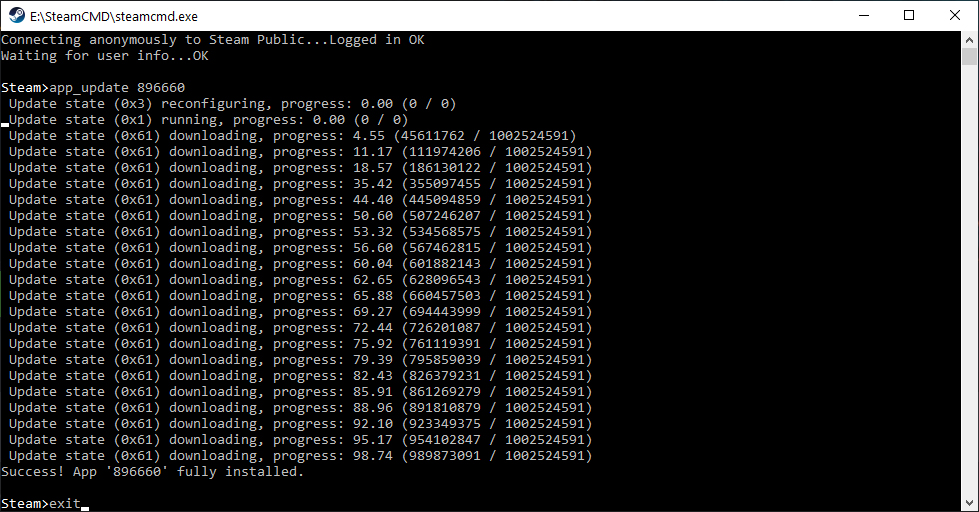
Save the Notepad++ file and shut it. Now, double-click the replace.bat file. It will run a script that may obtain the Valheim Dedicated Server and set up it wherever you specified within the above code. Give this a jiffy because it should obtain after which replace this system. When it’s accomplished, you possibly can sort Exit and hit Enter to shut the SteamCMD.
Cut the replace.bat file and paste it inside your new Valheim Dedicated Server folder. This folder is discovered wherever you directed it to set up within the above code. The replace.bat file will probably be used to replace the server every time the builders launch an replace. Now, whether or not you downloaded the Valheim Dedicated Server utilizing SteamCMD or by your Steam Library, you need to do the subsequent step.
Editing the Valheim Dedicated Server file

Whether you used SteamCMD to set up your Valheim Dedicated Server or downloaded it by way of your Steam Library, you’ll now want to start the method of enhancing your server launch parameters.
Start by making a copy of the file start_headless_server.bat and renaming it to begin.bat. This will protect the unique file.
Right-click begin.bat and choose Edit with Notepad++. You will see the next code. You will want to edit the components on the valheim_server line (Line 9) which might be labeled “My server”, “Dedicated”, and “secret” under. Change the phrases inside the citation marks.
@echo offset SteamAppId=892970
echo "Starting server PRESS CTRL-C to exit"
REM Tip: Make a native copy of this script to keep away from it being overwritten by steam.REM NOTE: Minimum password size is 5 characters & Password cant be within the server title.REM NOTE: You want to be sure that the ports 2456-2458 is being forwarded to your server by your native router & firewall.valheim_server -nographics -batchmode -name "My server" -port 2456 -world "Dedicated" -password "secret"
What you choose for -world isn’t what individuals will see when attempting to be a part of the server. Instead, the -name is the way it will seem within the server checklist. Pick one thing you’ll keep in mind and is in any other case acceptable in your server. The -world title is what you should use to launch any worlds you may have created in singleplayer or worlds you had been beforehand internet hosting utilizing the in-game server internet hosting, and even worlds your mates have despatched to you (extra on that under). When you are carried out, it ought to look one thing like this: valheim_server -nographics -batchmode -name "Sam's Awesome Server" -port 2456 -world "Valhalla" -password "IntelligentPassword"
You should additionally make a password in your Valheim Dedicated Server. The password can’t be within the server or world title and should be 5 characters lengthy. I like to recommend making all of the entries distinctive, that’s to say, make -name and -world completely different, too.
When all of the adjustments are made, save the file and shut Notepad++.
Double-click begin.bat to start setting up the Valheim Dedicated Server. You will discover a Command Prompt field seem and start scrolling with textual content. The server creation will probably be accomplished while you see Game server related. This course of might take a whereas relying in your machine.
At this level, you and your mates will want to add your server to Steam’s server checklist. This course of may cause some issues, so arm your self with that warning.
Add your Valheim Dedicated Server to Steam’s Server checklist

Before you start this half, be sure that your Valheim Dedicated Server is working by double-clicking the beginning.bat you created. Wait for the Game server related textual content to seem. Now, this half is completely different relying on whether or not you’re internet hosting the server in your machine or attempting to be a part of another person’s server in a completely different home (this final one is listed under).
Open Steam and choose View after which Servers. This will open up a new dialogue field the place you possibly can browse a number of servers throughout Steam.
Select the Favorites tab. It is right here you’ll need to add your machine’s IP tackle adopted by the port you might be utilizing. This is identical port listed within the begin.bat file you edited. The default port is 2456.
Right-click contained in the Favorites tab and choose Add server by IP tackle or by clicking Add a server down the underside proper. In this new field, enter your inside IP tackle adopted by a colon (:) after which the port you used within the begin.bat. You ought to have one thing that appears like this: 192.168.1.7:2456
You can discover your inside IP tackle by opening Command Prompt (search cmd in Windows or sort out Command Prompt) and typing ipconfig and hitting Enter. Your inside IP tackle is listed beside IPv4 Address and may be one thing like this: 192.168.1.7.
This inside IP tackle is what you’ll use to join to your individual server. It can be the IP tackle anybody else on your own home community will use to join to your server. They will do the very same: including the IP tackle to Steam’s server checklist beneath “Favorites” together with the proper port.
To be a part of the server, double-click the server and enter the password specified within the begin.bat. You will want to enter the password once more when Valheim launches. If the server would not seem, disappears, or is not going to allow you to be a part of, verify the troubleshooting section under.
How to get pals into your Valheim Dedicated Server
For people who need to play with pals who are usually not on the identical community as the place the Valheim Dedicated Server is hosted, they’ll want to join by way of a completely different IP tackle. For instance, in case you are internet hosting the server and your mate in one other metropolis desires to play, they won’t use your inside IP, they have to use your exterior IP.
To get your exterior IP, merely Google “what’s my IP” and it will likely be listed on the high as “Your public IP tackle”. It may look one thing like this: 123.456.789.101
Now, take this exterior IP tackle and add on the port you listed within the begin.bat file. By default, it’s 2456. This gives you a line like: 123.456.789.101:2456
Now, have your good friend (otherwise you, in the event you’re attempting to be a part of somebody’s server) open Steam, choose View, and click on Servers. In this display screen, choose the Add a server button and enter the exterior IP, a colon (:) and the proper port. There must be no areas. It ought to look one thing like the instance above.
Remember, in case your good friend is on the identical connection as you (in your own home), then they have to be a part of utilizing your inside IP tackle. This is listed above within the “Add your Valheim Dedicated Server to Steam’s Server list” part.
You ought to see the IP tackle added to the Favorites checklist. Now, you possibly can be a part of by double-clicking the server and getting into the password listed within the begin.bat. Enter the password once more when Valheim launches and also you’ve chosen your character.
If this doesn’t work, your good friend might have the ability to seek for your server utilizing the in-game search operate. They will want to verify “Community” not “Friends”. Put within the first a part of the server title to assist refine the search outcomes.
Valheim Dedicated Server not showing
Sometimes the Valheim Dedicated Server is not going to seem or it’d say < not responding > beneath the Game column. This at all times appears to occur. First, you might want to give Steam a jiffy. For some cause, ready 5 minutes can remedy the issue.
Alternatively, what you are able to do is click on one other tab (like History or Friends) then click on again to Favorites – you may even see your server flash on display screen earlier than disappearing. Double-click it earlier than it disappears.
A dialogue field ought to seem requesting a password. Enter the password you specified within the begin.bat and click on Connect. Valheim ought to launch and you must choose your character. You will then be requested for the password a second time.
This course of is identical whether or not you’re attempting to be a part of your individual server by yourself community or for somebody attempting to be a part of a server on an exterior community.
As talked about above, in the event you can not be a part of by way of Steam, you possibly can attempt looking out utilizing Valheim’s in-game server search. Make certain to verify “Community” not “Friends”. Type within the first a part of the server title to assist refine the outcomes.
Valheim Dedicated Server troubleshooting
As with all issues associated to setting up a server, generally you possibly can run into points. Here are some options I discovered to be useful that will remedy the issue you might be having. If this doesn’t assist, make an account and let me know what your downside is within the Chatty thread under and I’ll endeavour to assist. If you have discovered some options on-line, let me know and I’ll replace this information with different helpful info!
One potential repair is to change the port listed within the begin.bat file. By default, this port is 2456 however it may be modified to 2457 or 2458, offered these have all been correctly forwarded in your router. You will then want to guarantee this port change is mirrored within the Steam Server checklist the place you entered your IP tackle.
Another repair is to make sure that Valheim has been allowed entry by Windows Defender Firewall:
- Search Windows Defender Firewall and open it
- Select Allow an app or characteristic by Windows Defender Firewall
- Click Change settings
- Ensure all situations of Valheim have each Private and Public bins checked
- Click Okay to end
You may additionally want to make sure the ports are getting by your Windows Firewall. This might be carried out from inside the Advanced Settings of Windows Defender Firewall:
- Search Windows Defender Firewall and open it
- Select Advanced settings
- Select Inbound Rules
- Choose New Rule…
- Select Port
- Select UDP and Specific native ports and kind: 2456-2458
- Select Allow the connection
- Check all three bins for Domain, Private, and Public
- Enter a title for the brand new rule (Valheim) and a description if you would like and click on Finish
How to host different worlds in your Valheim Dedicated Server
It is feasible to host worlds you may have created in single-player, worlds that had been created utilizing the in-game multiplayer creation system, and even worlds your mates have created and also you had been taking part in on. The course of is easy and solely requires shifting a couple of information round and altering the title in your server begin.bat file.
To do that, you’ll need to find your Valheim world information. These are discovered contained in the AppData location in your PC, not contained in the Valheim Steam sport folder. To discover this location, search %AppData% within the search field in your Windows toolbar or by opening Run and typing it into that.
This will open the Roaming folder inside AppData. Back out of this folder and comply with this pathway to discover your Valheim world saves: AppDataLocalLowIronGateValheimworlds
In right here you must see all of the worlds you may have created in Valheim. There will probably be a .db and a .fwl file. To host certainly one of these worlds in your server do the next:
- Right-click the beginning.bat file and choose Edit with Notepad++
- Change the -world to the title of the world contained in the worlds folder you want to host
- Save and shut Notepad++
- Double-click the beginning.bat file
By merely altering the -world parameter, you might be directing the server to fetch the world that matches that title.
This can be helpful in internet hosting a good friend’s world they’ve created. However, you’ll need to have your good friend ship you the 2 information (.db and .fwl), both by e mail, Google Drive, Dropbox or another FTP. Save the information contained in the worlds folder after which edit the beginning.bat file as above.
There is actually a lot to cowl when setting up a Valheim Dedicated Server. Hopefully, the above has ensured your server is up and working, and pals are ready to be a part of you for an journey throughout the tenth world. If you may have any issues or word any errors, please let me know within the Chatty thread under. In the meantime, take a have a look at our Valheim guides and walkthroughs web page for extra useful articles.