Valheim is the newest open-world RPG game to hit the market and it has taken the sport trade by storm. The title is presently in early entry on Steam however has already offered a whopping 5 million copies since its launch in the beginning of February. A ton of gamers are loving the survival gameplay, constructing mechanics, and different facets of the sport. The neatest thing about Valheim will, nonetheless, be the truth that you may discover the wilderness by yourself or with up to 10 ten gamers on a devoted server.
Now, when you fall within the latter class and wish to exit on this Nordic journey with your mates, then it’s a nice concept to set up a devoted server. It will allow anybody to hop into the sport at any time and make progress. No one could have to watch for that one buddy who initially created the server to come on-line to play the sport. While you may at all times select to flip your PC into a server, there’s a neater method to set up a Valheim Dedicated Server. In this text, we’ll information you thru the steps on how to set up a devoted server with ease.
Easiest Way to Set up Valheim Dedicated Server (Guide)
Instead of going by means of the effort of changing your PC into a devoted server, we advise you employ cloud internet hosting firm Linode’s one-click Valheim app. It might be the easiest method to create a personal Valheim server and prices a modest $30 per thirty days. You can decide extra reasonably priced plans relying in your want. So, with out losing any extra time, let’s take a take a look at the setup course of.
-
How to Set up Valheim Dedicated Server
1. Head to Linode’s web site and create a new account when you don’t have one already. It may take a while in your account to get activated.
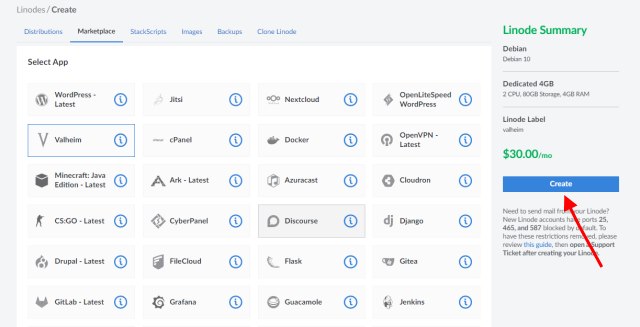
2. Once your account is activated, log in to the Linode Cloud Manager account. Here, click on on the ‘Create’ button on the high left and choose the ‘Marketplace’ possibility. You may also click on on the Marketplace button within the left-hand navigation menu.
3. Then, the Linode creation web page opens and you’ll see the ‘Valheim’ app underneath the ‘Select App’ part within the pre-selected Marketplace tab.

4. Click on the ‘Valheim’ app and scroll down to the ‘Valheim Options’ part. Here, you may set your server’s identify and password. You additionally want to choose a Linode server username, password, area, in addition to plan.
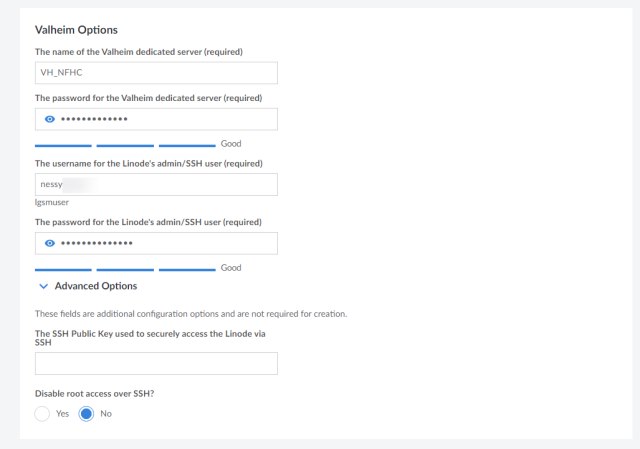
Note: Valheim recommends 4 CPU cores and 2GB RAM, so we initially recommend you deploy your Valheim Server on a 4GB Dedicated CPU Linode plan, which prices $30 per thirty days. You are charged hourly primarily based in your utilization so don’t want to pay the complete quantity up-front. If you propose to delete the server or want fewer {hardware} assets sooner or later, you may alter your plan accordingly.
5. Once you have got entered all the required data, hit the ‘Create’ button to deploy your Valheim server. It will take Linode round 20-Half-hour to set up the server.
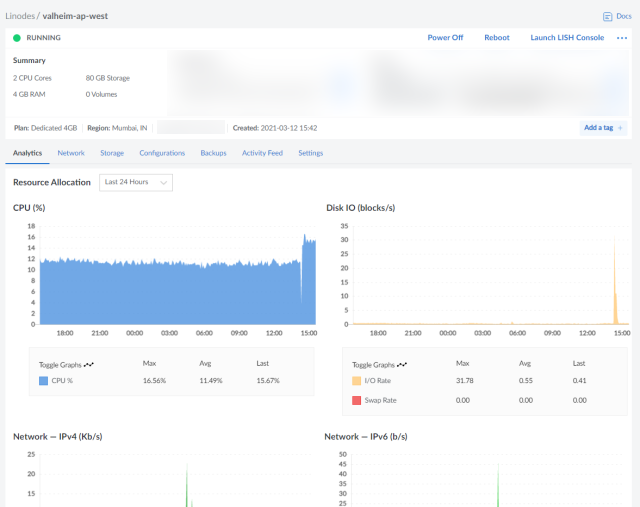
6. You can click on on ‘Linode’ within the left-hand navigation menu to see your server. Click on it for extra particulars. Once you begin seeing the ‘Resource Allocation’ graphs underneath the ‘Analytics’ header, it means your server is up and working.
You can now be a part of your Valheim devoted server and get again to exploring, accumulating assets, constructing bases, or killing the bosses. We have listed the steps for how one can be a part of a devoted server proper right here.
-
How to Join Valheim Dedicated Server
Once you have got set up a devoted server, comply with the steps beneath to enter the Valheim world in your devoted server:
1. Boot up Valheim in your PC. Click on ‘Start Game’ after which head to the ‘Community Server’ checklist underneath the ‘Join Game’ part.
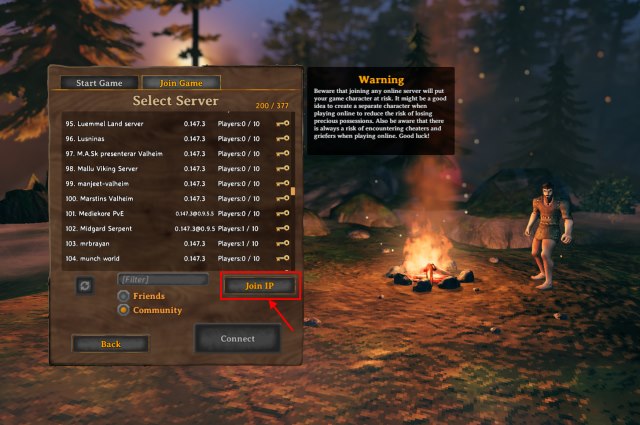
2. Here, click on on the ‘Join IP’ button and enter your Linode’s IPv4 handle and port (2456). You can copy the IPv4 handle from the Linode Cloud Manager through this hyperlink right here.
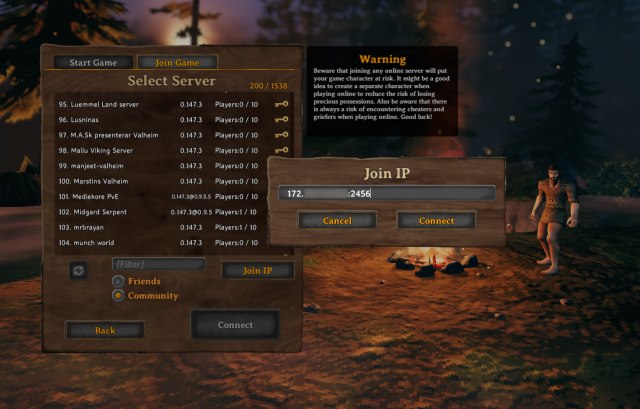
3. Click on ‘Connect’ and enter the password for the devoted server. Wait a whereas and you may be prepared to begin your Viking journey. I’ve been taking part in on this server for the previous two days and have confronted no points.
-
Transfer Existing Valheim World to a Dedicated Server
Now, you could possibly both begin your Valheim journey from scratch or convey your current realm to the devoted server. The former will contain gathering assets, constructing a new base, and combating all the bosses as soon as once more. If that’s what you need to do with your mates, go forward and have an adventurous journey. But, when you and your mates have already made substantial progress within the recreation and wish to proceed forward, it’s best to switch your pre-existing realm to the devoted server.
To switch a pre-existing Valheim world to a devoted server, comply with the steps beneath:
1. Head to the “C:Users[USER]AppDataLocalLowIronGateValheimworlds” folder. You want to copy this path, substitute the [USER] along with your PCs person identify, and hit Enter.
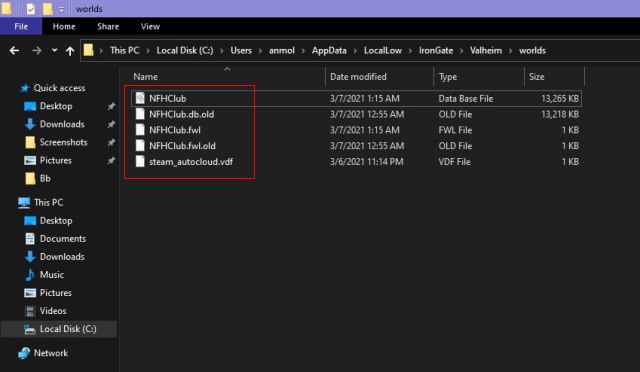
2. Here, you want to transfer the .db, .db.outdated and .fwl recordsdata to the server. You can use the LinuxGSM engine employed by many cloud service suppliers or use FileZilla to join to your server and switch the recordsdata.
3. If you additionally use Linode, you’ll want to switch the recordsdata to this location on the server – “/house/person/.config/unity3d/IronGate/Valheim/worlds” and substitute all the present recordsdata. Now, try to be all set to proceed your Viking journey from the place you left it in your PC.
Play with Friends with out Worrying About Bandwidth
So yeah, these are the steps you want to comply with to create a devoted Valheim server you could be a part of any time with or with out your mates. It provides you additional bandwidth and might be on-line always. If you’re planning a new Nordic journey, then go forward and provides this simple 6-step Linode Valheim server setup course of a attempt. Do share your expertise with us within the feedback beneath.