Our Enshrouded Server Guide will go over how to setup a server for the game, including hosting one yourself or buying an external one.
We’ll go into more detail below on how you can host a server yourself, or where to get (and setup) a dedicated server.
Enshrouded Dedicated Servers
There are 2 main Enshrouded Server options. The first would be to host a dedicated server, either yourself or via a third party like Survival Servers (affiliate link). The second is to make a standard multiplayer world that only runs when you’re playing.
The main differences come down to your PC specs and whether you want the server to always be available. A dedicated server will always be available as long as the server client is running (for a third party server, this would be for the entire duration you pay the subscription).
Meanwhile, a standard multiplayer server would only be available while you’re in-game. Depending on the amount of players, this could also affect your performance.
A Note on Server Quest Progression
One key factor to take into account when setting up your sever is that quest progression is currently shared server wide. This means that, even if you’re playing in multiple groups on a single server, if one group completes a quest, it’s counted as completed for everyone.
With that in mind, it would be a bad idea to leave your server without a password if you want to experience quests yourself. It could also cause issues if you plan to make use of the largest player cap (16), since most players will likely not get to do any of the quests themselves.
Setting Up an Enshrouded Server (Private)
If you don’t want to create a dedicated server, go to the “host” tab in the play section of the main menu. Here, you’ll have the option to set the player cap — and possibly the server visibility at a later date — and then set a password when starting the world you want to use.
Servers set up this way can bypass any issues with the server browser, since you can invite friends directly via Steam.
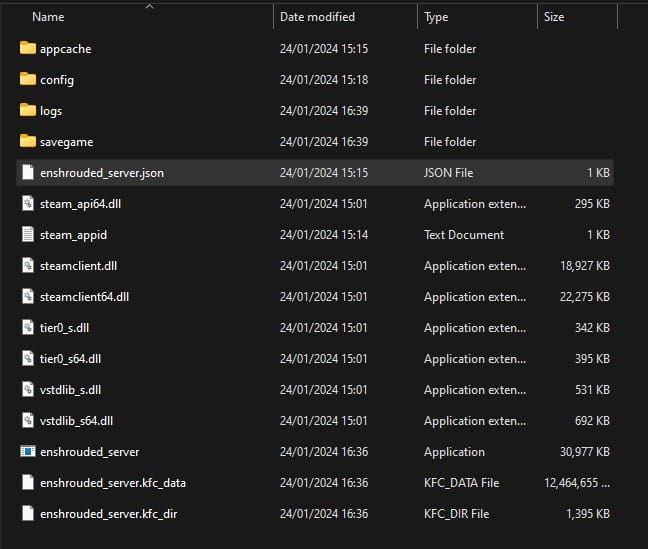
To host your own dedicated server, download the Enshrouded Dedicated Server tool on Steam (available in your library after buying the game). Afterwards, right click and go to properties, then “Browse…” in the Installed Files tab.

Here, you’ll be able to access the “enshrouded_server.json” file. Using a program like Notepad, open the file to change your server settings. You’ll have access to a few main options:
- “name” – The server’s name in the server browser.
- “password” – The password needed to access the server.
- “saveDirectory” – Where save files will be stored (defaults to the “savegame” folder in your Enshrouded Dedicated Server tool folder).
- “logDirectory”: – Where server logs will be stored.
- “slotCount” – Max player count allowed at one time (caps at 16)
After setting things up, close the file and run the server tool. After it loads up, your server will be available for others to play. The command prompt window must be kept open at all times for the server to run, though you don’t have to be playing the game itself.
Note that if you want to change the server settings, you’ll have to close the server tool first.
Enshrouded Server Commands
As of Early Access Launch, there are currently no Server Commands or settings beyond the default server configuration settings.
How to Invite Friends To Your Server
The easiest way to invite friends to your world is to host a game, then use the Steam friends list. If you’ve setup a dedicated server as shown above, you can also provide the access information to them and they can join and leave as they wish!
Thanks for checking out our Enshrouded Server Guide. Make sure to check out our other guides below!
https://techraptor.net/gaming/guides/enshrouded-server-guide


