While Valheim can be played on your own, it’s just a lot more fun to play with friends — or, sometimes, even total strangers. Many hands make light work, as the old adage goes, so it makes sense to get a bunch of people in your world at the same time. The obvious problem is that it’s not always easy to line up schedules, especially when trying to take down the many bosses of Valheim, which makes setting up a dedicated server much more attractive. That way, you and your friends can jump on at any time since the server will always be running! Here’s how to get it set up.
Products used in this guide
- Survive like a Viking: Valheim ($20 at Steam)
How to set up a Valheim dedicated multiplayer server
- Open Steam, navigate to the Library tab and search for Valheim.
- Install Valheim Dedicated Server. This is a separate free download from the game Valheim.
- Once it’s finished downloading and installing, right-click in the Valheim Dedicated Server entry in your Steam Library and select properties.
- Select local files on the left side of the screen, then click browse to locate the directory where the server is installed. For reference, it’s typically installed in “C:Program Files (x86)SteamssteamappscommonValheim dedicated server” on a Windows 10 PC.
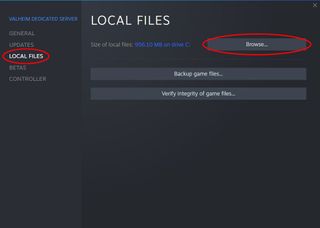
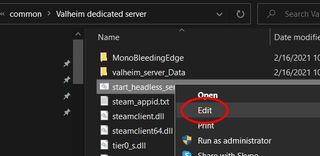
- Right-click on “start_headless_server.bat” and select Edit. This will open the server’s settings file in Notepad.
- You’ll want to edit the bottom line to customize your server. The highlighted parts in the image below are what need to be customized.

- Change “My Server” to the name you want for your server. Give it a unique name so your friends can find it.
- Change “Dedicated” to the name of the world you’re playing in. Valheim Dedicated Server will automatically look for worlds in the same folder that Valheim stores them in
- If you’re hosting a dedicated server, make sure to copy the “C:UsersYourWindowsUsernameAppDataLocalLowIronGateValheim” folder from the computer you’re playing the game on to the same location on your server so that the server can find the worlds you want to play in.
- Change “secret” to the password of your choice. We recommend setting a password to avoid griefers entering your server and destroying your stuff.
- If you want a friends-only server, leave the 0 public setting as-is. If you want this dedicated server to appear in the list of community servers, change this number to 1.
- Save the file and close Notepad.
- Back in the Valheim Dedicated Server folder, double-click on “start_headless_server.bat” to start the server.
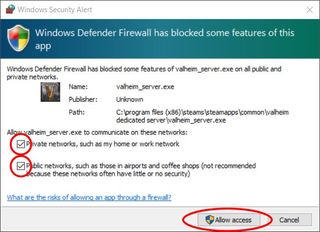
- The first time you run the dedicated server, Windows Firewall should ask you to allow the connection. Check the boxes next to private and public to allow Valheim Dedicated Server to talk to your private at-home network and the Internet.
- A command prompt window will appear and show you a running log of what’s happening on the server. Once everything has started, open Valheim and search for your server in the Join Server tab.
- Your server will only appear under the Friends listing if you set the public option to 0 in the config file. Otherwise, your server will appear under the Community Servers section if it’s a public server.
- If you and your friends are unable to find the server, you may need to add exceptions to your home router for ports 2456, 2457, and 2458. Consult your router’s documentation for the best ways to do this.
Once you’ve got your dedicated server running, you can leave it be until the next time Valheim updates! If your server crashes or your computer gets turned off somehow, you can always start the server back up by running the “start_headless_server.bat” file located in the application directory.
How to update a Valheim dedicated multiplayer server

Since Valheim is in Early Access, it’s receiving a lot of updates regularly. When Valheim updates, you’ll need to stop your dedicated server and let Steam update the application files. But it’s not just a matter of closing the command prompt window, as you could end up corrupting your world thanks to a bug in Valheim.
- Make sure all players have exited the server before making any changes.
- With the command prompt dedicated server window open, press the Control and C keys at the same time to initiate a shutdown.
- You may be asked to confirm server termination. Press Y to confirm.
- The window will close automatically when the server has been shut down.
- In Steam, go to your Downloads and select the up arrow on the Valheim Dedicated Server to initiate an update.
- Once the update is complete, run the “start_headless_server.bat” file located in the application directory.
Dedicated servers are the best way to run a huge Valheim world that’s easy for everyone to play. That’s because a dedicated server is designed to run all the time and allow people to play when it’s most convenient for them. It’s recommended that you have a decent modern computer to run the dedicated server, as it’ll need a good bit of processing power and memory to process everything Valheim players can do in the game.
If you’re dealing with lots of stuttering or slowdowns while playing, you might want to consider picking up one of the best gaming PCs to get an upgraded experience.

Grab a friend, or nine
Valheim is an early access survival game that has you living the life of a Viking stuck between Earth and Valhalla. Will you make it to see paradise?
https://www.windowscentral.com/valheim-servers-how-play-multiplayer-dedicated-server

