

Set up a Palworld dedicated server for your friends and how to troubleshoot any issues you might encounter.
While Palworld lets four friends play together online, you can increase this number to 32 players if you set up a Palworld dedicated server on PC. This is a bit of a finicky process for those unfamiliar, but it can be worth it to play with more of your friends. Here’s a step-by-step guide for creating a Palworld dedicated server, including solutions to common problems and some other tips.
Palworld dedicated server setup
Before you begin setting up a Palworld dedicated server, download a notepad editing tool like Notepad++ and ensure you can edit file extension types. To do this on Windows, open the Windows File Explorer, click View, and select the box that says File name extensions. Once this is done, you can start the setup.
- Purchase Palworld via Steam, download it, launch it, and then exit
- Download Palworld Dedicated Server via Steam, launch it, and then exit
- Open the Palworld Dedicated Server folder (PalServer)
- Edit file DefaultPalWorldSettings.ini
- Copy everything on Line 4 and below
- Paste this into PalWorldSettings.ini in folder PalServerPalSavedConfigWindowsServer and save
- Launch Palworld Dedicated Server
- Launch Palworld
To begin with, you will need to own and launch Palworld. This will create the necessary folders and allow you to access the Palworld Dedicated Server. You can find this by searching in your Library on Steam. It is a Tool, so make sure you’ve got that box checked.

Download Palworld Dedicated Server and run it. A dialog box will appear, select Play Palworld Dedicated Server. A new window will appear that reads “Setting breakpad minidump AppID = 2394010” – this means it has successfully loaded.
Close the dedicated server and then find the folder where you installed it. This will be different depending on your own file setup. You can find where you saved it by right-clicking Palworld Dedicated Server in your Library, selecting Properties, Installed Files, and then hitting Browse.
Locate the file DefaultPalWorldSettings.ini and right-click it. Select Edit with Notepad++ and then copy everything on Line 4 and down. When I did this, all of the server information was written on Line 5, so it will look rather long.
Go back to the PalServer folder and then go down the following folder line: PalServerPalSavedConfigWindowsServer. Find the PalWorldSettings.ini file, right-click it, select Edit with Notepad++ and then paste the code in.

Source: Shacknews
At this point you can begin editing the line of code. This is where you can change things like resource rates, stamina regeneration, but more importantly, the server name and password. Here are the four things you should change:
- ServerName: This is what the server is called and how it appears in the Community Server list
- ServerDescription: A small overview of the server, for other players to read and gauge what the server is all about
- AdminPassword: Unlocks admin-specific console commands
- ServerPassword: Setting a password will mean only those with the password can join your server
You can also take a bit of time to edit the other elements of the server as well. When you’re ready, save the file and close it.
Launch the Palworld Dedicated Server, wait for it to load, and then launch Palworld. You’re now ready to have players join your server.
How to join a Palworld Dedicated Server
Joining your Palworld dedicated server will be different if it’s you joining your own computer, someone on your home network joining you, and other players in a different house trying to join the server. Here’s a quick look at the IP addresses you will need for each situation:
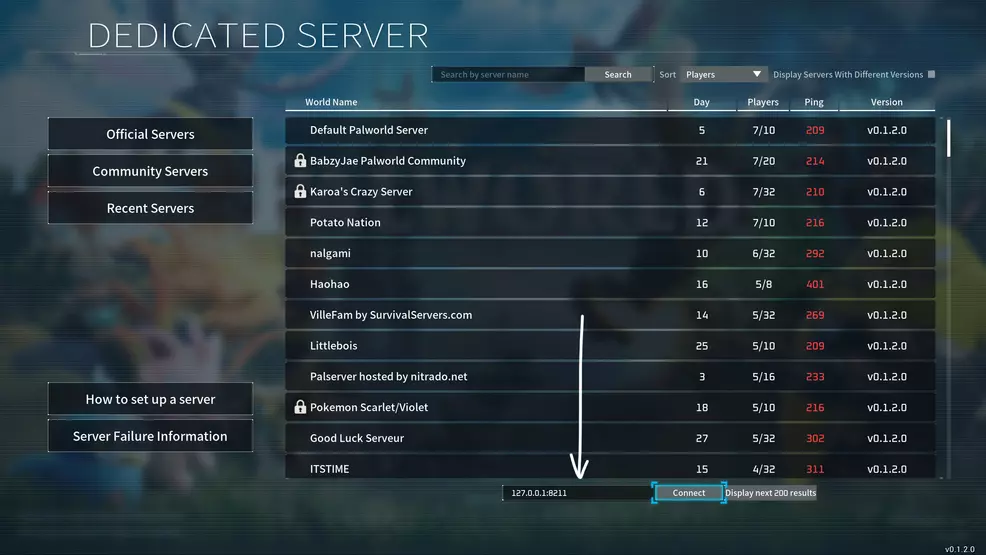
- Join your own: 127.0.0.1:8211
- Someone on the same network: Internal IP address / IPv4 address and PublicPort
- Someone outside of your house: External IP address and PublicPort
Source: Shacknews
To join your own server, click Join Multiplayer Game and then down the bottom enter 127.0.0.1:8211 as the code. This will let you connect directly to your own dedicated server that you’re running on the same computer you’re using to play Palworld. The last digits (8211) refer to the PublicPort option in the PalWorldSettings file you edited before. You can change this if you want, just remember to update the code when you join.
For someone in the same house as you, they will need your IPv4 address (internal IP address). Find this by opening Command Prompt by typing cmd into the Windows search bar. When Commend Prompty is open, type ipconfig and hit Enter. Give your IPv4 address to the person on the same network as you, it might look like this: 192.168.1.101. They will then enter the IPv4 and the PublicPort, like this: 192.168.1.101:8211.
Someone on an external connection will need your external IP address. You can find this by Googling “What is my IP” and then scrolling down. Google should list this as your public IP address. Anyone who has this can join your server, so only give it to people you trust. They will need to use this and the PublicPort number. So for them it might look like this: 11.104.164.72:8211
At this point, you should have all of your friends connected to your Palworld server. However, if you’ve got a password on your server, they may encounter the “no password has been entered” problem.
No password has been entered
When the Palworld dedicated server you are trying to join has a password, sometimes it will not let you in. This often results in an error message reading “No password has been entered”. Unfortunately, when joining via an IP address, the game doesn’t let you enter a password. However, there is a weird solution that involves using another server’s input password box to enter your own password. Shout out to Reddit user xSerp for this fix:
- Click the Join Multiplayer Game option at the main menu
- Click the Community Servers tab and find a server with a lock symbol (password protected)
- Select the server and enter YOUR server password, click OK and then NO
- Try again to connect to your server using the IP address and port number
Setting up a SteamCMD server
Players that want to set up a Palworld server using the SteamCMD method should check out this Reddit post by akep. They have outlined the settings they used to ensure the game runs effectively. There is also the Palworld support page that offers some more details.
That’s all there is to setting up a Palworld dedicated server for your friends. Make sure you understand how to join a dedicated server, as the method will differ depending on who is joining and from where. We’ll be sure to keep this updated as we encounter more problems and find more solutions, including more information on the SteamCMD side of the setup. But for now, you should be able to dive into Palworld with more than four people! Check out our Palworld page for more help with this huge game.

https://www.shacknews.com/article/138399/palworld-dedicated-server-guide


