

Setting up a dedicated server on Palworld via Steam allows you to either play privately with your friends or be joined by people from around the world.
Keep in mind that dedicated servers for Palworld can only be set up on the Steam version of the game; so, if you’re playing the game on Xbox, you sadly can’t make a dedicated server.
Below we walk you through how to set up a dedicated server for Palworld on Steam, so you can go on a Pal adventure with your friends. Alongside this, we also cover how to join a dedicated server, how to get admin privileges and a possible solution for the ‘No password has been entered’ error.
On this page:
How to set up a dedicated Palworld server
Before we get started, it’s worth remembering that only the Steam version of Palworld can have dedicated servers. This means if you’re playing Palworld via GamePass or have purchased it on Xbox, you can not set up a dedicated server.
Here’s a quick rundown of how to set up a dedicated server in Palworld – continue reading for more detailed instructions.
- Get IPv4 address.
- Download Palworld from Steam and boot up once.
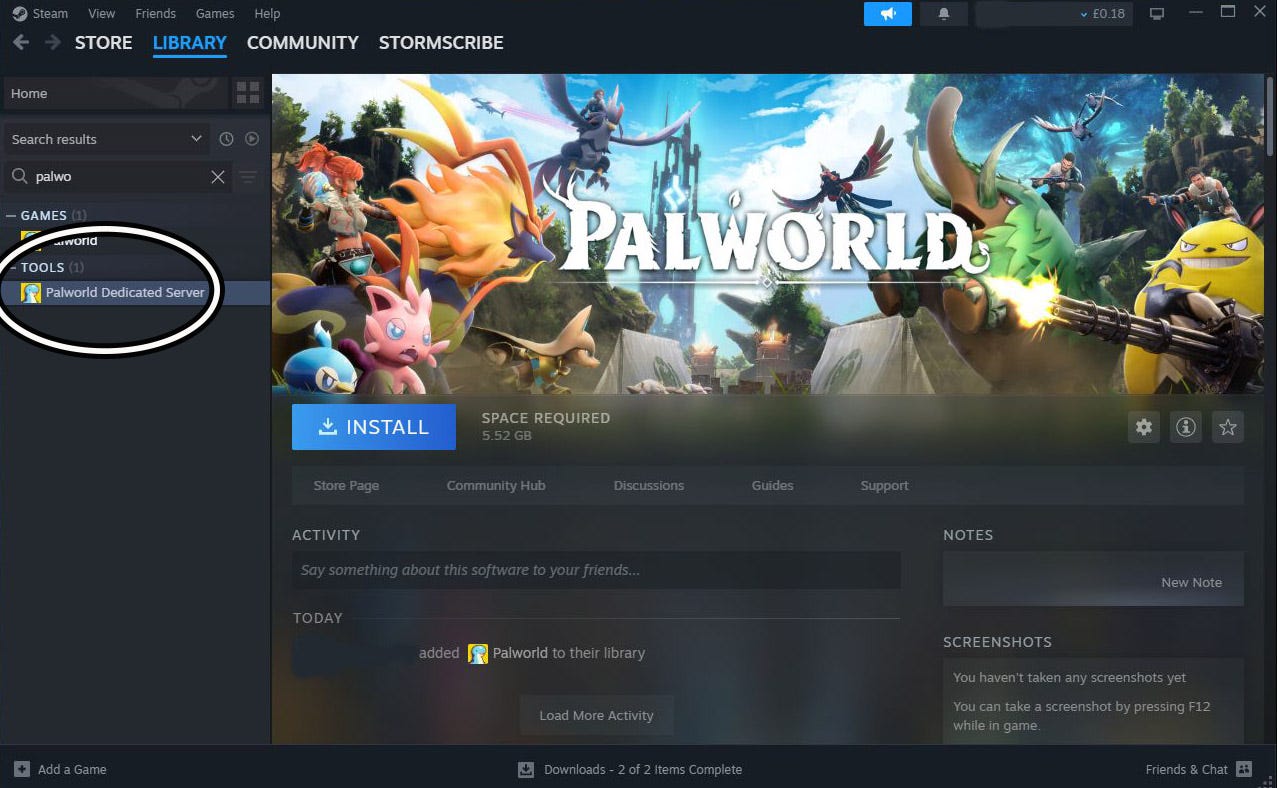
- Download Palworld Dedicated Server from Steam.
- Open local files for Palworld Dedicated Server.
- Run ‘PalServer’ until a line of code appears before closing.
- Open ‘DefaultPalWorldSettings’.
- Copy and paste text from this folder, starting with [/Script/Pal.PalGameWorldSettings].
- Close ‘DefaultPalWorldSettings’.
- Follow this folder path: PalServer > Pal > Saved > Config > WindowsServer.
- Open ‘PalWorldSettings’.
- Paste in text.
- Change Server Name, Server Description, Admin Password, Server Password and Public IP.
- Save and close.
- Allow Palworld to play through firewall software.
- Port forward Palworld.
- Launch Palworld Dedicated Server from Steam.
- Select ‘Play Palworld Dedicated Server.’
Let’s start with getting your IPv4 address. If you already know this, then feel free to jump ahead to the next step. If you don’t then you can easily find it by opening Command Prompt and entering ‘ipconfig’. Make sure you note down the number next to IPv4 Address and keep this handy for later.
With that out of the way, the first step to setting up a dedicated Palworld server is, obviously, to purchase the game via Steam and then boot it up at least once to ensure all the files are in.
Now you need to close Palworld and search for ‘Palworld Dedicated Server’ in your Steam library. If you haven’t done so already, make sure you download the Palworld Dedicated Server before moving to the next step. If it doesn’t appear in your system library, change your filters so you can see ‘Games and Tools’.
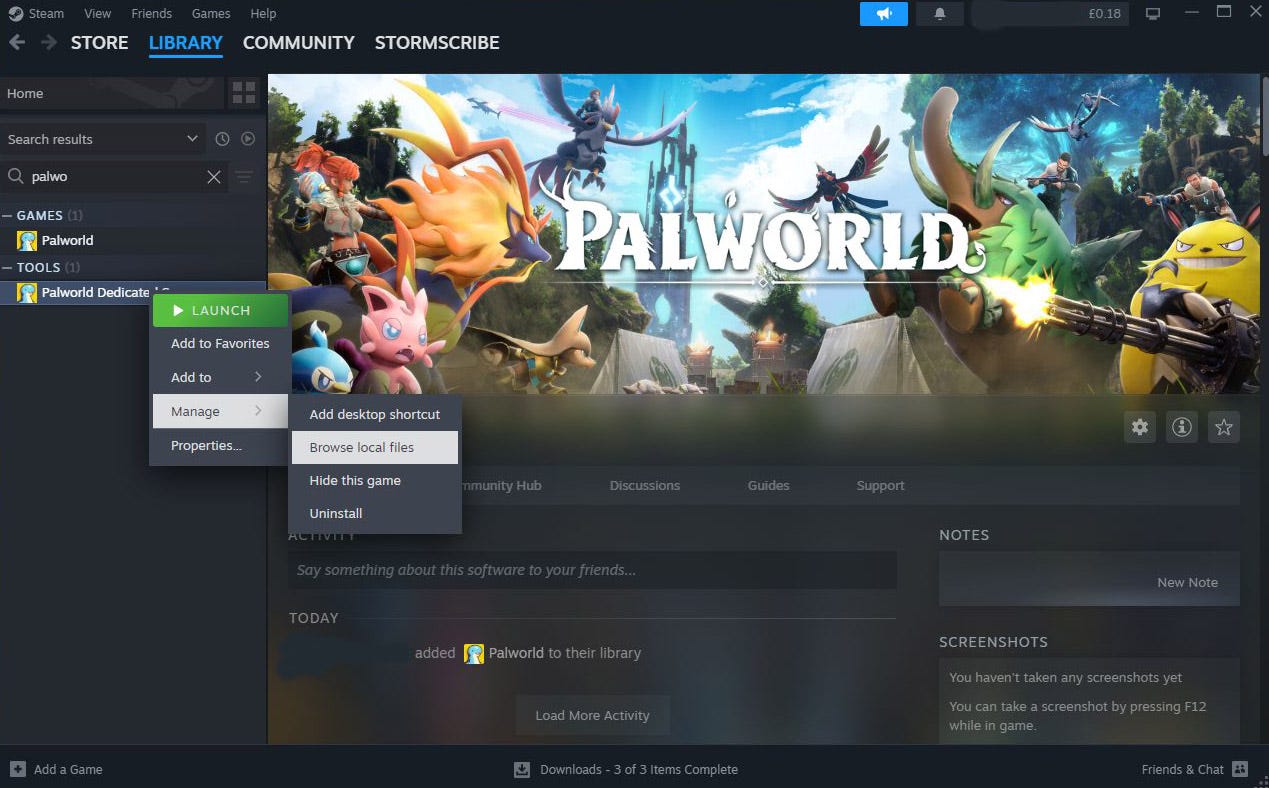
When you’re ready, right-click on Palworld Dedicated Server, go to ‘Manage’ and then select ‘Browse Local Files’.
First you need to double-click on ‘PalServer’ and wait for a line of text starting with ‘Setting breakpad’ to appear as shown in the screenshot below. After this text appears, close this window. You may receive a notification from your Firewall while doing this.

Now you need to open ‘DefaultPalWorldSettings’ with Notepad or another text editor program. On Windows you can ensure this file is opened in your preferred text editor by right-clicking it, scrolling down to ‘Open With’ and selecting the program.
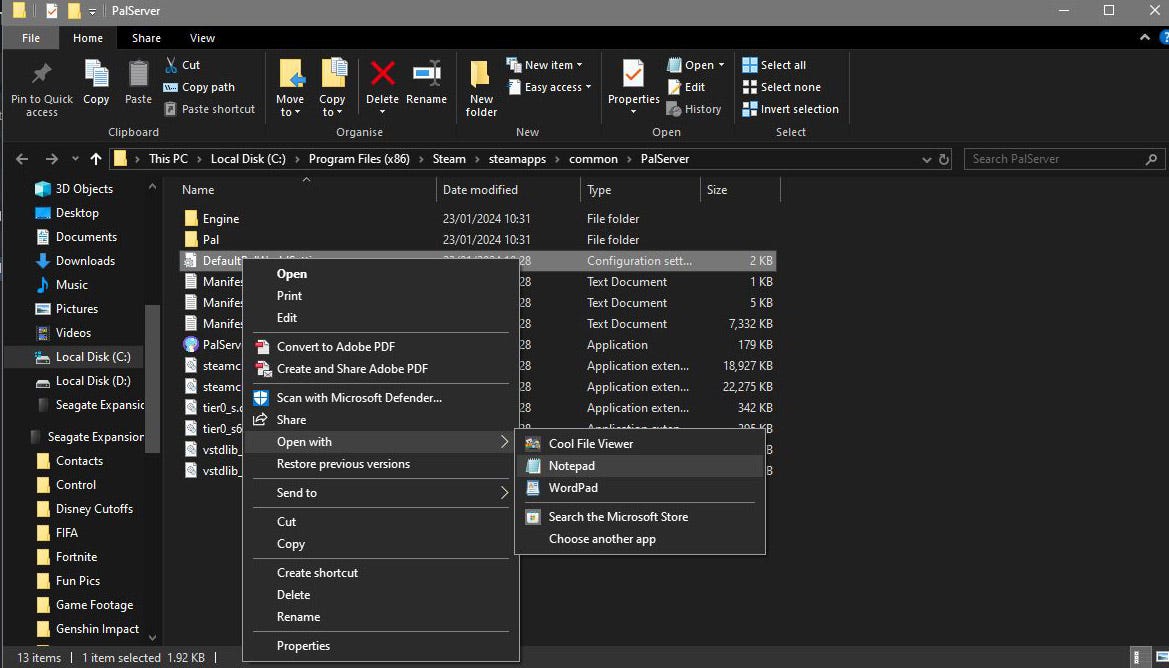
Next, you need to copy all of the text starting from [/Script/Pal.PalGameWorldSettings]. This includes all of the text below it and it’s worth double checking that all of this text is selected.

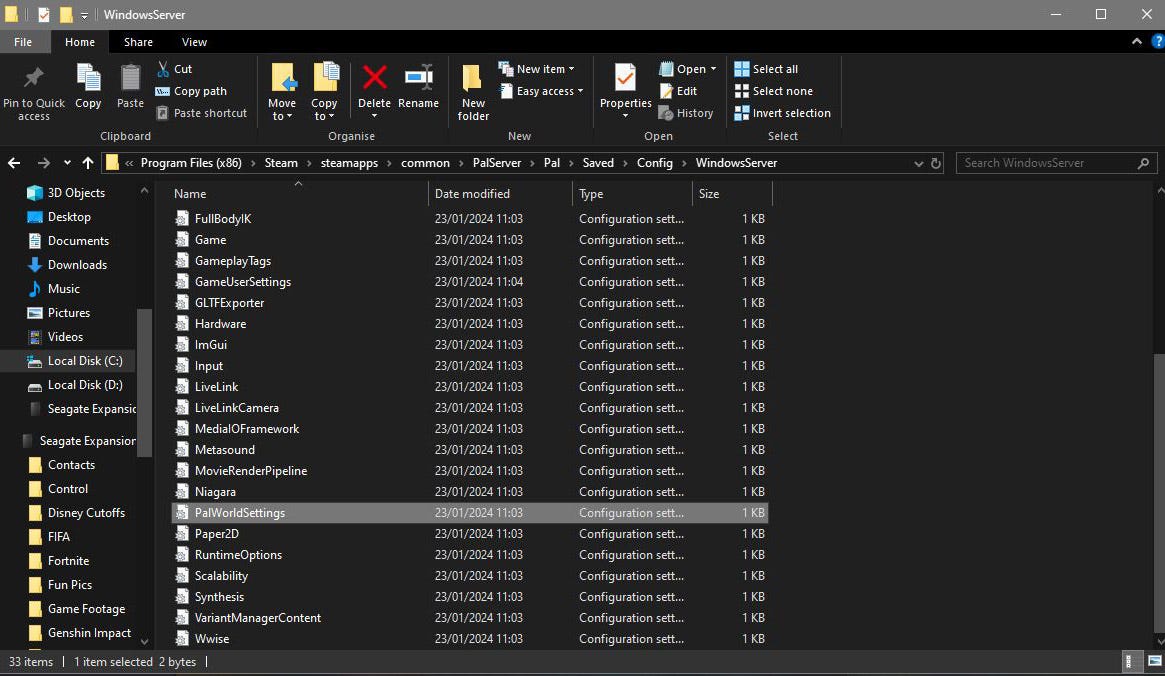
Close this window and return to the ‘PalServer’ folder. Here you need to open the ‘Pal’ folder, then ‘Saved’, followed by ‘Config’ and finally open ‘Windows Server’.
The path we used to reach this folder was: PalServerPalSavedConfigWindowsServer
Next, you need to scroll down to ‘PalWorldSettings’ and, like before, open this with Notepad or your preferred text editor.
When you open this file, it will be empty so copy and paste the text from ‘DefaultPalWorldSettings’ into it.
Before closing this file, there’s a number of things you’ll want to change. These are:
- ServerName= – The name of your server.
- ServerDescription= – Not required, but it will provide a short description for your server.
- AdminPassword= – The password you’ll need to access Admin commands.
- ServerPassword= – The password required for players to join your server if you wish to play privately.
- PublicIP= – Enter your IPv4 address we grabbed earlier.

You may need to scroll horizontally through your text editor program to find this section of the code. Once found, input the information for each one between the quote marks (“).
You can also give your server a region by inputting one between the quote marks for ‘Region=’.
If you’d like to use RCon to run commands remotely using a separate piece of software, find ‘RCONEnabled=False’ and change ‘False’ to ‘True’.
Once you’re happy with the file, save and close it.
Next, we need to ensure other players can join your server by playing on the same local network (LAN) as you. It’s important to note that the following is very much dependent on your firewall software and choice of router, so, since I can’t see into your home, I can’t give dedicated instructions for every player.
Firstly, you need to ensure that Palworld can play through your firewall. If you’re using third party firewall software, then you’ll have to look up the specific instructions for that software.
If you’re using the Windows firewall, then you first need to open Windows PowerShell as an administrator. You can do this by finding this program on your PC and right-clicking to select ‘Run as administrator’.
Now all you need to do is copy and paste the below code into Windows PowerShell. We recommend pressing enter a couple of times to ensure it has gone through and checking to see if there are any issues.
New-NetFirewallRule -DisplayName “Palworld Server” -Direction Inbound -LocalPort 27015,27016,25575 -Protocol TCP -Action Allow
New-NetFirewallRule -DisplayName “Palworld Server” -Direction Outbound -LocalPort 27015,27016,25575 -Protocol TCP -Action Allow
New-NetFirewallRule -DisplayName “Palworld Server” -Direction Outbound -LocalPort 8211,27015,27016,25575 -Protocol UDP -Action Allow
New-NetFirewallRule -DisplayName “Palworld Server” -Direction Inbound -LocalPort 8211,27015,27016,25575 -Protocol UDP -Action Allow
Thank you to TroubleChute from YouTube for the help with the above code.
After this you need to port forward (also called application forward). The exact instructions for achieving this depends on your specific router, so I can’t list all of the instructions for every router or I won’t be doing anything else for a very long time. I can, however, give you an idea of what you need to do. Though, I do recommend looking up a guide for your specific router.
Essentially, you need to find the port (or application) forward section for your router. Here you need to port forward the following numbers for Palworld: 8211, 27015, 27016, 25575. With the protocol ideally being TCP/UDP. You may also need to enter your local IP address, which we covered finding at the beginning of this guide.
Sometimes you need to enter the port numbers separately, sometimes as a range.
There are third party programs which will allow you to get around port forwarding, but we do recommend port forwarding for Pal.
With this achieved, the following will be the same no matter which router or firewall software you’re using.
Now, return to Steam and select ‘Launch’ for the Palworld Dedicated Server. After doing so, a pop-up about launch options will appear:
- Play Palworld Dedicated Server – For a private server.
- Open and start as a community server – Allows anyone to join your server and it will appear in the Multiplayer menu.
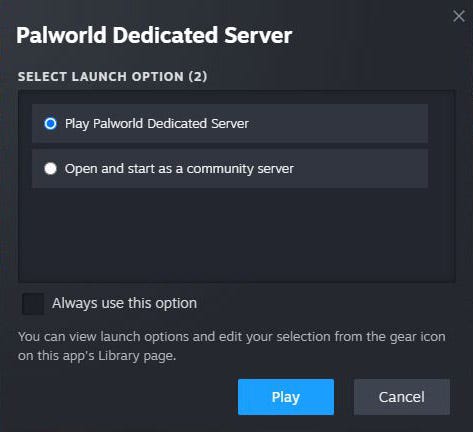
If you’d like the launch options to always remain the same for this server, then make sure to click the box next to ‘Always use this option’. If you change your mind, however, then you’ll be able to find the launch option by selecting the gear icon on the library page for ‘Palworld Dedicated Server’.
Since we’re setting up a dedicated server here, we recommend selecting ‘Play Palworld Dedicated Server’ followed by ‘Play’.
A Command Prompt window should now appear and you will need to keep this open for the server to work – whether you’re playing or not. You may receive a notification from Windows concerning your firewall when this Command Prompt opens.
How to join a dedicated server in Palworld
Here we’ll cover how to join your own dedicated server or one belonging to another player in Palworld. If this is the first time you’ve set up a dedicated server for this game, we recommend giving yourself admin privileges which we explain down below.
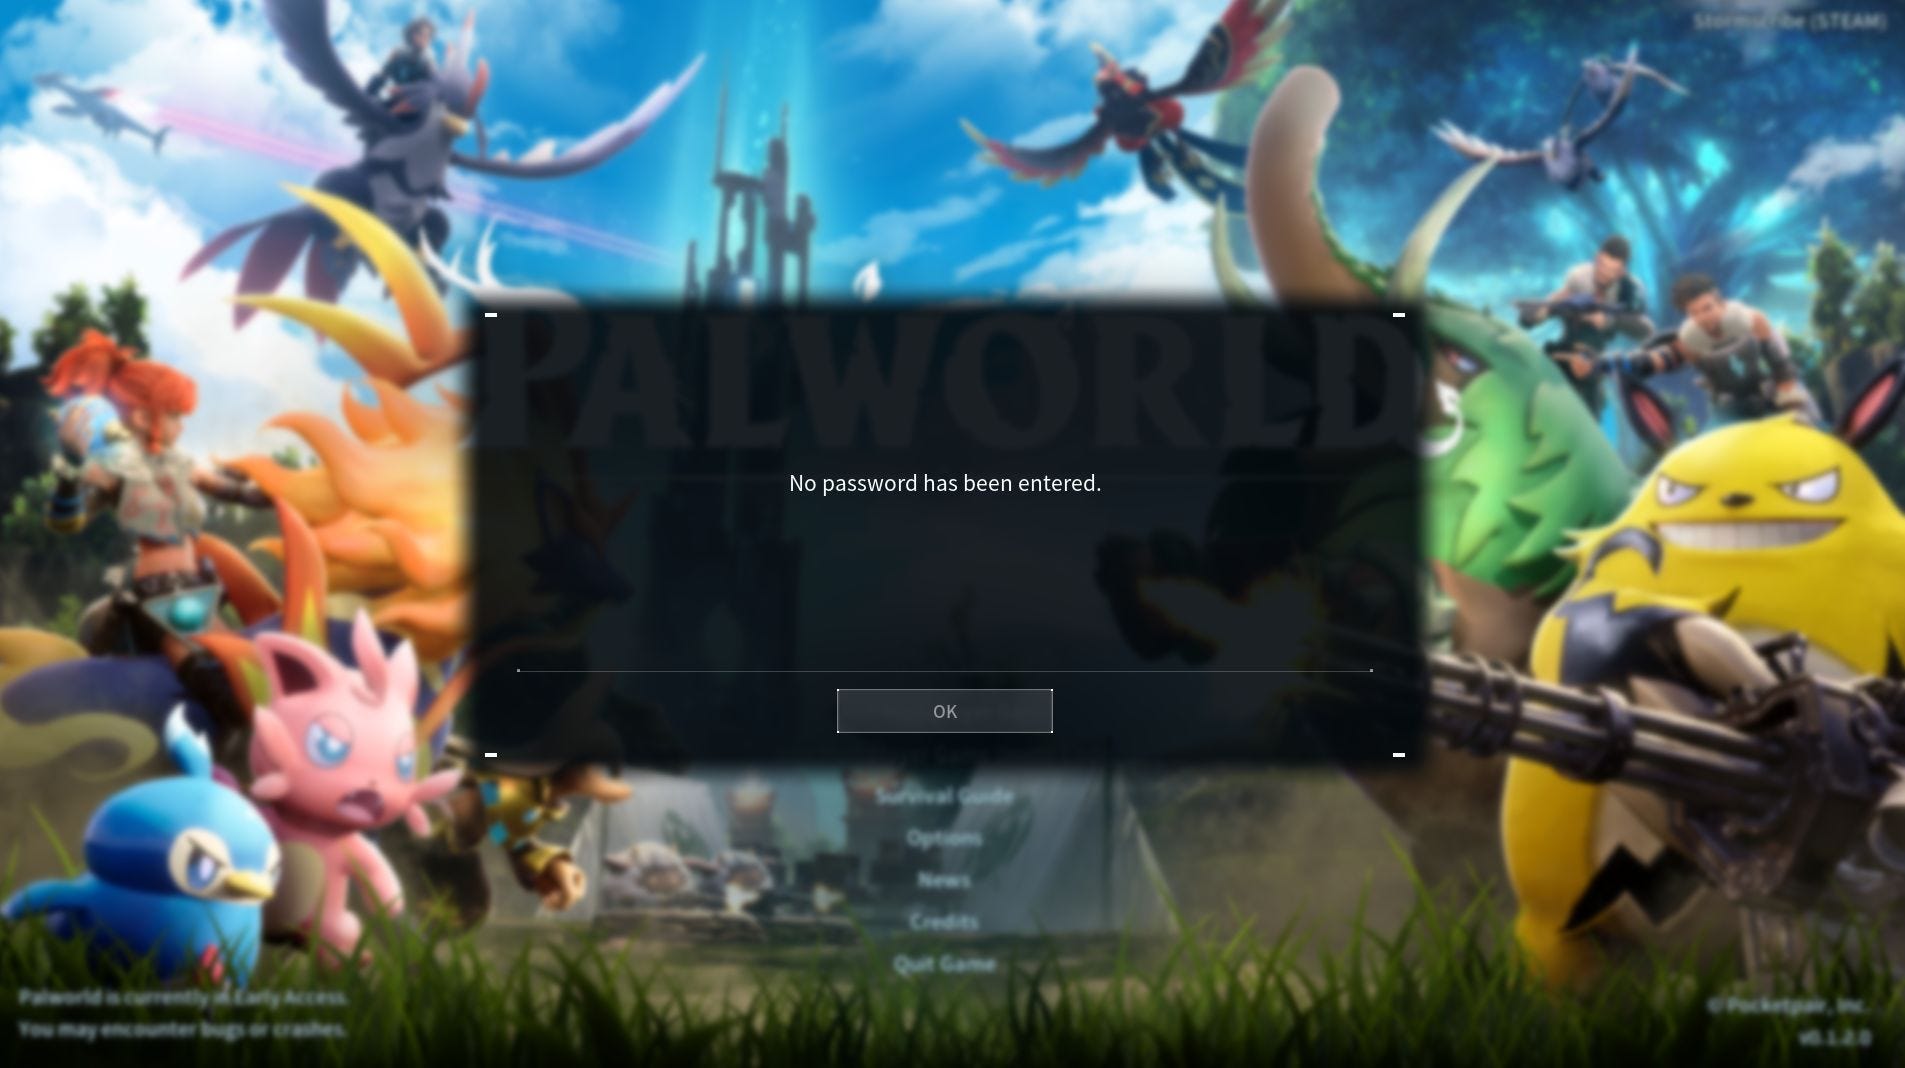
If you enter an error message stating ‘No password has been entered’ then we also have a dedicated section covering a solution for this issue later on in this guide.
Joining your own dedicated server
To join your own dedicated server, you first need to boot up Palworld and select ‘Join Multiplayer Game’.
Now all you need to do is select ‘Connect’ at the bottom of the page and, hopefully, your dedicated server should start running. If you receive the ‘No password has been entered’ error message, then jump ahead to the last section of this guide where we cover a possible solution.
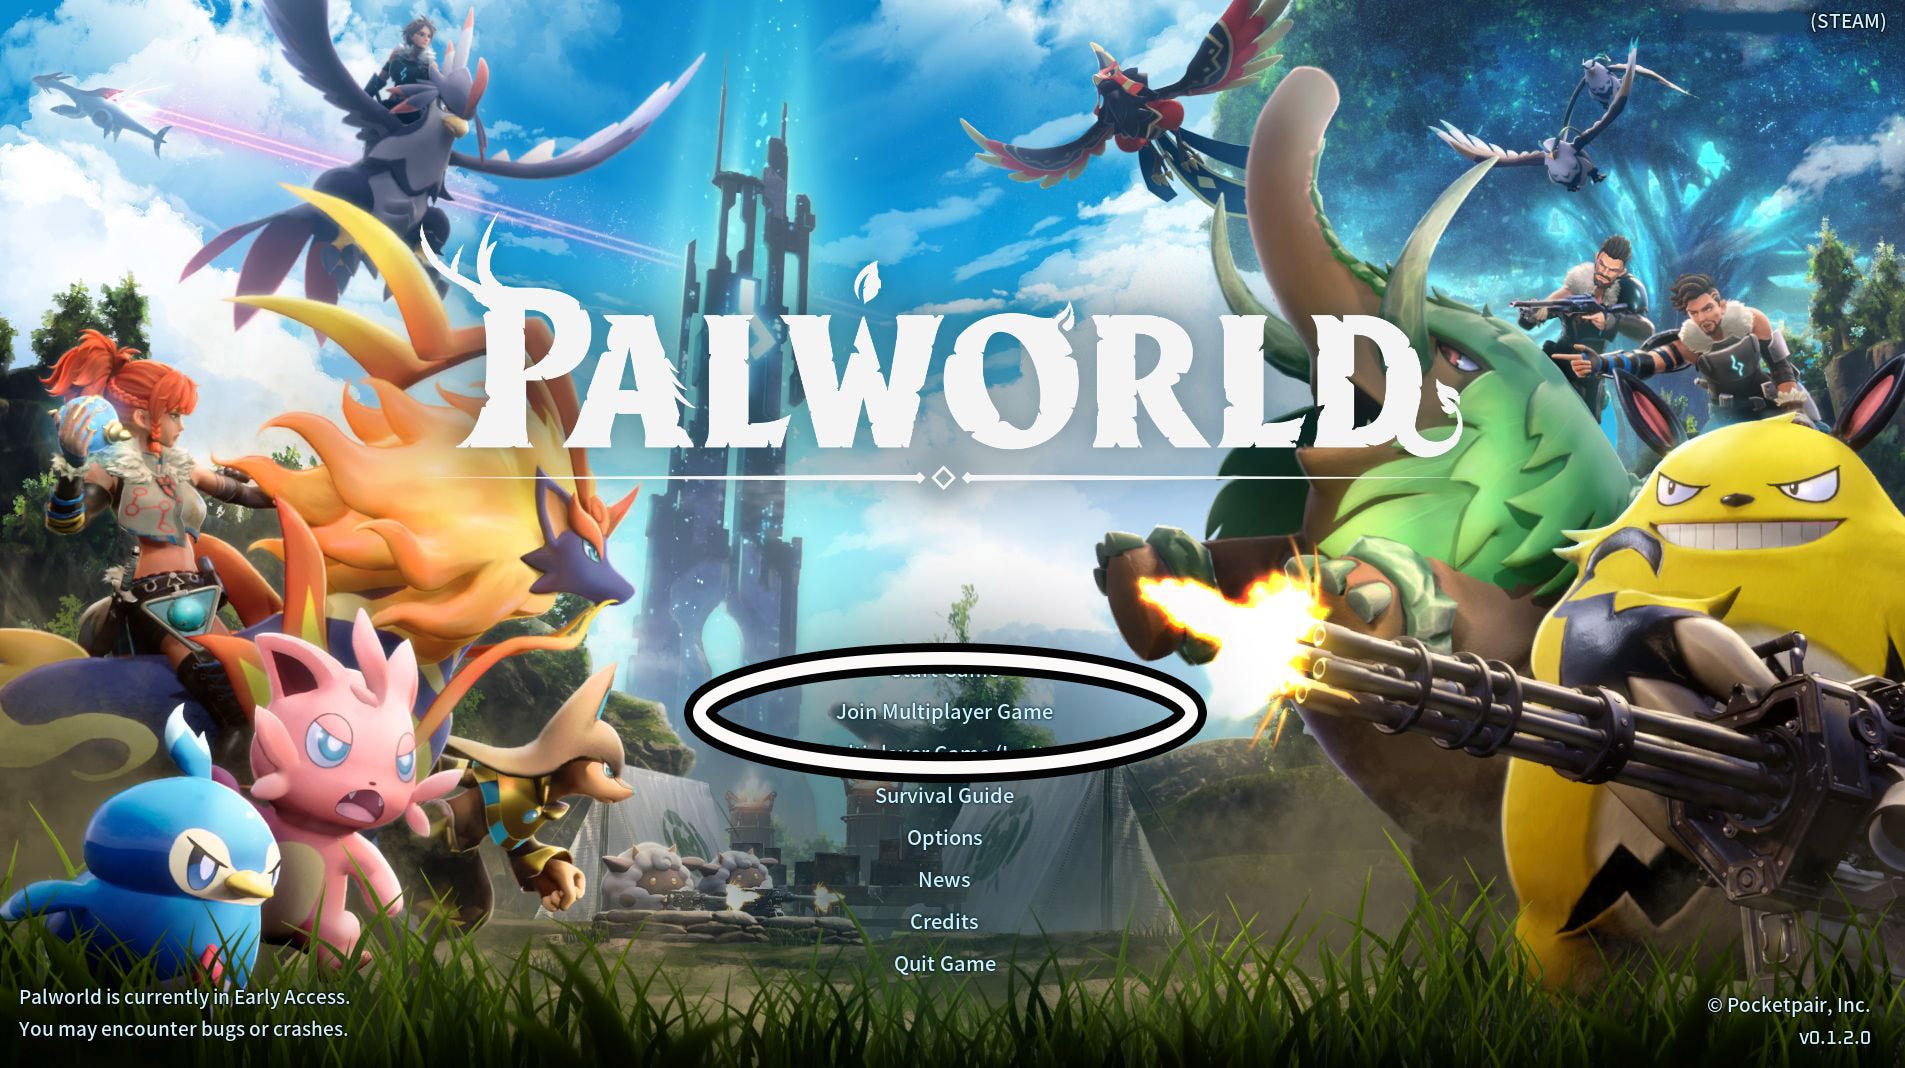
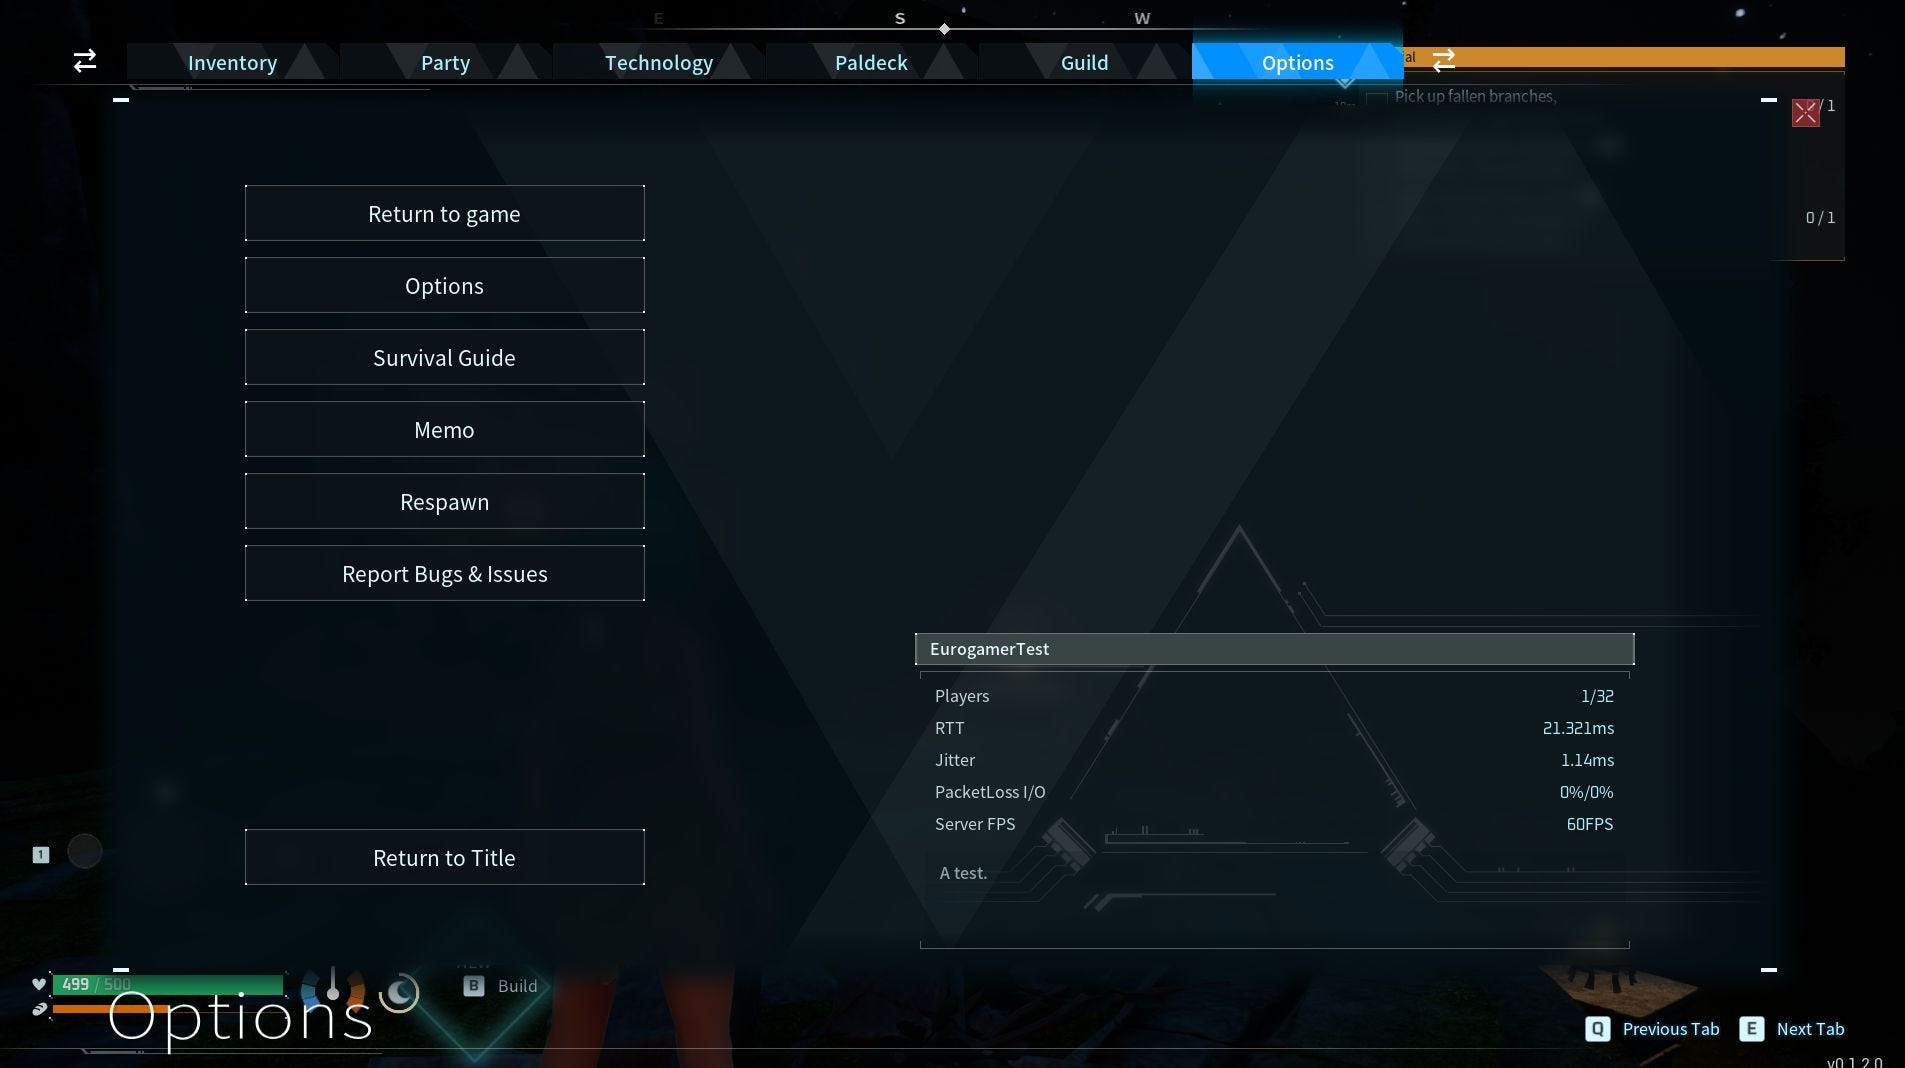
You can check to see if you’ve joined the server correctly by opening the main menu and seeing if the server’s details are in the ‘Options’ section.
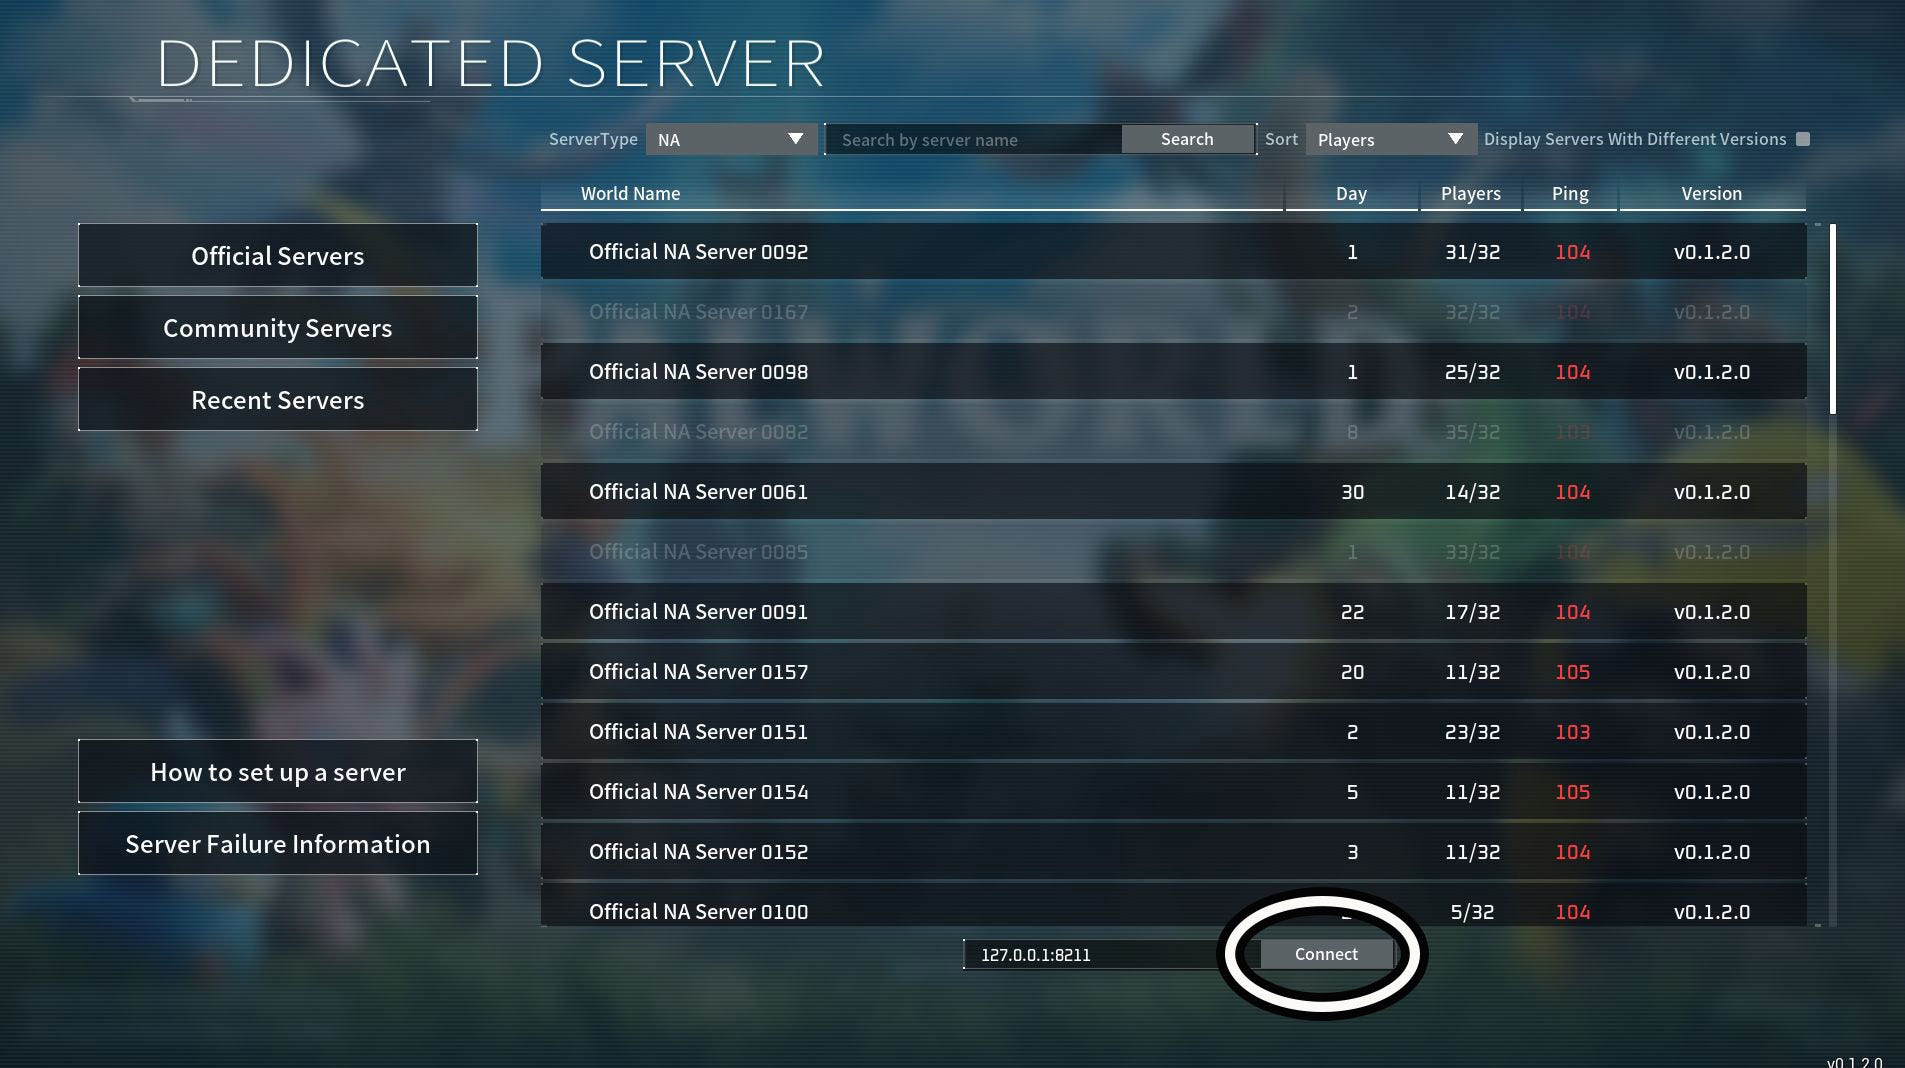
Joining another player’s dedicated server
To join another player’s dedicated server, you first need to ensure you have the IPv4 address for the server you wish to join.
With that in hand, you need to select ‘Join Multiplayer Game’ from the main Palworld menu. Now you need to input the server’s IP address into the box at the bottom of the screen without removing ‘:8211’.
Remember – you need to keep ‘:8211’ as this is the port number you need to join the server.
It’s also important to keep in mind that if the server has reached the max 32 players, you won’t be able to join. If you receive the ‘No password has been entered’ error message, then jump ahead to the last section of this guide where we cover a possible solution.
You can check to see if you’ve joined the correct server by looking at the ‘Options’ section of the main in-game menu.
How to get admin privileges in a dedicated Palworld server
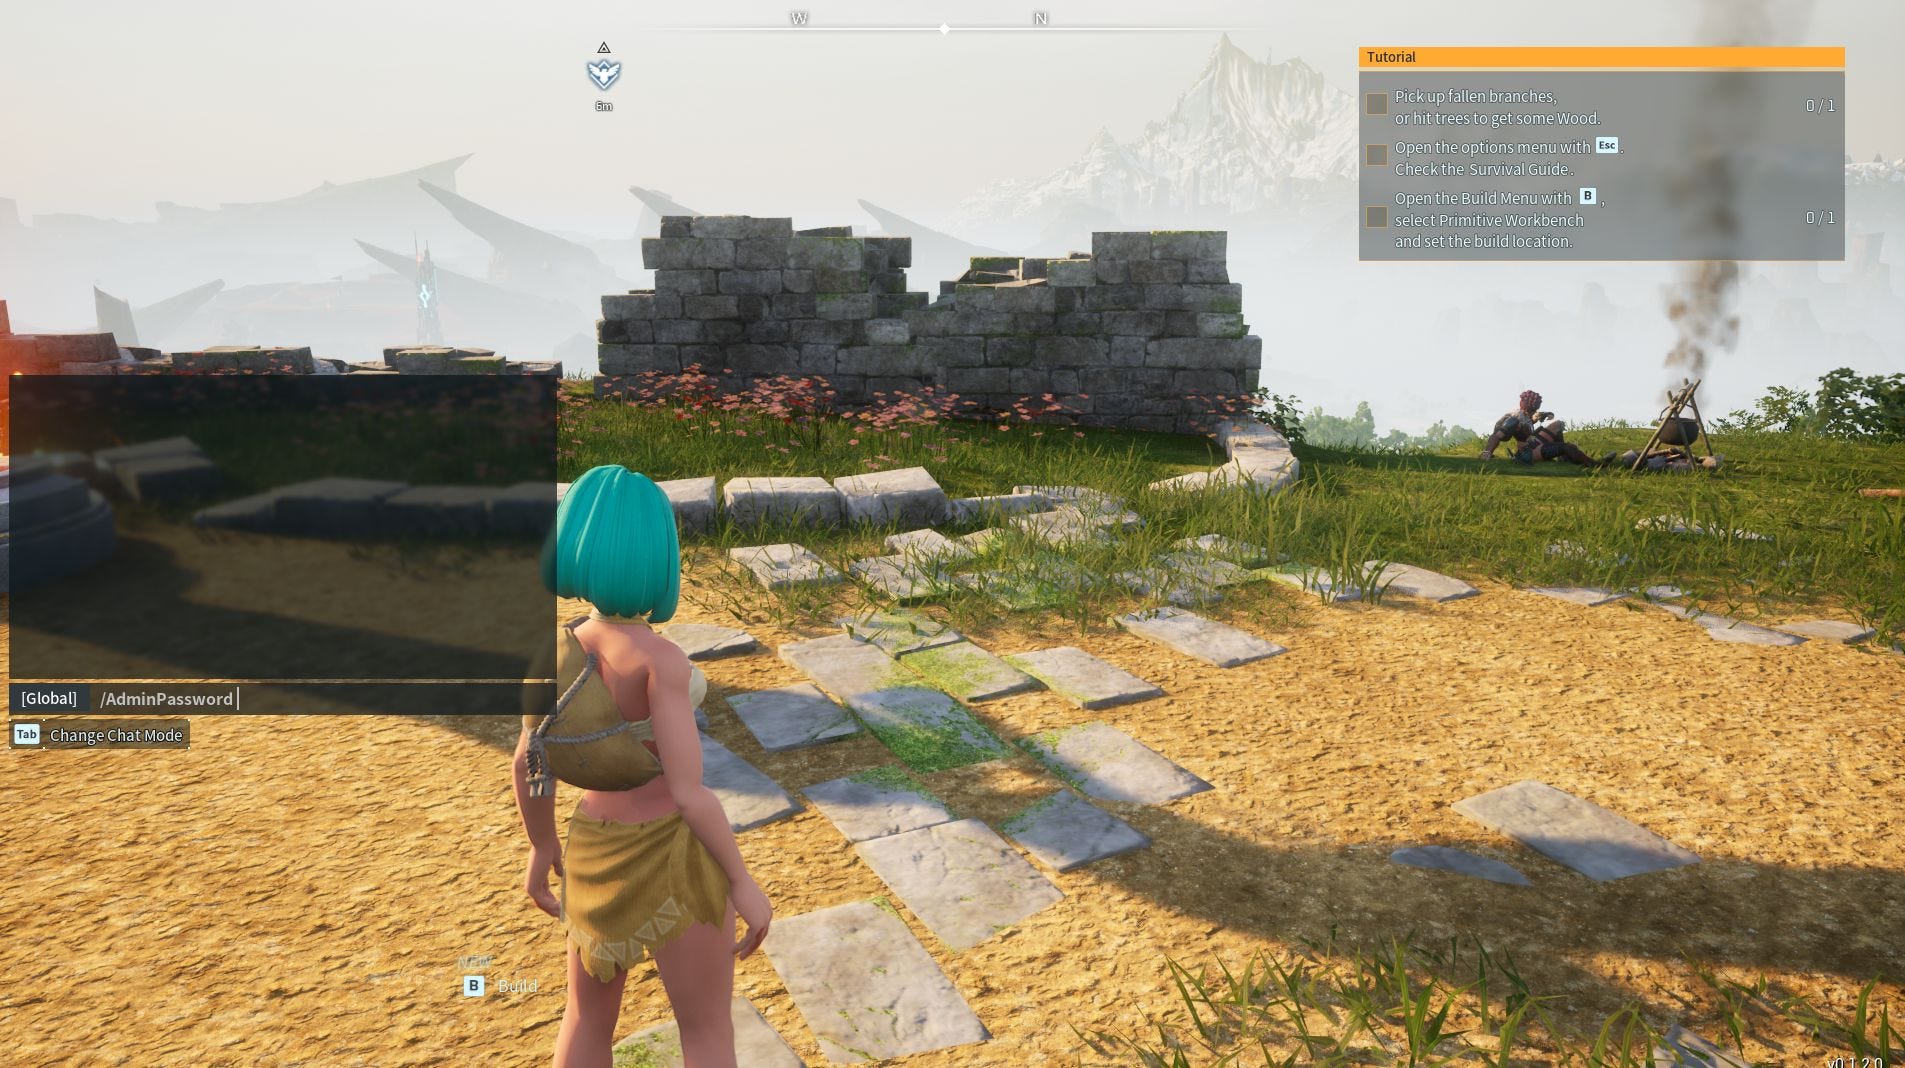
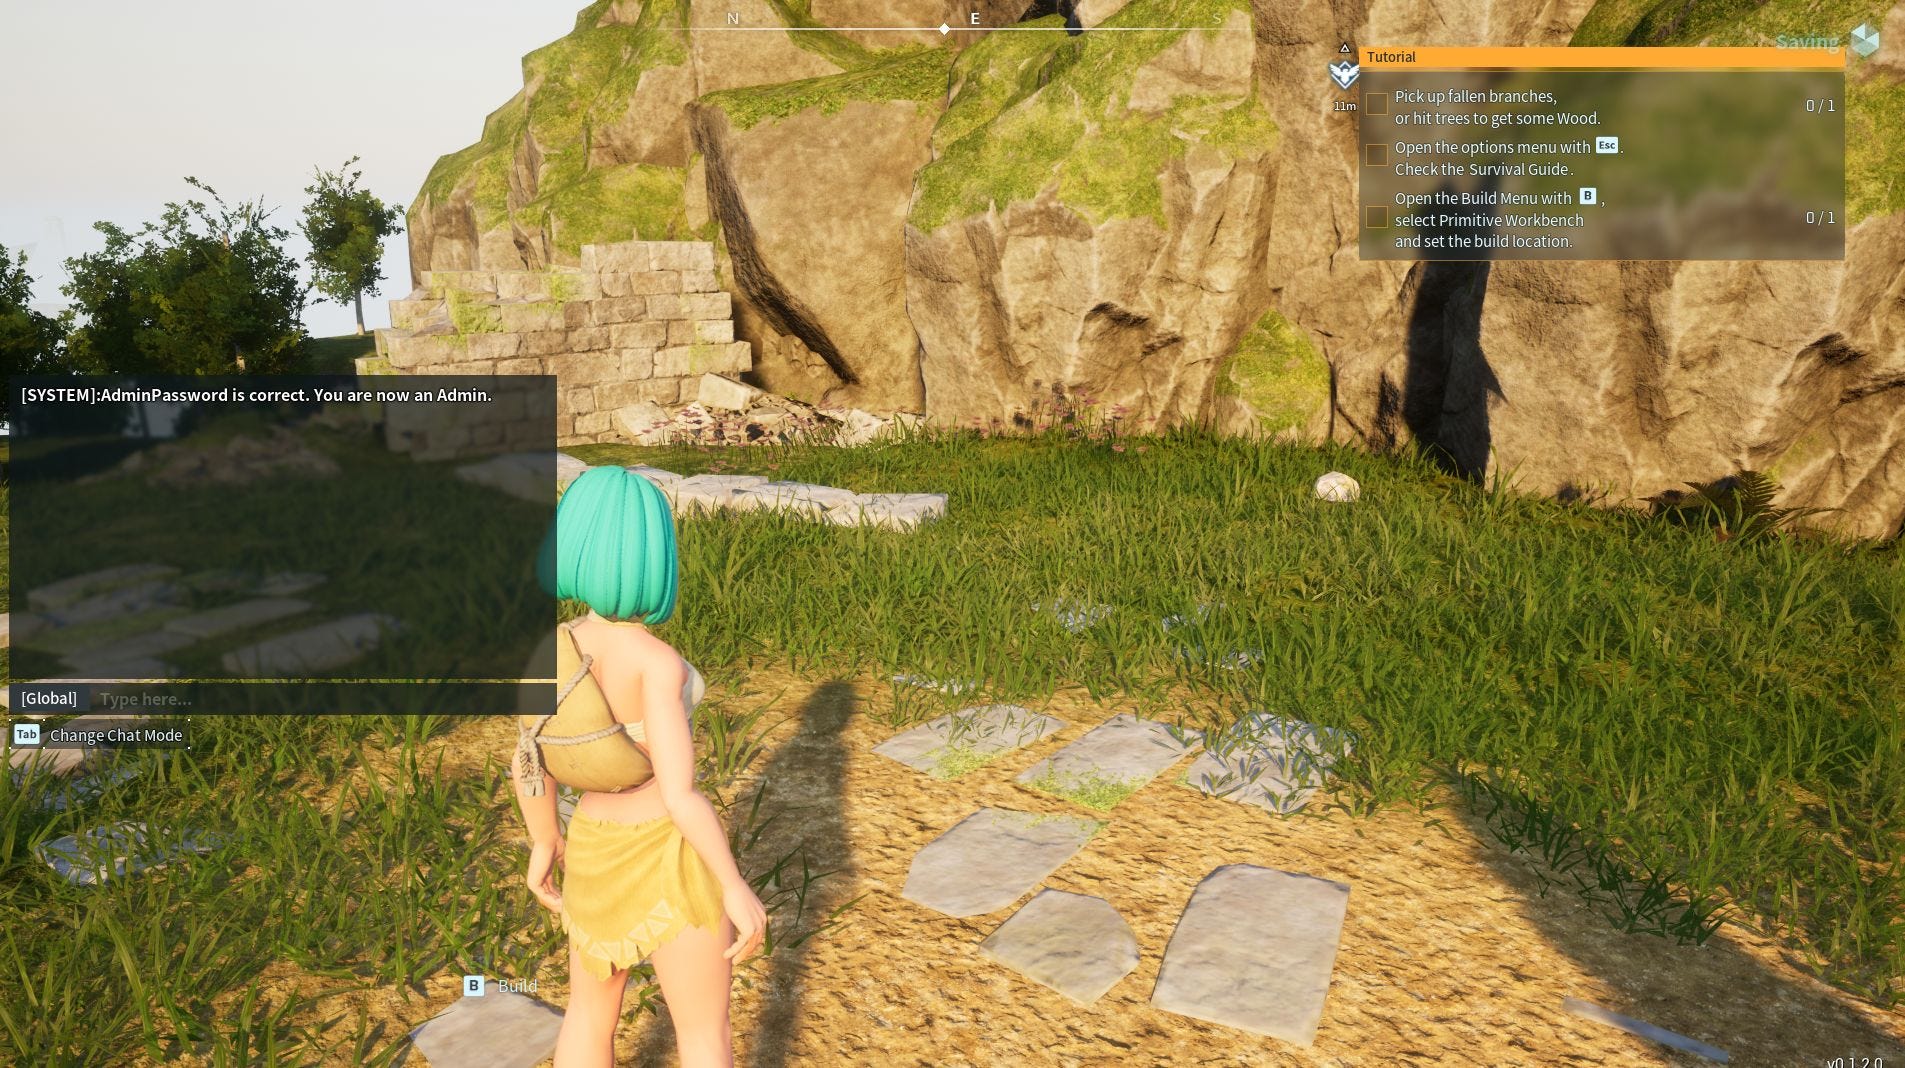
Getting admin privileges in your dedicated Palworld server is a quick and easy task. First, however, make sure you’re in the server in-game – outlined above – before attempting to do so.
Once you’re playing your dedicated server, press ‘Enter’ to open the chat box. Now all you have to do is type ‘/Admin Password YOURADMINPASSWORD’ before pressing enter again. (Please remember to replace that mess of capital letters with your admin password.)
If done correctly, you should receive a notification stating that you’re now the admin for this server.
How to save and close your dedicated server in Palworld
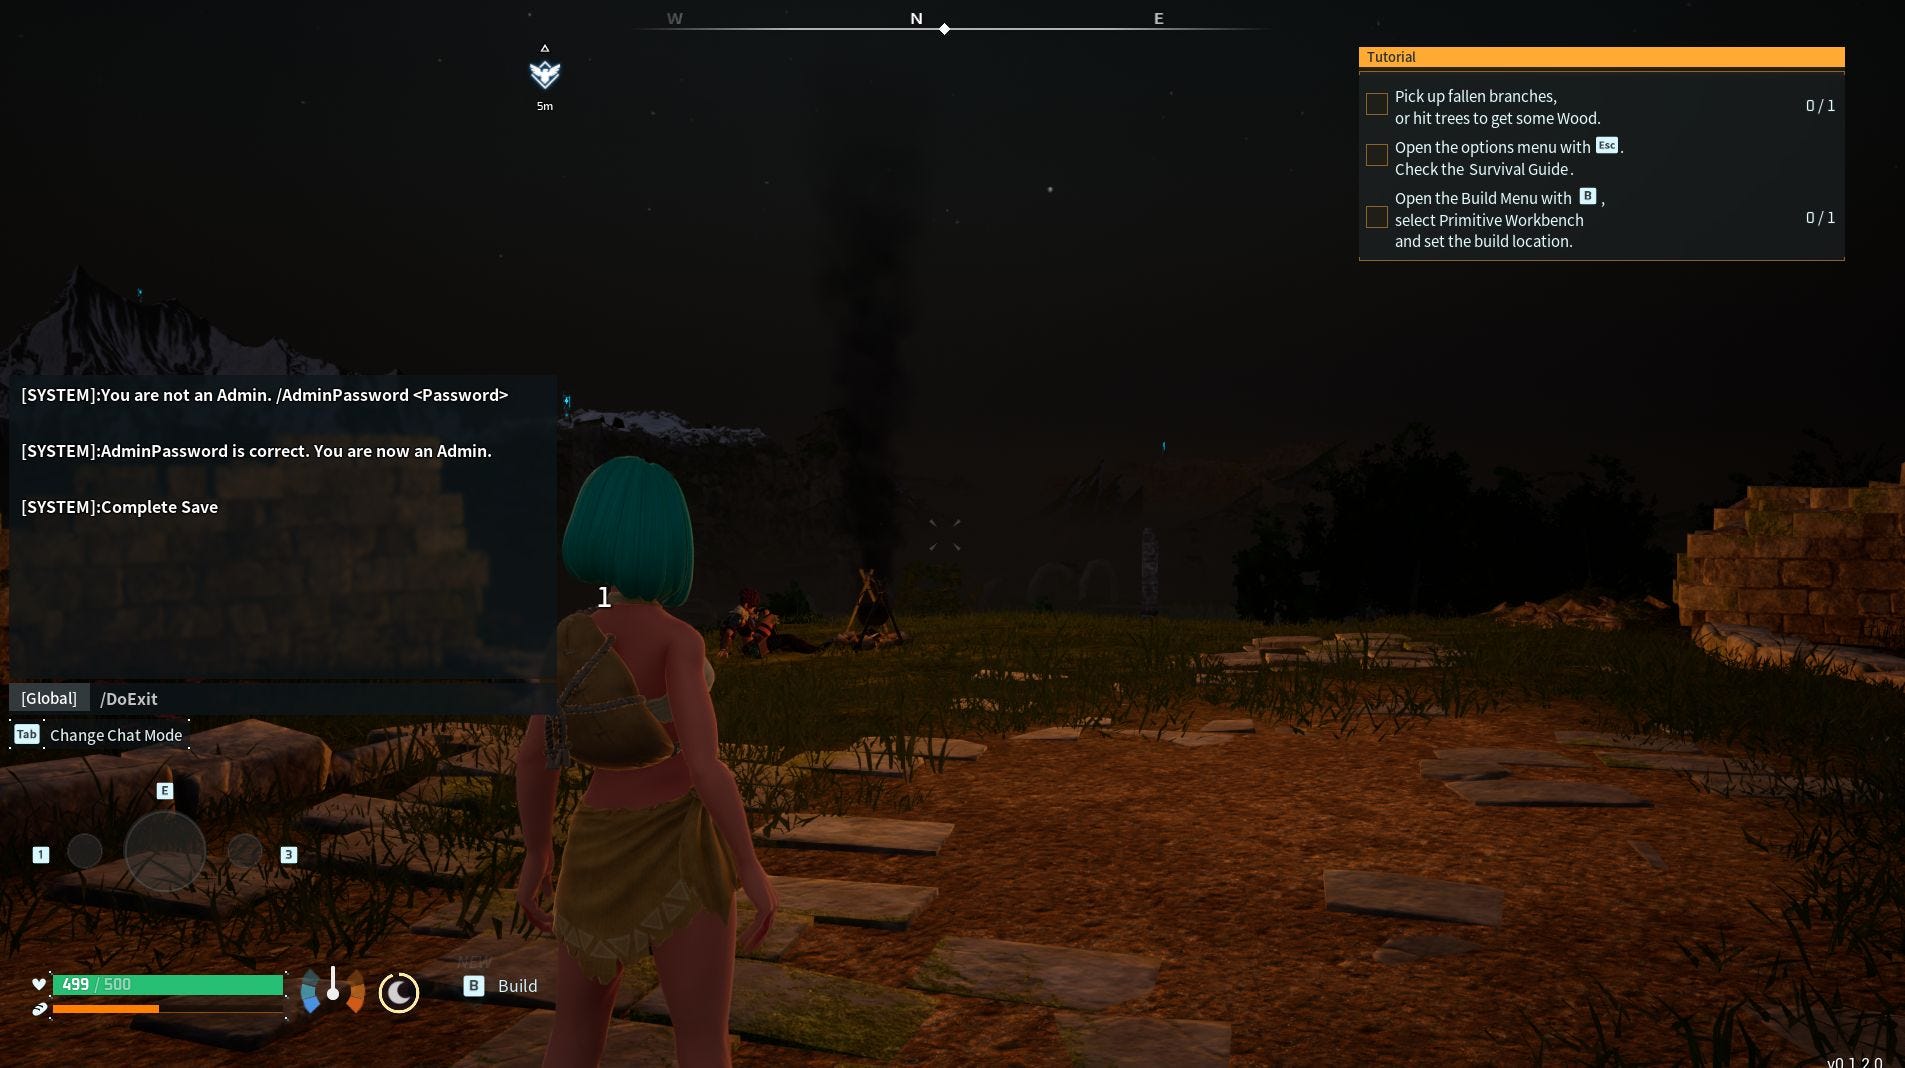
While you can close your dedicated Palworld server by simply closing its command prompt window, this does run the risk of losing your progress.
To ensure you’ve safely saved and closed your dedicated server, you first need to give yourself admin privileges as outlined above. After doing so, press ‘Enter’ and type in ‘/Save’. Doing so should cause a system prompt stating that the save has been completed to appear.
To close the server, you now need to type ‘/DoExit’. This should automatically close the server, causing you to exit the game.
‘No password has been entered’ error solution in Palworld
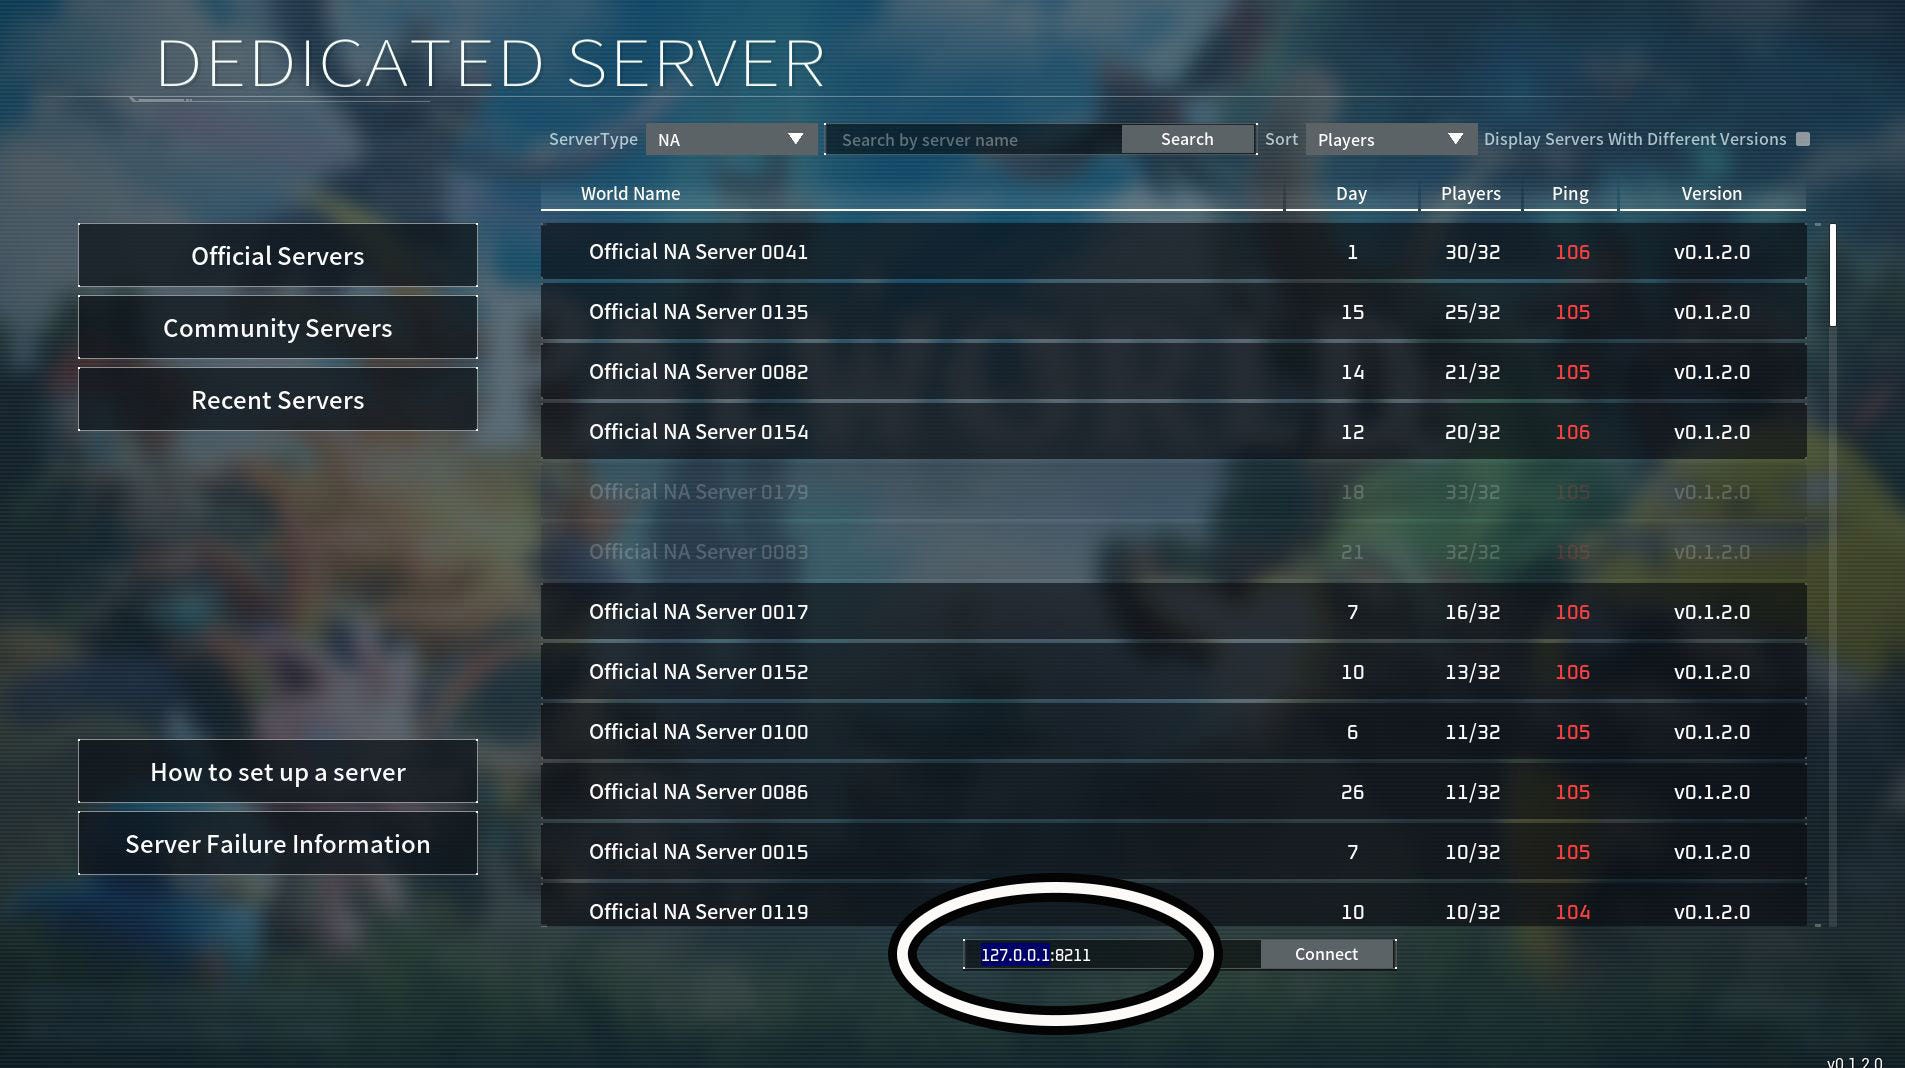
When attempting to join a dedicated server in Palworld, even your own, you may receive an error message stating ‘No password has been entered.’ Thankfully, there is a solution to this and I want you to bear with me, because it might feel a little bit silly.
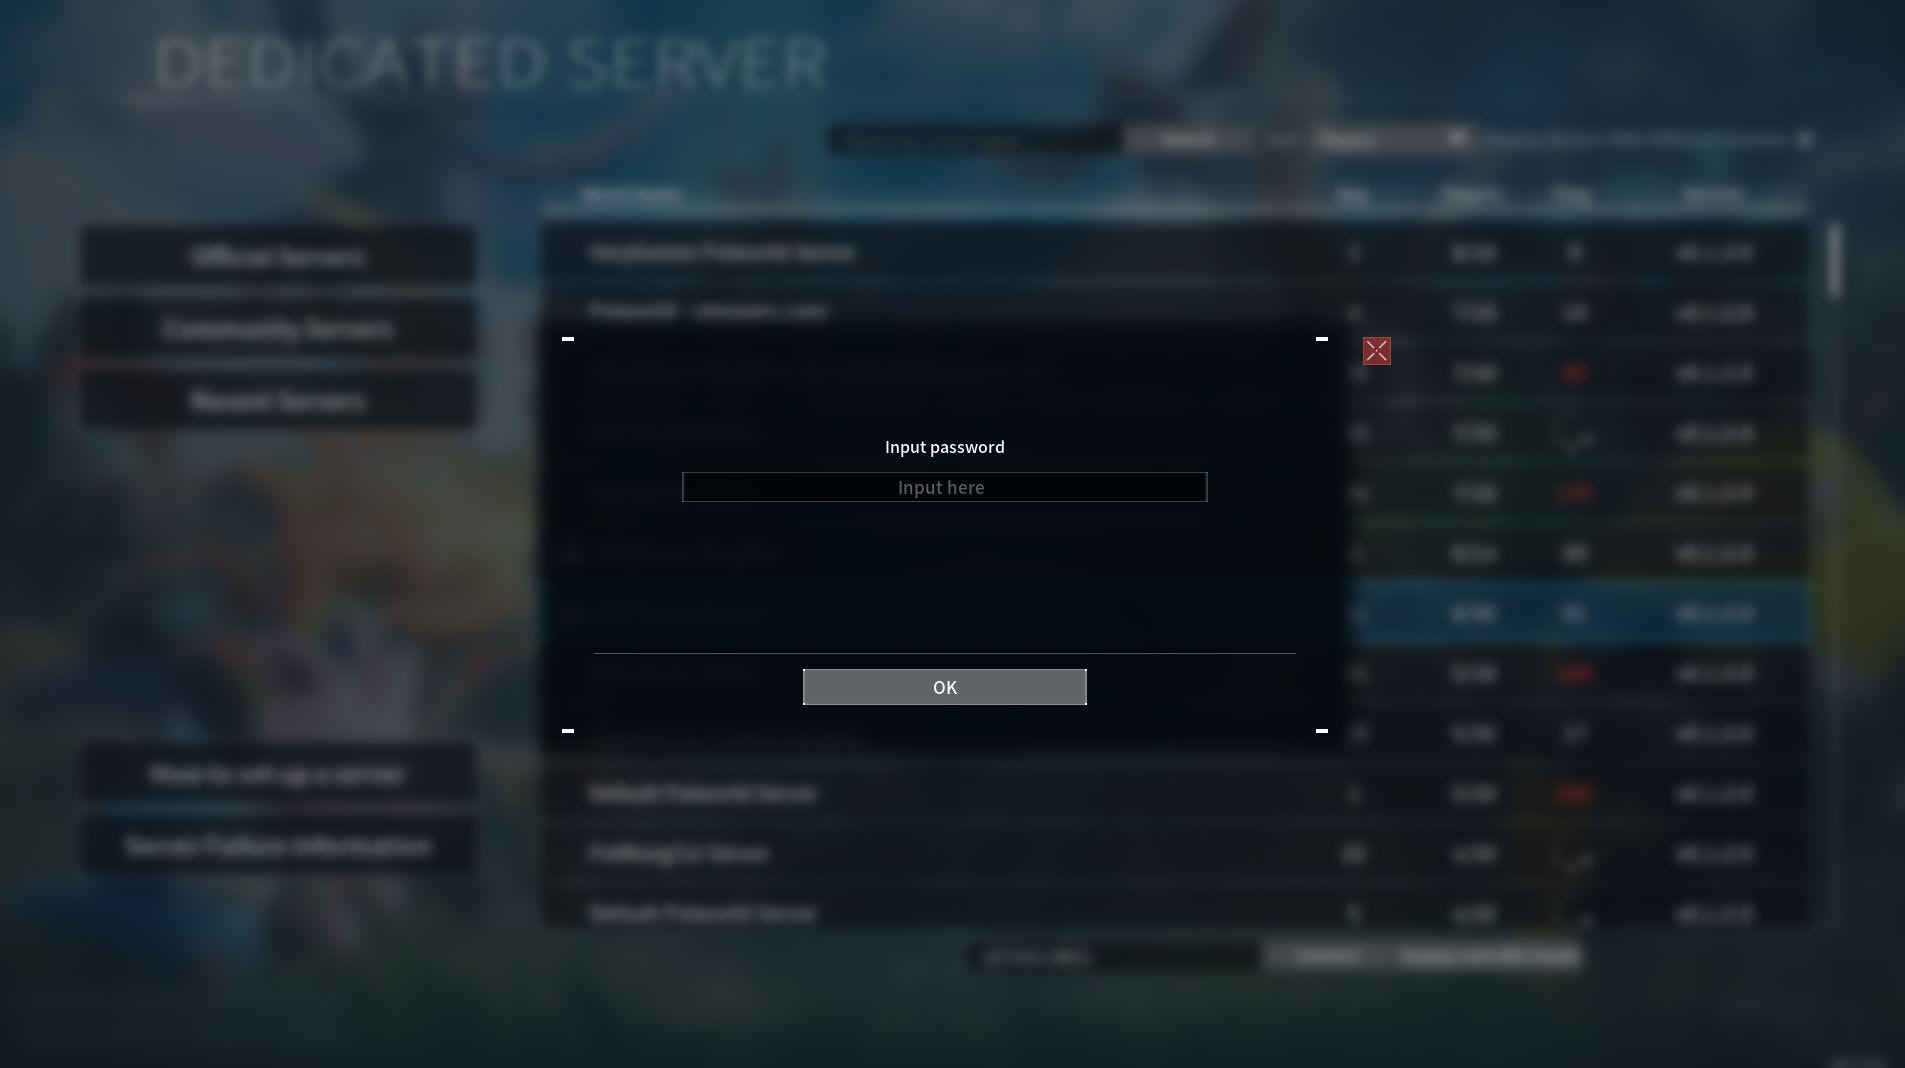
First you need to return to the server list by selecting, ‘Join Multiplayer Game.’ Next, select ‘Community Servers’ and then select any server, any at all, which has a lock on it.
This will cause a password entry box to appear and here you need to enter your server’s password. (Yes, I’m being serious.) When the option to join this server appears afterwards, select ‘No’.
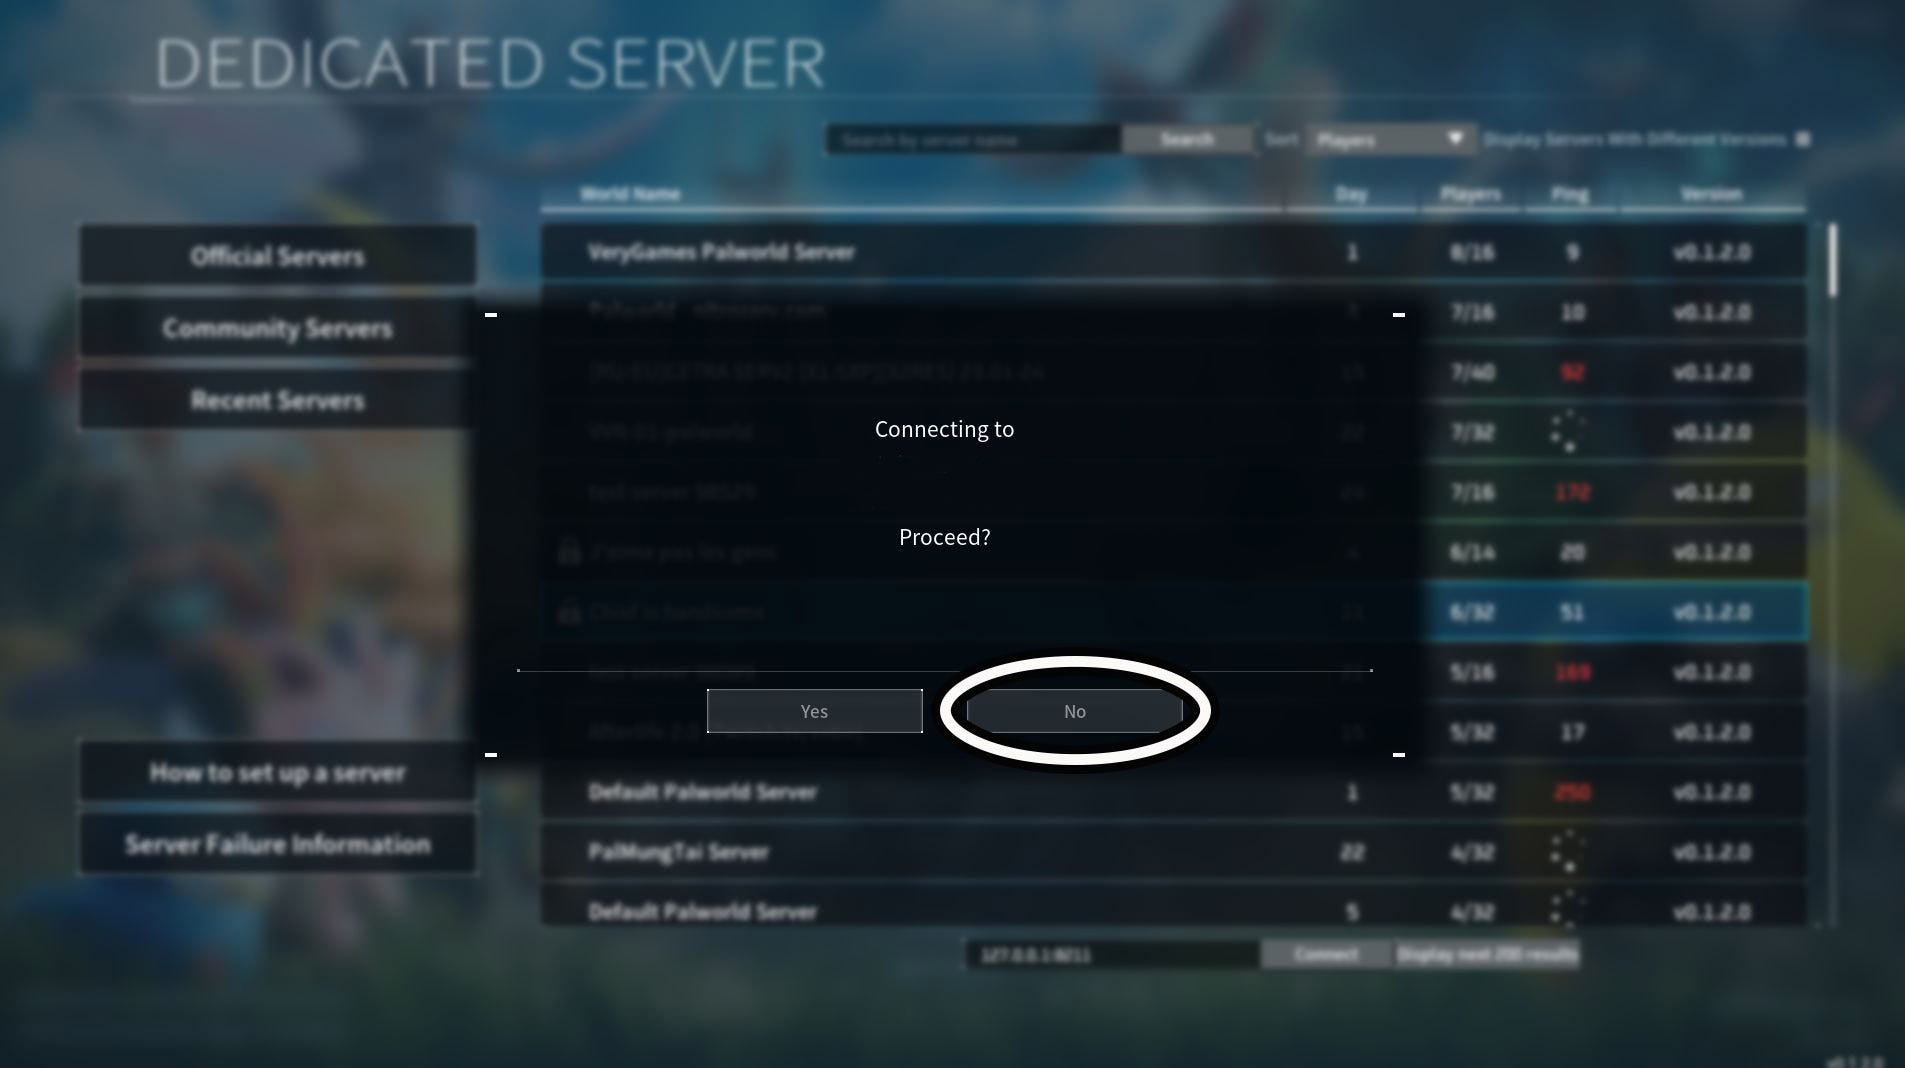
Now all you have to do is click ‘Connect’ down at the bottom of your screen and you should be sent to your dedicated server. Remember – if you’re joining someone else’s dedicated server, you will need to enter their IPv4 address.
Hope you’re enjoying Palworld!
https://www.eurogamer.net/how-to-set-up-dedicated-server-steam-palworld-9409


