Valheim has taken Steam by storm, and its inherently cooperative design means loads of followers need to begin their very own Dedicated Server. There are loads of methods to spin up your personal Valheim devoted server, comparable to utilizing SteamCMD and manually creating the recordsdata your self. Here’s the factor: you don’t have to do any of that. Developer Iron Gate has truly made creating a devoted server for Valheim painless and straightforward (properly, comparatively), so even full idiots like myself can get one up and operating.
Download the Valheim Dedicated Server utility out of your Steam library after buying the sport.
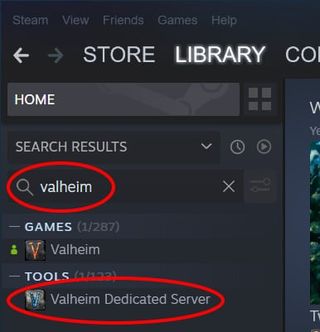
Iron Gate has a standalone Dedicated Server utility for Valheim, and it’s accessible to everybody who owns the sport. Simply seek for Valheim in your Steam library and also you’ll see it listed alongside the sport correct. It’s roughly 1 gig in measurement, very like the principle recreation itself. Just obtain the Valheim Dedicated Server app in Steam to get began (oh, and sure, it really works with Linux). If you may’t discover it be sure to have the “Tools” filter in your Steam library chosen.
Once you’ve downloaded the Valheim Dedicated Server utility you may click on on it to convert your private pc into a persistent Valheim server to your pals and group. That mentioned, there are a few issues it’s best to do prior to firing up the Dedicated Server utility to guarantee every thing runs easily. You’ll want to open the set up folder for the Valheim Dedicated Server to entry the file you want to tweak, which ought to observe this path: Program Files (x86) > Steam > steamapps > frequent > Valheim devoted server. If you’ve manually adjusted the place your Steam video games are put in then head to the drive you used, discover your Steam folder, and observe the remainder of the trail simply talked about.

Edit the “start_headless_server.bat” file in Notepad to guarantee your Valheim server runs easily.
In this folder is the file “start_headless_server.bat” (or “start_server.sh” on Linux). Save a copy of this file earlier than doing something to it, simply in case issues go sideways, and reserve it in a totally different folder. It’s additionally necessary to word that any adjustments you make to the file throughout the Valheim Dedicated Server set up folder will reset everytime you replace the app in Steam, so save a second copy of the file when you’ve completed making the changes I’m about to describe under.
First, proper click on the “start_headless_server.bat” file and choose Edit to open the file in Notepad (Linux customers will need to open a terminal within the server listing and run the bash script: “./start_server.sh”, per Iron Gate). Once the file is open for modifying find line 7, which begins with “begin valheim_server…”. This line has all of the properties we wish to regulate to get our Valheim Dedicated Server operating easily. If you don’t see traces simply seek for “begin valheim_server”. These properties are:
- -name “My Server”
- Enter a title to your server. You can’t use duplicate phrases out of your password or World title.
- -port 2456
- This is the default port, however you’ll need to change it to no matter port your router is utilizing for Port Forwarding. Simply log into your router and choose the Port Forwarding setting to determine what that is. Also make sure this port is open in your firewall.
- -world “Dedicated”
- The title to your world. You may also select a world that already exists by getting into its title.
- -password “Secret”
- The password to your server. If you permit this empty you’ll run an open server.
Save the file, create a duplicate for backup functions (and reserve it elsewhere), then hearth up the Valheim Dedicated Server utility both from Windows or inside Steam. Let the Command Processor do its factor, and when you see “Game Server Connected” on the backside your Valheim devoted server is up and operating! Bear in thoughts that closing the Command-window gained’t kill the server: you could have to press Any Key (or the ENTER KEY in Linux) throughout the command immediate window to shut down your server. Also keep in mind that the thought behind a devoted server is it’s one thing you permit on, so in case you are utilizing your own home PC make sure to alter your energy settings to guarantee your folks don’t get the boot as a result of your pc abruptly determined it was shutdown time. And, sure, you may play in your server whereas additionally operating it within the background.
Before we go, listed here are some console instructions (opened by urgent F5) to assist you administer and run your server extra effectively:
- assist – Show all accessible instructions.
- kick [name/ip/userID] – Kick the person.
- ban [name/ip/userID] – Ban the person.
- unban [ip/userID] – Unban the person.
- banned – Shows a listing of banned customers.
- ping – Send a ping to the server to get your latency.
- information – Print system information
– This article was up to date on:February eighth, 2021
GAME DEALSGet Twitch Prime For Free Right Now and get in-game items, rewards, and free games