

There’s an old proverb that states: “Shared joy is doubled joy.” While this is indeed true when it comes to things like candy and laughter, it can just as well be applied to shared web hosting.
Shared hosting is an inexpensive and simple way of making a website available online, regardless of your experience with web hosting. Especially if this is your first time creating a site, shared hosting is often your best bet.
DreamHost has been a top-notch hosting company for more than 20 years, and we offer two fantastic shared hosting plans — Shared Starter and Shared Unlimited — that can be a great help when getting your new site off the ground.
In this quick-start guide, we’ll take you through the benefits of using shared hosting and explain why DreamHost’s plans are such strong choices. We’ll also show you how to get your website going and even offer a list of resources to help you learn more. Let’s get to it!
A Brief Introduction to Shared Hosting
In case you’re unfamiliar with the jargon involved in web hosting, let’s start from the top. A web host is a company where you can buy server space to store your website. This is how your site becomes publicly available. When a visitor tries to access your site, all the necessary data is sent from the web server to that visitor’s device.
This is all pretty straightforward. However, things do get slightly more complicated when you start to consider the different types of web hosting. There are many varieties, and they differ in how they’re set up, what resources they provide, and more.
In this post, we want to take a close look at shared hosting packages. As the name suggests, this is a type of hosting where your site shares a server and resources with a multitude of other users. For this reason, shared hosting is usually the least expensive option. What’s more, it comes with several key benefits.
For one, shared hosting is usually aimed at beginners or those who don’t want to spend too much time on the technical aspects of hosting. As such, these plans will generally be the easiest to set up and manage. This makes shared hosting perfect for smaller sites, such as blogs or portfolios that don’t require a lot of upkeep.
Here at DreamHost, we offer our own shared hosting plans — Shared Starter and Shared Unlimited.
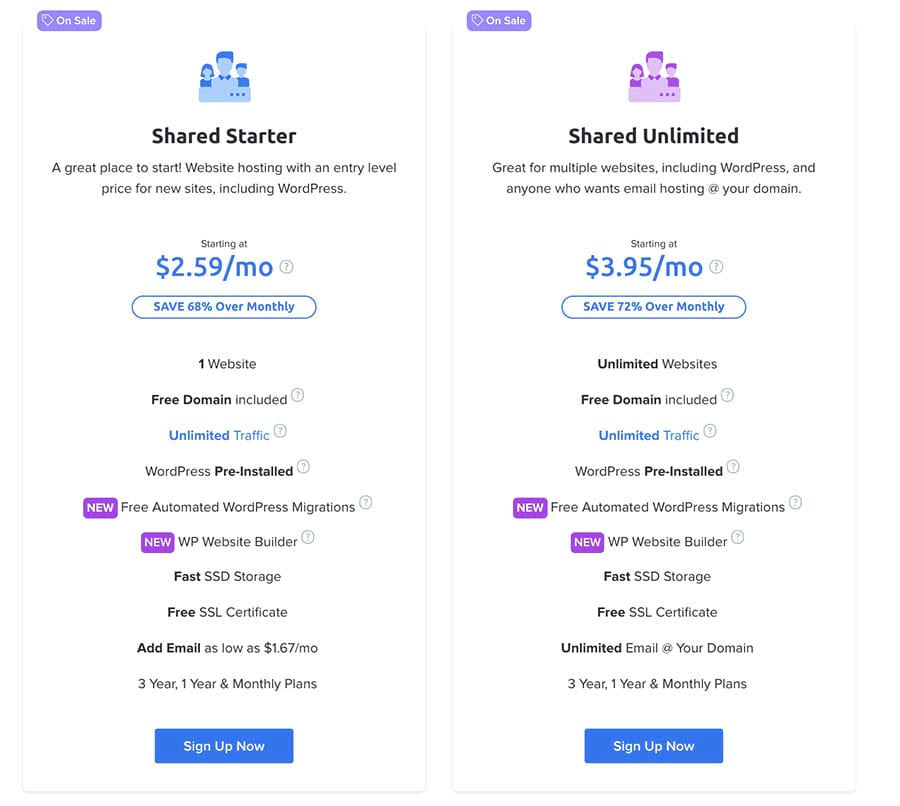
Shared Starter is a fantastic and highly affordable starter plan for users building their first websites. Shared Unlimited offers everything in Shared Starter and includes unlimited site storage, subdomains, and more, as well as email and a pre-installed SSL certificate. This makes it perfect for serious users ready to take their websites to a more professional level.
These plans have been specifically tailored to be as easy as possible to get started with and use — especially Shared Unlimited, which gives you everything you need for a successful website right out of the gate. We’ll get into the finer details soon. However, if you’re looking for a simple and painless way to get your website off the ground, suffice it to say that DreamHost has you covered.
Of course, we’d be remiss not to mention that we also offer a number of other plans. Large, complex sites sometimes require more robust hosting services. If that sounds like you, then you might want to check out our managed WordPress hosting, VPS hosting, dedicated hosting, and WooCommerce hosting. If shared hosting sounds intriguing, however, read on for all the details.
Related: How to Choose a Web Hosting Provider — 15-Point Checklist
Why DreamHost Shared Hosting Is a Perfect Choice for Your Site
The DreamHost shared hosting plan contains everything you need to get your site online. This plan is specifically tailored to make it easy and fast to sign up and publish a site, even if you have no prior experience.
In short, if you want to create a website with minimal fuss and worry, you’ll want to consider this plan. Aside from the benefits we’ve already mentioned, it also includes:
- Unlimited websites. Create as many websites as you want or need on one plan, and all with unlimited data and storage.
- Free domain. Claim your own piece of internet real estate, and establish your online presence with a free domain name. This saves you an average of $10—$12 per year.
- Guaranteed 100% uptime. You never have to worry about your site being down at a critical time with our reliable servers.
- WordPress pre-installed. WordPress is the most popular platform for building a website. The flexibility of WordPress makes it easy to bring your site to life just as you imagine it. We can install the platform for you so that everything is ready to go when you are.
- WP Website Builder. Our simple site creation wizard makes building your WordPress website easier than ever. The drag-and-drop editor and free professional templates help you get up and running in no time.
- Free Secure Sockets Layer (SSL) certificate. Security is vital in today’s online world. The Shared Unlimited plan includes a free SSL/TLS certificate so you can secure your site and enjoy peace of mind. With this perk, you’ll save an average of $20 per year.
- Unlimited email @ your domain. Send and receive as much email as you need — this is ideal for business use and highly-active websites.
- Access to 24/7 support. Get support whenever you need it. Never worry about being stuck on your own.
While we’re confident that you’ll enjoy shared hosting with us for these reasons and more, we do offer a 97-day money-back guarantee. Therefore, you can feel safe and secure in giving us a shot and see for yourself if we live up to your expectations!
Let DreamHost Shared Hosting Power Your Site
Our Unlimited Shared Hosting plan gives you everything you need to thrive online — we throw in a domain, SSL certificate, email address, and privacy protection for free!

How to Get Started with DreamHost Shared Hosting (In 6 Steps)
Getting started with DreamHost couldn’t be easier. To show you how it works, we’ll walk you through every step of the process, from creating an account and choosing a plan to building and securing your website.
Step 1: Sign Up for Your Hosting Plan
The first step to getting started with DreamHost and bringing your website to the world is to sign up for one of our hosting plans. The role of the web host is to give your site a physical server to house its data and enable visitors to access it.
We offer a wide variety of hosting plans, but shared hosting is one of the most popular and cost-effective options. Shared hosting has your website living on a server with other sites, making it more affordable. However, those other sites never have access to your data.
For most users, our Shared Unlimited plan is the best way to get started with your website, especially if you want to use WordPress. We pre-install WordPress for you, and you’ll get unlimited traffic and the ability to build as many websites as you like.
To sign up for your new Shared Unlimited plan, click on the blue Sign Up Now button underneath the feature list. You’ll be taken to a wizard that will walk you through purchasing your plan and creating a DreamHost account.
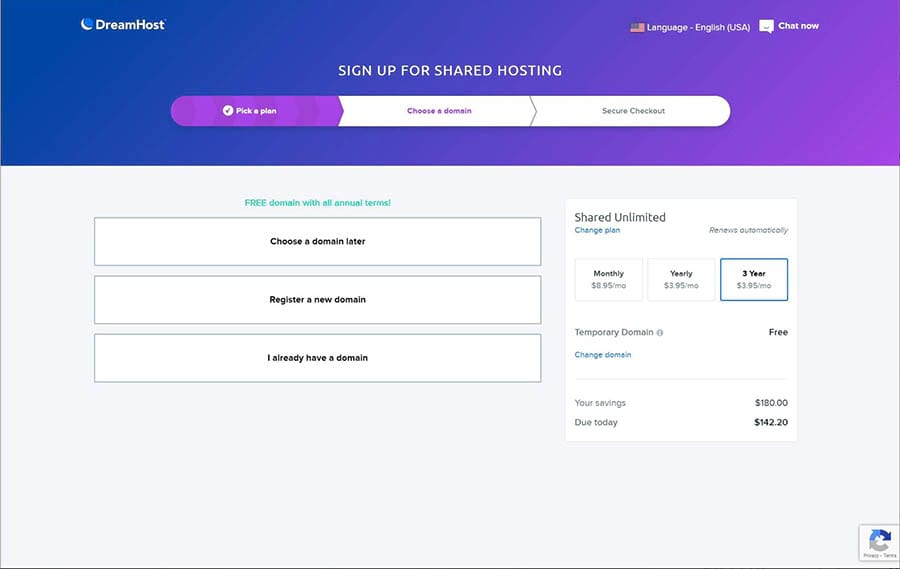
Simply follow the steps to get everything set up. You can opt to register a domain right away during the process or save that task for later. Which you choose is totally up to you — there’s no right or wrong way to do it.
The DreamHost account creation is on the third page (Secure Checkout). Below that, you’ll find additional options you can configure for your new site.
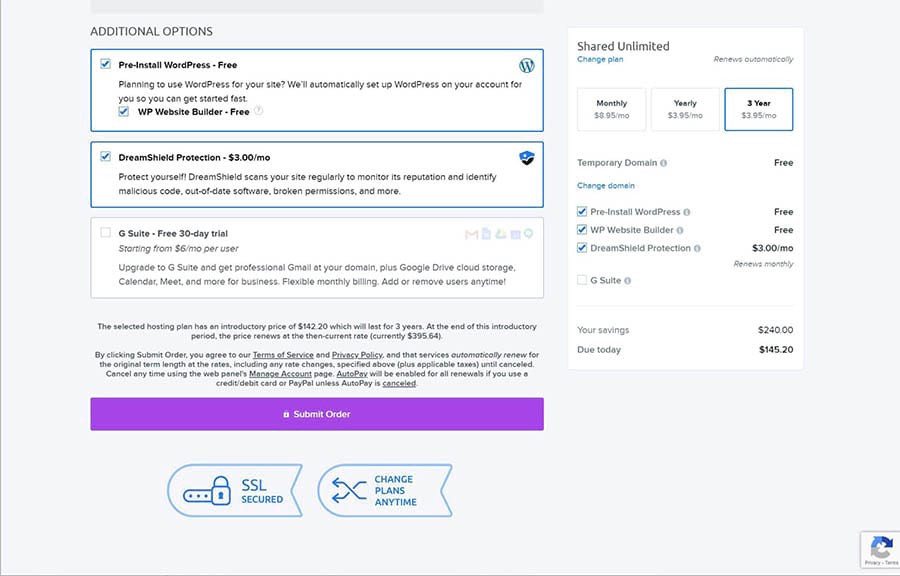
If you’re planning on using WordPress to build your site, we highly recommend checking the boxes to pre-install the platform and use the WP Site Builder. This can greatly streamline the process of getting your site up and running.
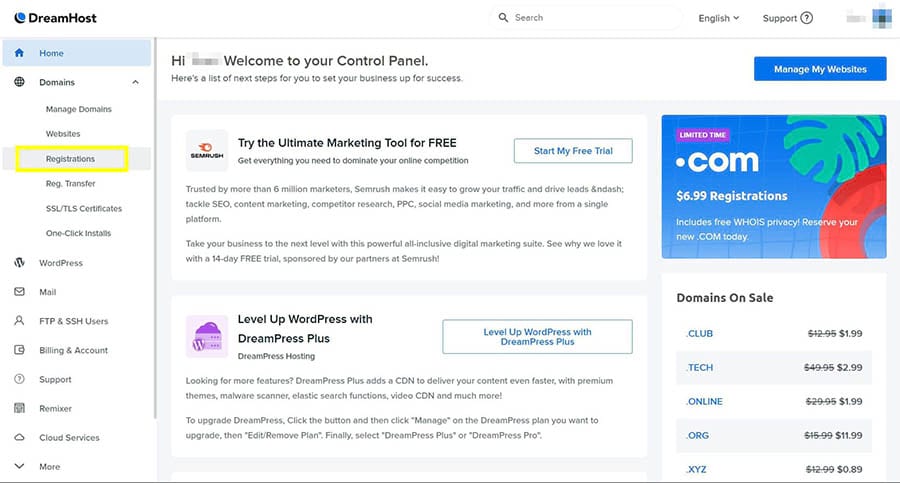
Step 2: Explore the DreamHost Panel
Once you’ve created your account and purchased a hosting plan, you can log into your DreamHost control panel (using the email and password you provided during signup).
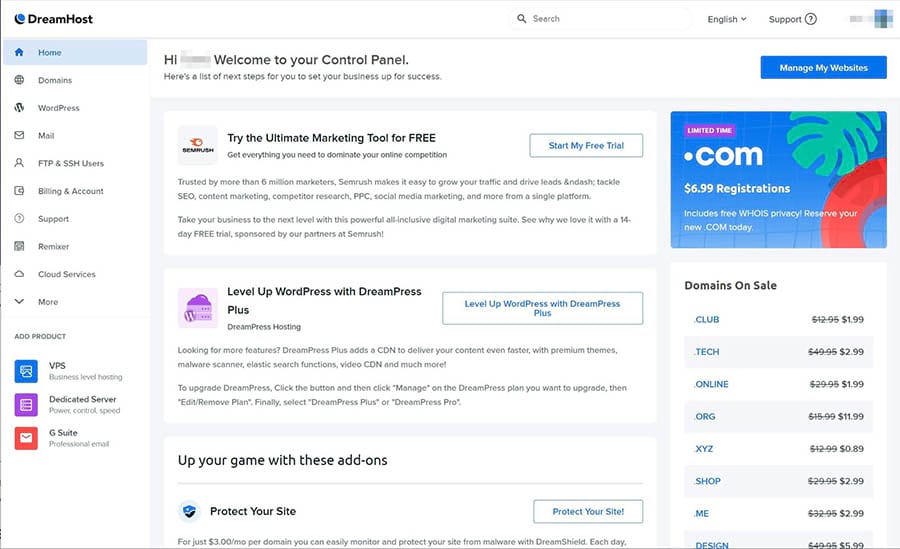
The user panel is your home base for all things related to your websites, domains, and hosting account. Along the left side, you can find all of the available features and functions:
- Domains. The Domains menu is where you’ll access your existing domains or register new ones.
- WordPress. The WordPress menu provides access to any WordPress services you’ve added to your account, such as our DreamPress managed hosting. You can also add new installations of WordPress from this menu.
- Mail. The Mail menu provides you with everything you need to manage your unlimited email services.
- Users. The Users menu is where you’ll find options for adding and managing additional users you’ve added to your account.
- MySQL Databases. If you ever need to access your MySQL databases, you can use this option, found under the More menu.
There’s plenty more to explore in the panel, so we recommend taking a few minutes to click on the various links and get acquainted with where things are located.
Step 3: Register Your Domain
If you didn’t register your domain during the initial signup process, you should do so now. Your domain name gives your site its primary URL and carves out its unique place on the web. No one else can use your domain once you’ve registered it.
Your Shared Unlimited hosting plan includes a free domain registration credit. You have one month from signup to use the credit, so if you’re unsure what domain you want, you can take a little time to think about it. However, you can’t start building your website until your domain is registered.
To register a domain, head to your DreamHost panel and navigate to Domains > Registrations.
From there, you can search for the domain you want. If it’s available, you can add it to your cart.
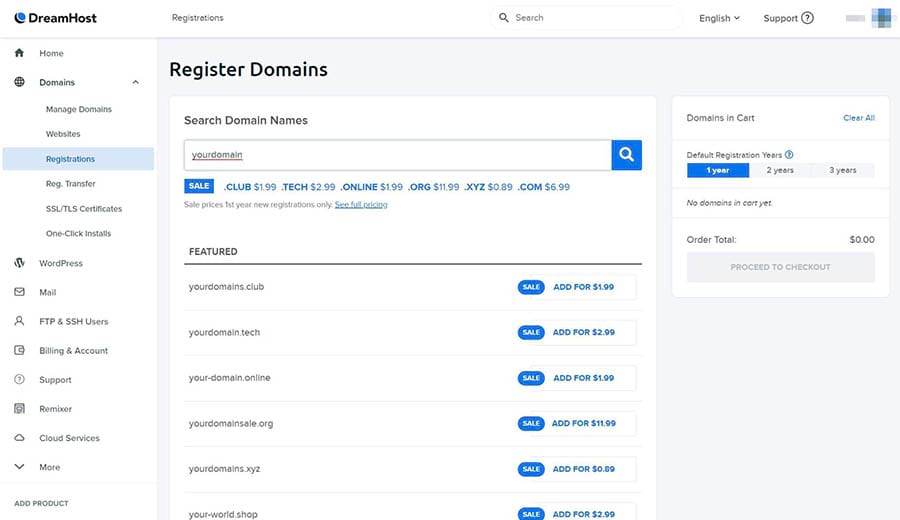
Keep in mind that it can take up to 72 hours for your domain to become accessible once you purchase it. So if you’re in a hurry to get your site online, it’s best to take care of this task as soon as possible.
Step 4: Customize Your WordPress Site
With your domain registered, you can start building and customizing your WordPress site. We highly recommend using our WP Site Builder tool, as it makes the process much more pleasant. If you didn’t enable this option when signing up, you can contact support any time to have it turned on.
The easiest way to access your WordPress dashboard and admin page is to simply navigate to yourwebsitename.com/wp-admin in your browser, where “yourwebsitename.com” is your site’s domain name. You can also access the dashboard by clicking the link in the email you received when setting up your account.
If you enabled the WP Site Builder, you’ll be greeted by a “getting started” wizard the first time you log into your dashboard. This wizard will walk you through three quick steps to begin building your site.
When you’re finished, you’ll land back in your dashboard, with a new item available in the menu: Inspirations. From there, you can edit your WP Site Builder theme and make other changes.
Step 5: Increase Security With an SSL/TLS Certificate
SSL (Secure Sockets Layer) and its successor, TLS (Transport Layer Security), are protocols that help enable secure data transmission online. Sites using SSL/TLS have “https” in the URL, and most browsers display a padlock icon in the address bar to indicate that a site is using this security feature.
We offer a free SSL/TLS certificate for personal websites. E-commerce sites can take advantage of our partnered offer with Sectigo Verified SSL. No matter which offer you’re using, you’ll follow the same steps to add the certificate.
Open your DreamHost panel and navigate to Domains > SSL/TLS Certificates.
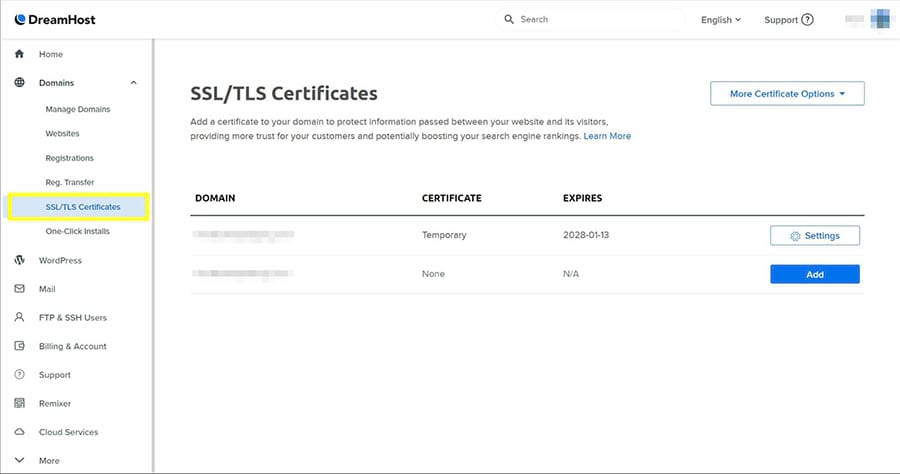
From this screen, you can manage any existing certificates on your sites or add a new one by clicking the Add button. After that, simply follow the instructions provided.
Step 6: Set Up Your Email
Finally, we recommend setting up email on your domain to take advantage of the unlimited email that comes with your Shared Unlimited plan. This gives you a simple and reliable way to communicate with website visitors and customers.
To access your email settings, go to your DreamHost panel and click on Mail.
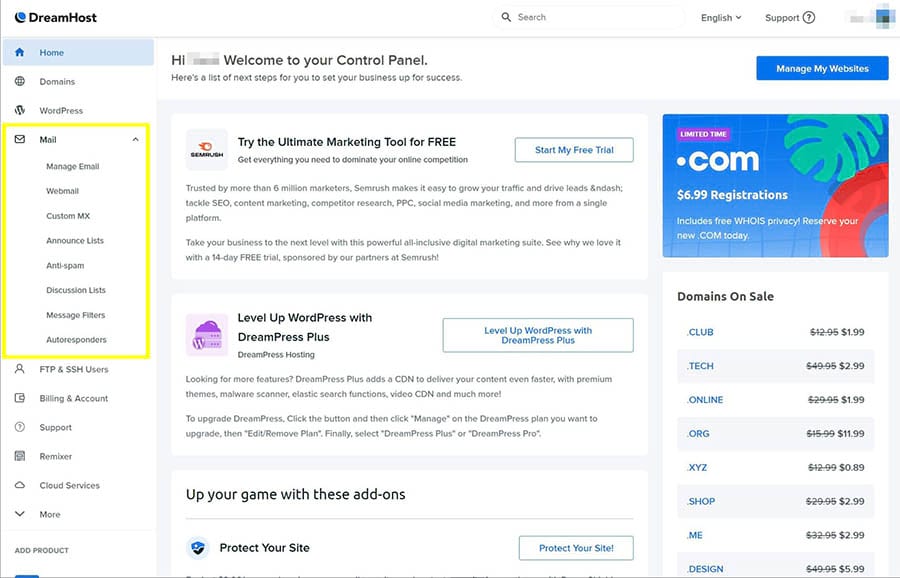
There you’ll find options for accessing your email, adding new email addresses, managing spam settings, and more. To set up email on your new domain, navigate to Webmail and follow the instructions within.
5 Helpful Resources for Learning More About Shared Hosting and WordPress
If you’re anything like us, you could probably spend all day reading about WordPress. Whether you’re as obsessed as we are, or you just want to know more about how to use DreamHost and WordPress together, we’d like to leave you with some handy resources.
These will surely become useful as you create and manage your site with DreamHost.
- The DreamHost Knowledge Base. To learn more about DreamHost, what features we offer, and how to use them, our knowledge base is your ultimate guide. Here you’ll find thorough and clear information and support for any issues that may occur.
- DreamHost’s WordPress Tutorials. This free e-course is intended to help you learn how to use WordPress. It includes guides on everything related to the platform and technical tutorials for developers and other advanced users.
- DreamHost Academy. This is our free guide to help you create your new website. We break down the process step-by-step, so you can get started quickly and understand what you’re doing at the same time. There are also guides available for growing traffic and optimizing your site.
- DreamHost Support. If you have any questions or need help with an issue, our customer support team is always there. They’re available 24/7 to help you out, and they’re so good at it that they’ve even won awards! You and your site couldn’t be in better hands.
- WordPress Support. If you want to discuss anything related to WordPress or need help with something specific to the platform, the official message board is another valuable destination.
At this point, you should have everything you need to make your shared hosting venture a successful one. If you have a question or encounter any problems, you’ll want to check out our knowledge base first. We’ve also created a series of guides to help you identify and fix common WordPress errors:
Get Content Delivered Straight to Your Inbox
Subscribe to our blog and receive great content just like this delivered straight to your inbox.
DreamHost Shared Hosting Guide
When it comes to shared hosting, there are plenty of options out there waiting for you. However, by choosing DreamHost, you’re putting yourself at the very front of the line.
The DreamHost Unlimited Shared hosting plan is the least expensive way to get your website out of your imagination and onto the ‘net, without making any compromises in the process. Do you have any questions about DreamHost’s shared hosting or how to get started? Let us know!
https://www.dreamhost.com/blog/shared-hosting-quick-start-guide/


