Important
Effective from December 2022, the classic Exchange Admin Center will be deprecated for
worldwide customers. Microsoft recommends using the new Exchange Admin Center, if not
already doing so.
While most of the features have been migrated to new EAC, some have been migrated to
other admin centers and remaining ones will soon be migrated to New EAC. Find features
that are not yet there in new EAC at Other Features or use Global Search that will help you
navigate across new EAC.
Important
Mail flow rules are now available in the new Exchange admin center. Try it now!
Prerequisites: Office 365 or Microsoft 365 subscription, Exchange Online Plan.
This article explains how you can send email from devices and business applications when all of your mailboxes are in Microsoft 365 or Office 365. For example:
- You have a scanner, and you want to email scanned documents to yourself or someone else.
- You have a line-of-business (LOB) application that manages appointments, and you want to email reminders to clients of their appointment time.
Option 1: Authenticate your device or application directly with a Microsoft 365 or Office 365 mailbox, and send mail using SMTP AUTH client submission
This option supports most usage scenarios and is the easiest to set up. Choose this option when:
- You want to send email from a third-party hosted application, service, or device.
- You want to send email to people inside and outside your organization.
To configure your device or application, connect directly to Microsoft 365 or Office 365 using the SMTP AUTH client submission endpoint smtp.office365.com.
Each device or application must be able to authenticate with Microsoft 365 or Office 365. The email address of the account that’s used to authenticate with Microsoft 365 or Office 365 will appear as the sender of messages from the device or application.
How to set up SMTP AUTH client submission
Enter the following settings directly on your device or in the application as their guide instructs (it might use different terminology than this article). As long as your scenario meets the requirements for SMTP AUTH client submission, the following settings will enable you to send email from your device or application.
| Device or Application setting | Value |
|---|---|
| Server/smart host | smtp.office365.com |
| Port | Port 587 (recommended) or port 25 |
| TLS/StartTLS | Enabled |
| Username/email address and password | Enter the sign-in credentials of the hosted mailbox being used |
TLS and other encryption options
Determine what version of TLS your device supports by checking the device guide or with the vendor. If your device or application doesn’t support TLS 1.2 or above, you have the following alternatives:
- Depending on your requirements, use direct send (Option 2) or Microsoft 365 or Office 365 SMTP relay (Option 3) instead.
- Use an on-premises email server (Exchange Server or any other SMTP server) to relay mail if your device is unable to meet the previous requirements for connecting to Microsoft 365 or Office 365. In fact, you might find it easier to configure and manage an on-premises SMTP server to relay messages from your devices and applications, especially if you have many devices and applications that send email.
To find out more about configuring your own email server to send mail to Microsoft 365 or Office 365, see Set up connectors to route mail between Microsoft 365 or Office 365 and your own email servers.
Note
If your device recommends or defaults to port 465, it doesn’t support SMTP AUTH client submission.
Features of SMTP AUTH client submission
- SMTP AUTH client submission allows you to send email to people in your organization and outside your company.
- This method bypasses most spam checks for email sent to people in your organization. This bypass can help protect your company IP addresses from being blocked by a spam list.
- With this method, you can send email from any location or IP address, including your (on-premises) organization’s network, or a third-party cloud hosting service, like Microsoft Azure.
Requirements for SMTP AUTH client submission
- Authentication: If possible, we recommend using Modern Authentication in the form of OAuth. Otherwise, you’ll need to use Basic Authentication (which is simply a username and password) to send email from the device or application. To find out more about OAuth, see Authenticate an IMAP, POP, or SMTP connection using OAuth. If SMTP AUTH is intentionally disabled for the organization or the mailbox being used, you must use Option 2 or 3 below.
- Mailbox: You must have a licensed Microsoft 365 or Office 365 mailbox to send email from.
- Transport Layer Security (TLS): Your device must be able to use TLS version 1.2 and above.
- Port: Port 587 (recommended) or port 25 is required and must be unblocked on your network. Some network firewalls or ISPs block ports, especially port 25, because that’s the port that email servers use to send mail.
- DNS: Use the DNS name smtp.office365.com. Do not use an IP address for the Microsoft 365 or Office 365 server, as IP Addresses are not supported.
Limitations of SMTP AUTH client submission
- You can only send from one email address unless your device can store login credentials for multiple Microsoft 365 or Office 365 mailboxes.
- Microsoft 365 or Office 365 imposes some sending limits. See Exchange Online limits – Receiving and sending limits for more information.
Option 2: Send mail directly from your printer or application to Microsoft 365 or Office 365 (direct send)
Choose this option when:
- Your environment has SMTP AUTH disabled.
- SMTP AUTH client submission (Option 1) is not compatible with your business needs or with your device.
- You only need to send messages to recipients in your own organization who have mailboxes in Microsoft 365 or Office 365; you don’t need to send email to people outside of your organization.
Other scenarios when direct send may be your best choice:
-
You want your device or application to send from each user’s email address and do not want each user’s mailbox credentials configured to use SMTP client submission. Direct send allows each user in your organization to send email using their own address.
Avoid using a single mailbox with Send As permissions for all your users. This method is not supported because of complexity and potential issues.
-
You want to send bulk email or newsletters. Microsoft 365 or Office 365 does not allow you to send bulk messages via SMTP AUTH client submission. Direct send allows you to send a higher volume of messages.
There is a risk of your email being marked as spam by Microsoft 365 or Office 365. You might want to enlist the help of a bulk email provider to assist you. For example, they’ll help you adhere to best practices, and can help ensure that your domains and IP addresses are not blocked by others on the internet.
Settings for direct send
Enter the following settings on the device or in the application directly.
| Device or application setting | Value |
|---|---|
| Server/smart host | Your MX endpoint, for example, contoso-com.mail.protection.outlook.com |
| Port | Port 25 |
| TLS/StartTLS | Optional |
| Email address | Any email address for one of your Microsoft 365 or Office 365 accepted domains. This email address does not need to have a mailbox. |
We recommend adding an SPF record to avoid having messages flagged as spam. If you are sending from a static IP address, add it to your SPF record in your domain registrar’s DNS settings as follows:
| DNS entry | Value |
|---|---|
| SPF | v=spf1 ip4: |
Step-by-step instructions for direct send
-
If your device or application can send from a static public IP address, obtain this IP address and make a note of it. You can share your static IP address with other devices and users, but don’t share the IP address with anyone outside of your company. Your device or application can send from a dynamic or shared IP address but messages are more prone to antispam filtering.
-
Sign in to the Microsoft 365 admin center.
-
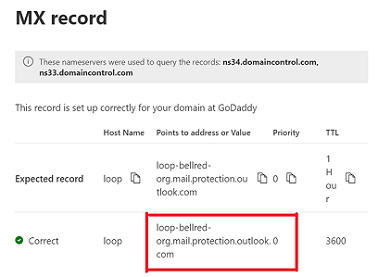
Go to Settings > Domains, select your domain (for example, contoso.com), and find the MX record.
The MX record will have data for Points to address or value that looks similar to
contoso-com.mail.protection.outlook.com. -
Make a note of the data of Points to address or value for the MX record, which we refer to as your MX endpoint.
-
Go back to the device, and in the settings, under what would normally be called Server or Smart Host, enter the MX record Points to address or value you recorded in step 4.
Note
Do NOT use an IP address for the Microsoft 365 or Office 365 server connection, as IP addresses are not supported.
-
Now that you are done configuring your device settings, go to your domain registrar’s website to update your DNS records. Edit your sender policy framework (SPF) record. In the entry, include the IP address that you noted in step 1. The finished string looks similar to the following example:
v=spf1 ip4:10.5.3.2 include:spf.protection.outlook.com ~allwhere 10.5.3.2 is your public IP address.
Caution
This IP address will be authorized to send on your domain’s behalf. Anyone with access to it could send email to any external recipient and it would pass SPF checking. You should consider carefully who has access to use this IP address.
Note
Skipping this step might cause email to be sent to recipient Junk Email folders.
-
To test the configuration, send a test email from your device or application, and confirm that the recipient received it.
How direct send works
The application or device in your organization’s network uses direct send and your Microsoft 365 or Office 365 mail exchange (MX) endpoint to email recipients in your organization. It’s easy to find your MX endpoint in Microsoft 365 or Office 365 if you need to look it up.
You can configure your device to send email direct to Microsoft 365 or Office 365. Use direct send to relay email to recipients with Microsoft 365 or Office 365 mailboxes in your organization. If your device uses direct send to try to relay an email for a recipient who doesn’t have a Microsoft 365 or Office 365 mailbox, the email will be rejected.
Note
If your device or application has the ability to act as a email server to deliver messages to Microsoft 365 or Microsoft 365 or Office 365 as well as other email providers, there are no Microsoft 365 or Office 365 settings needed for this scenario. For more information, see your device or application instructions.
Features of direct send
- Uses Microsoft 365 or Office 365 to send emails, but does not require a dedicated Microsoft 365 or Office 365 mailbox.
- Doesn’t require your device or application to have a static IP address. However, it is recommended for your device or application to have a static IP address, if possible.
- Doesn’t work with a connector; never configure a device to use a connector with direct send because such a configuration can cause problems.
- Doesn’t require your device to support TLS.
Direct send has higher sending limits than SMTP client submission. Senders are not bound by the limits described in Option 1.
Requirements for direct send
- Port: Port 25 is required and must be unblocked on your network.
- Static IP address is recommended: A static IP address is recommended so that an SPF record can be created for your domain. The SPF record helps avoid your messages being flagged as spam.
- Does not require a Microsoft 365 or Office 365 mailbox with a license.
Limitations of direct send
- Direct send cannot be used to deliver email to external recipients, for example, recipients with Yahoo or Gmail addresses.
- Your messages will be subject to antispam checks.
- Sent mail might be disrupted if your IP addresses are blocked by a spam list.
- Microsoft 365 and Office 365 use throttling policies to protect the performance of the service.
Option 3: Configure a connector to send mail using Microsoft 365 or Office 365 SMTP relay
This option is more difficult to implement than the others. Only choose this option when:
- Your environment has SMTP AUTH disabled.
- SMTP client submission (Option 1) is not compatible with your business needs or with your device
- You can’t use direct send (Option 2) because you must send email to external recipients.
SMTP relay lets Microsoft 365 or Office 365 relay emails on your behalf by using a connector that’s configured with your public IP address or a TLS certificate. Setting up a connector makes this option more complicated.
Settings for Microsoft 365 or Office 365 SMTP relay
| Device or application setting | Value |
|---|---|
| Server/smart host | Your MX endpoint, for example, yourdomain-com.mail.protection.outlook.com |
| Port | Port 25 |
| TLS/StartTLS | Enabled |
| Email address | Any email address in one of your Microsoft 365 or Office 365 verified domains. This email address does not need a mailbox. |
If you already have a connector that’s configured to deliver messages from your on-premises organization to Microsoft 365 or Office 365 (for example, a hybrid environment), you probably don’t need to create a dedicated connector for Microsoft 365 or Office 365 SMTP relay. If you need to create a connector, use the following settings to support this scenario:
| Connector setting | Value |
|---|---|
| From | Your organization’s email server |
| To | Microsoft 365 or Office 365 |
| Domain restrictions: IP address/range | Your on-premises IP address or address range that the device or application will use to connect to Microsoft 365 or Office 365 |
We recommend adding an SPF record to avoid having messages flagged as spam. If you are sending from a static IP address, add it to your SPF record in your domain registrar’s DNS settings as follows:
| DNS entry | Value |
|---|---|
| SPF | v=spf1 ip4: |
Step-by-step configuration instructions for SMTP relay
-
Obtain the public (static) IP address that the device or application with send from. A dynamic IP address isn’t supported or allowed. You can share your static IP address with other devices and users, but don’t share the IP address with anyone outside of your company. Make a note of this IP address for later.
-
Sign in to the Microsoft 365 admin center.
-
Go to Settings > Domains, select your domain (for example, contoso.com), and find the MX record.
The MX record will have data for Points to address or value that looks similar to
contoso-com.mail.protection.outlook.com. -
Make a note of data of Points to address or value for the MX record, which we refer to as your MX endpoint.
-
Check that the domains that the application or device will send to have been verified. If the domain is not verified, emails could be lost, and you won’t be able to track them with the Exchange Online message trace tool.
-
In Microsoft 365 or Office 365, select Admin and then Exchange to go to the new Exchange admin center.
Note
On clicking Exchange, the new Exchange admin center is launched. If you want to navigate to the Classic Exchange admin center, click Classic Exchange admin center on the left pane of the new Exchange admin center home page.
-
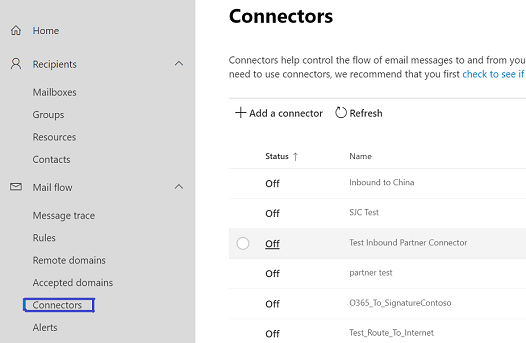
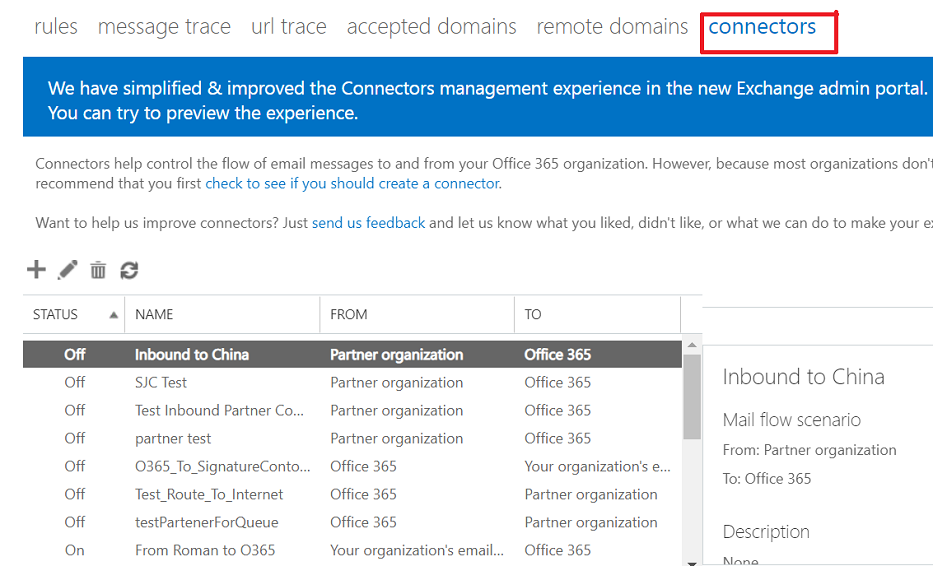
In the Exchange admin center (EAC), go to Mail flow > Connectors. The Connectors screen is depicted in the subsequent two images below, for New EAC and Classic EAC, respectively.
-
Check the list of connectors set up for your organization. If there is no connector listed from your organization’s email server to Microsoft 365 or Office 365, create a connector in the Exchange admin center (EAC):
-
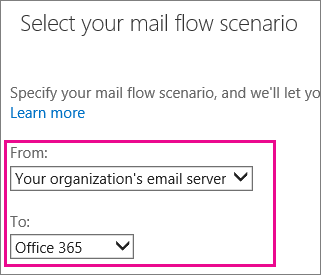
Classic EAC:
-
Open the EAC at https://admin.protection.outlook.com/ecp/ and go to Mail flow > Connectors, and then click Add
 . In the wizard that opens, choose the options that are depicted in the following screenshot on the first screen:
-
Click Next, and give the connector a name.
-
On the next screen, choose By verifying that the IP address of the sending server matches one of these IP addresses that belong to your organization, and add the IP address from Step 1.
-
Leave all the other fields with their default values, and select Save.
-
-
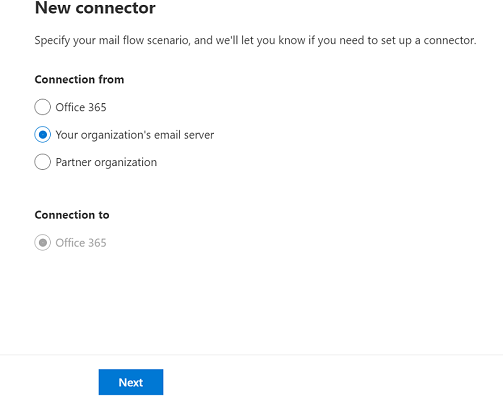
New EAC:
-
Open the EAC at https://admin.protection.outlook.com/ecp/ and go to Mail flow > Connectors. Or, to go directly to the Connectors page, use https://admin.exchange.microsoft.com/#/connectors.
-
Click Add a connector
 . In the wizard that opens, choose the options that are depicted in the following screenshot on the first screen:
-
Click Next. The Connector name screen appears.
-
Provide a name for the connector and click Next. The Authenticating sent email screen appears.
-
Choose By verifying that the IP address of the sending server matches one of these IP addresses which belong exclusively to your organization, and add the IP address from Step 1 of Step-by-step configuration instructions for SMTP relay section.
-
Click Save.
-
-
-
Now that you’re done with configuring your Microsoft 365 or Office 365 settings, go to your domain registrar’s website to update your DNS records. Edit your SPF record. Include the IP address that you noted in step 1. The finished string should look similar to this
v=spf1 ip4:10.5.3.2 include:spf.protection.outlook.com ~all, where 10.5.3.2 is your public IP address. Skipping this step can cause email to be sent to recipient Junk Email folders. -
Now, go back to the device, and in the settings, find the entry for Server or Smart Host, and enter the MX record POINTS TO ADDRESS value that you recorded in step 3.
-
To test the configuration, send a test email from your device or application, and confirm that it was received by the recipient.
Configure a certificate-based connector to relay email through Microsoft 365 or Office 365
If your devices or applications are capable of using a certificate for mail flow, you can configure a certificate-based connector to relay email through Microsoft 365 or Office 365.
To do this task, verify the subject name on the certificate used by the sending device or application. The common name (CN) or subject alternative name (SAN) in the certificate should contain a domain name that you have registered in Microsoft 365 or Office 365. Also, you must create a certificate-based connector in Microsoft 365 or Office 365 with this same domain name to accept and relay emails coming from these devices, applications, or any other on-premises server. For more information about this method, see important notice for email customers who have configured connectors.
How Microsoft 365 or Office 365 SMTP relay works
The application or device in your organization’s network uses a connector for SMTP relay to email recipients in your organization.
-
The Microsoft 365 or Office 365 connector that you configure authenticates your device or application with Microsoft 365 or Office 365 using an IP address. Your device or application can send email using any address (including ones that can’t receive mail), as long as the address uses one of your domains. It is not mandatory for the email address to be associated with an actual mailbox. For example, if your domain is contoso.com, you could send from an address like [email protected].
-
Microsoft 365 or Office 365 SMTP relay uses a connector to authenticate the mail sent from your device or application. This authentication method allows Microsoft 365 or Office 365 to relay those messages to your own mailboxes and external recipients. Microsoft 365 or Office 365 SMTP relay is similar to direct send except that it can send mail to external recipients.
-
Due to the added complexity of configuring a connector, direct send is recommended over Microsoft 365 or Office 365 SMTP relay, unless you must send email to external recipients. To send email using Microsoft 365 or Office 365 SMTP relay, your device or application server must have a static IP address or address range. You can’t use SMTP relay to send email directly to Microsoft 365 or Office 365 from a third-party hosted service, such as Microsoft Azure. For more information, see Troubleshoot outbound SMTP connectivity issues in Azure.
Features of Microsoft 365 or Office 365 SMTP relay
- Microsoft 365 or Office 365 SMTP relay doesn’t require the use of a licensed Microsoft 365 or Office 365 mailbox to send emails.
- Microsoft 365 or Office 365 SMTP relay has higher sending limits than SMTP client submission. Senders are not subject to the limits described in Option 1.
Requirements for Microsoft 365 or Office 365 SMTP relay
- Static IP address or address range: Most devices or applications are unable to use a certificate for authentication. To authenticate your device or application, use one or more static IP addresses that are not shared with another organization.
- Connector: Set up a connector in Exchange Online for email sent from your device or application.
- Port: Port 25 is required. Ensure this port is not blocked on your network or by your ISP.
Limitations of Microsoft 365 or Office 365 SMTP relay
- Sent mail can be disrupted if your IP addresses are blocked by a spam list.
- Reasonable limits are imposed for sending. For more information, see High-risk delivery pool for outbound messages.
- Requires static unshared IP addresses (unless a certificate is used).
- The connecting client is expected to retry within a reasonable period, in case of transient failures. Microsoft recommends the connecting client to maintain SMTP logs to help investigate these types of failures.
Note
As per SMTP RFC suggestion, Option 1 SMTP AUTH client submission may be more appropriate method for an SMTP client/application, which is not a full-featured mail server (MTA).
Compare the options
Here’s a comparison of each configuration option and the features they support.
| Features | SMTP client submission | Direct send | SMTP relay |
|---|---|---|---|
| Send to recipients in your domain(s) | Yes | Yes | Yes |
| Relay to internet via Microsoft 365 or Office 365 | Yes | No. Direct delivery only. | Yes |
| Bypasses antispam | Yes, if the mail is destined for one of your Microsoft 365 or Office 365 mailboxes. | No. Suspicious emails might be filtered. We recommend a custom Sender Policy Framework (SPF) record. | No. Suspicious emails might be filtered. We recommend a custom SPF record. |
| Supports mail sent from applications hosted by a third party | Yes | Yes. We recommend updating your SPF record to allow the third party to send as your domain. | No |
| Saves to Sent Items folder | Yes | No | No |
| Requirements | |||
| Open network port | Port 587 or port 25 | Port 25 | Port 25 |
| Device or application server must support TLS | Required | Optional | Optional |
| Requires authentication | Microsoft 365 or Office 365 username and password required | None | One or more static IP addresses. Your printer or the server running your LOB app must have a static IP address to use for authentication with Microsoft 365 or Office 365. |
Here are the limitations of each configuration option:
| Limitations | SMTP client submission | Direct send | SMTP relay |
|---|---|---|---|
| Throttling limits | 10,000 recipients per day. 30 messages per minute. | Standard throttling is in place to protect Microsoft 365 or Office 365. | Reasonable limits are imposed. The service can’t be used to send spam or bulk mail. For more information about reasonable limits, see High-risk delivery pool for outbound messages. |
Run diagnostic to Set up applications or devices sending email using Microsoft 365
Note
This feature requires a Microsoft 365 administrator account.
If you still need help to set up applications or devices sending email using Microsoft 365 or you need help fixing issues with applications or devices sending email using Microsoft 365, you can run an automated diagnostic.
To run the diagnostic check, select the following button:
A flyout page opens in the Microsoft 365 admin center. Select the appropriate option that you are looking for, eg. new setup or troubleshooting existing setup.
Use your own email server to send email from multifunction devices and applications
If you happen to have an on-premises email server, you should seriously consider using that server for SMTP relay instead of Microsoft 365 or Office 365. A local email server that you have physical access to is much easier to configure for SMTP relay by devices and applications on your local network. The details about how to do this configuration depends on your on-premises email server. For Exchange Server, see the following articles:
Related articles
Set up connectors to route mail between Microsoft 365 or Office 365 and your own email servers
https://learn.microsoft.com/en-us/exchange/mail-flow-best-practices/how-to-set-up-a-multifunction-device-or-application-to-send-email-using-microsoft-365-or-office-365


