If you have never installed Wagtail or Django on shared hosting where you have no root access, it can be somewhat confusing to set up because there are some extra steps you must do before you set up your application.
This Knowledge Base article will guide you through the installation of Wagtail.
If you aren’t familiar with Wagtail, check out it’s official documentation by clicking here.
Let’s begin!
How to Install Wagtail on Shared Hosting without Root
Step 1: Login to your cPanel. There’s a lot of ways to do this, but the sure-fire easiest way is to log in to your Client Area, then open your cPanel.
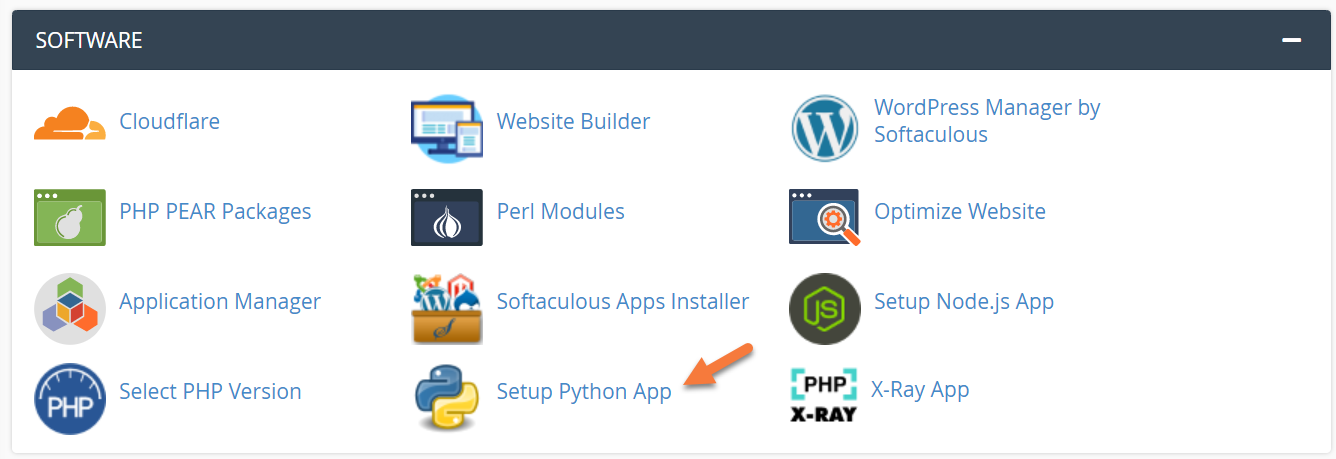
Step 2: Once your cPanel is open, scroll down to the Software section and open the Setup Python App link.
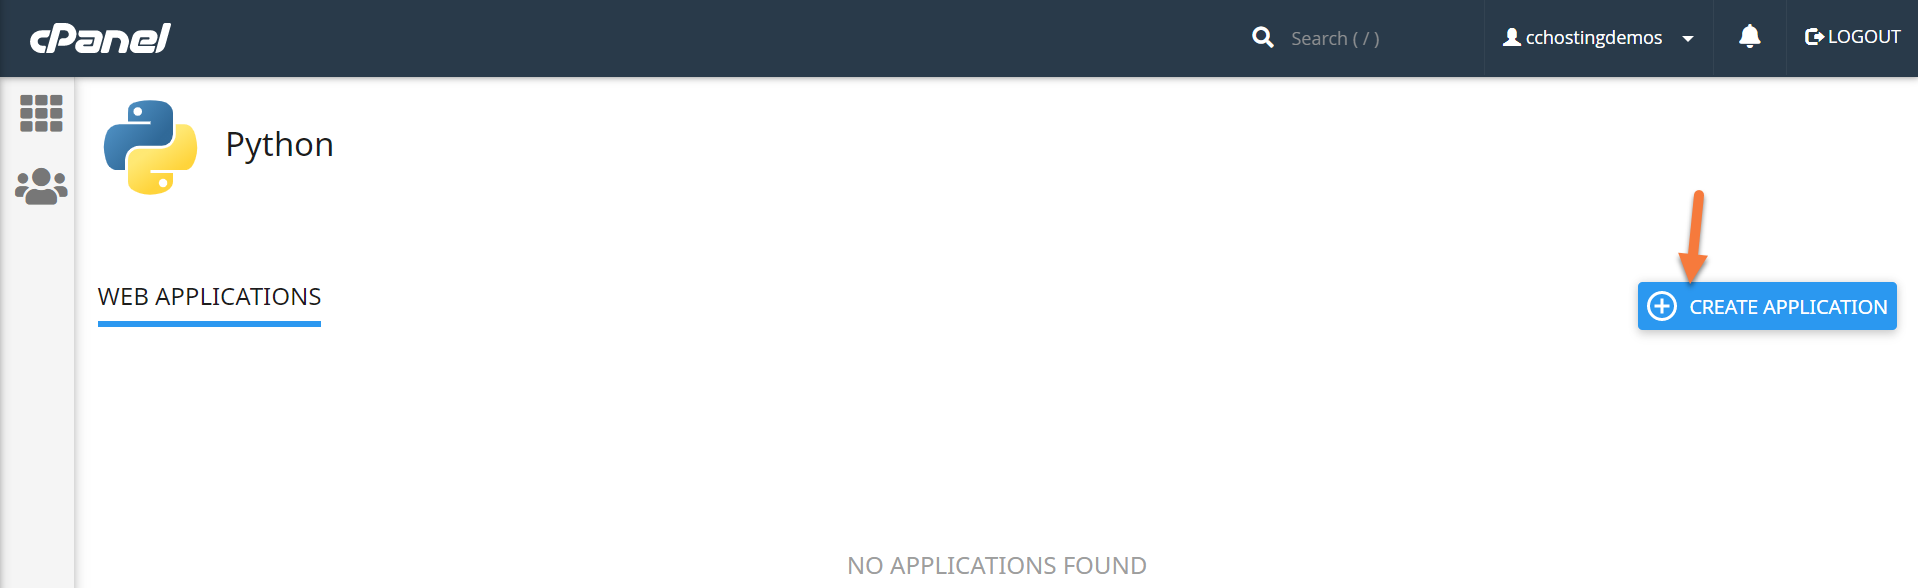
Step 3: Once the Python app opens, click Create Application in the top right corner.
Step 4: You will be presented with a blank Application setup screen, much like the one below:
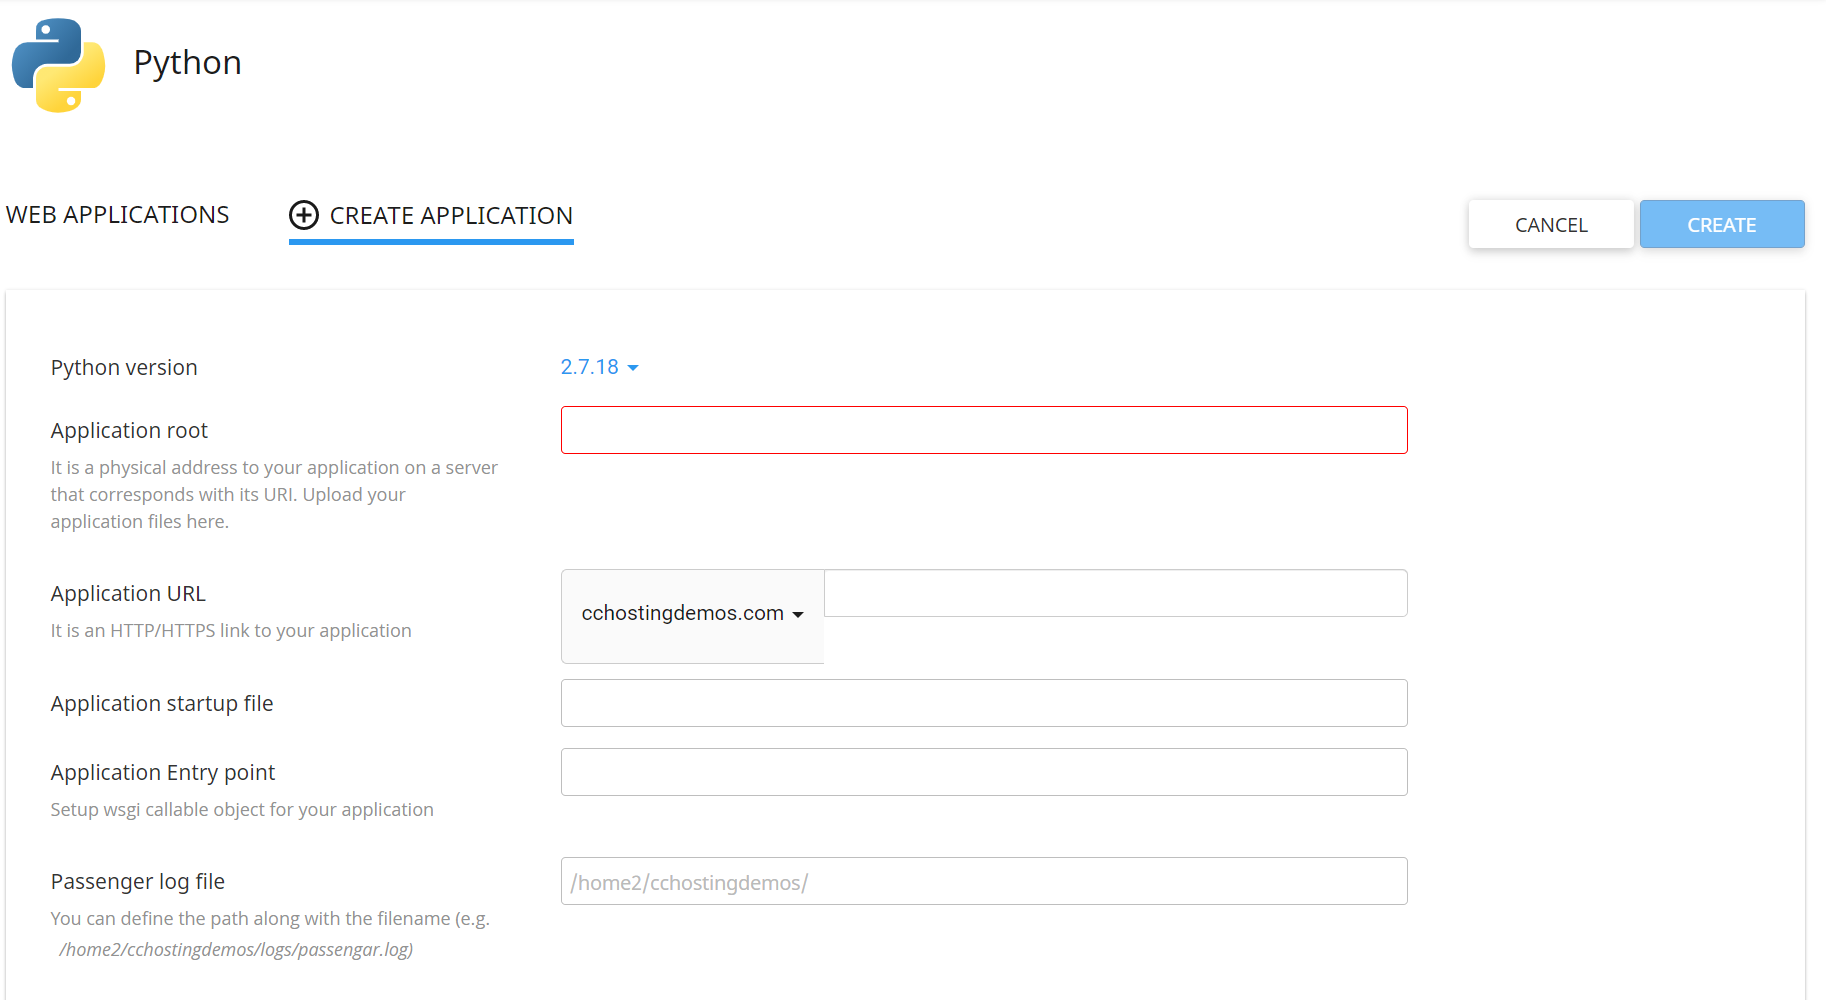
- In Python Version, select the version to use in the virtual Python environment. As of this writing, Wagtail requires Python version 3.7.10, so be sure to choose that version.
- In Application Root, enter the name of the folder associated to your domain that will be used to store the files of the web app.
- For application URL, choose the domain or subdomain to use for the application. You can also append a URL location, like /wagtail, if you wish.
- Leave the Application Startup File and Application Entry Point fields blank. They will be auto-populated.
- In the Passenger log file, enter the name and path to the Phusion Passenger log file. You will be creating this path here, it doesn’t have to already exist.
- There are no environment variables to add.
Once you’ve filled in the required fields, the screen should look like this:

Click Create in the top right corner to create the environment.
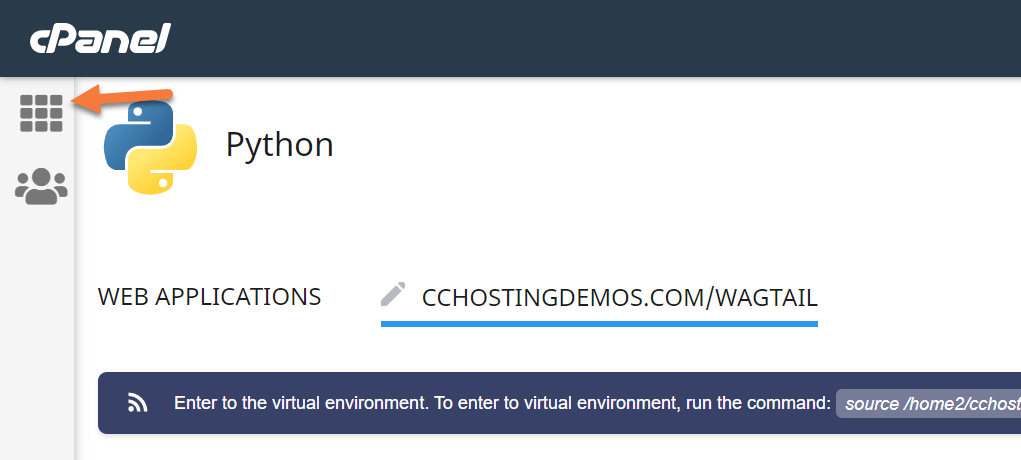
Step 5: Your web app will now be listed in the Web Applications list.
Next, we need to obtain the line of code to activate the application. To do this, click the pencil icon next to your App:

The Application “Editor” allows you to perform some key functions for your Python app, so let’s take a look at those real quick so you are aware:
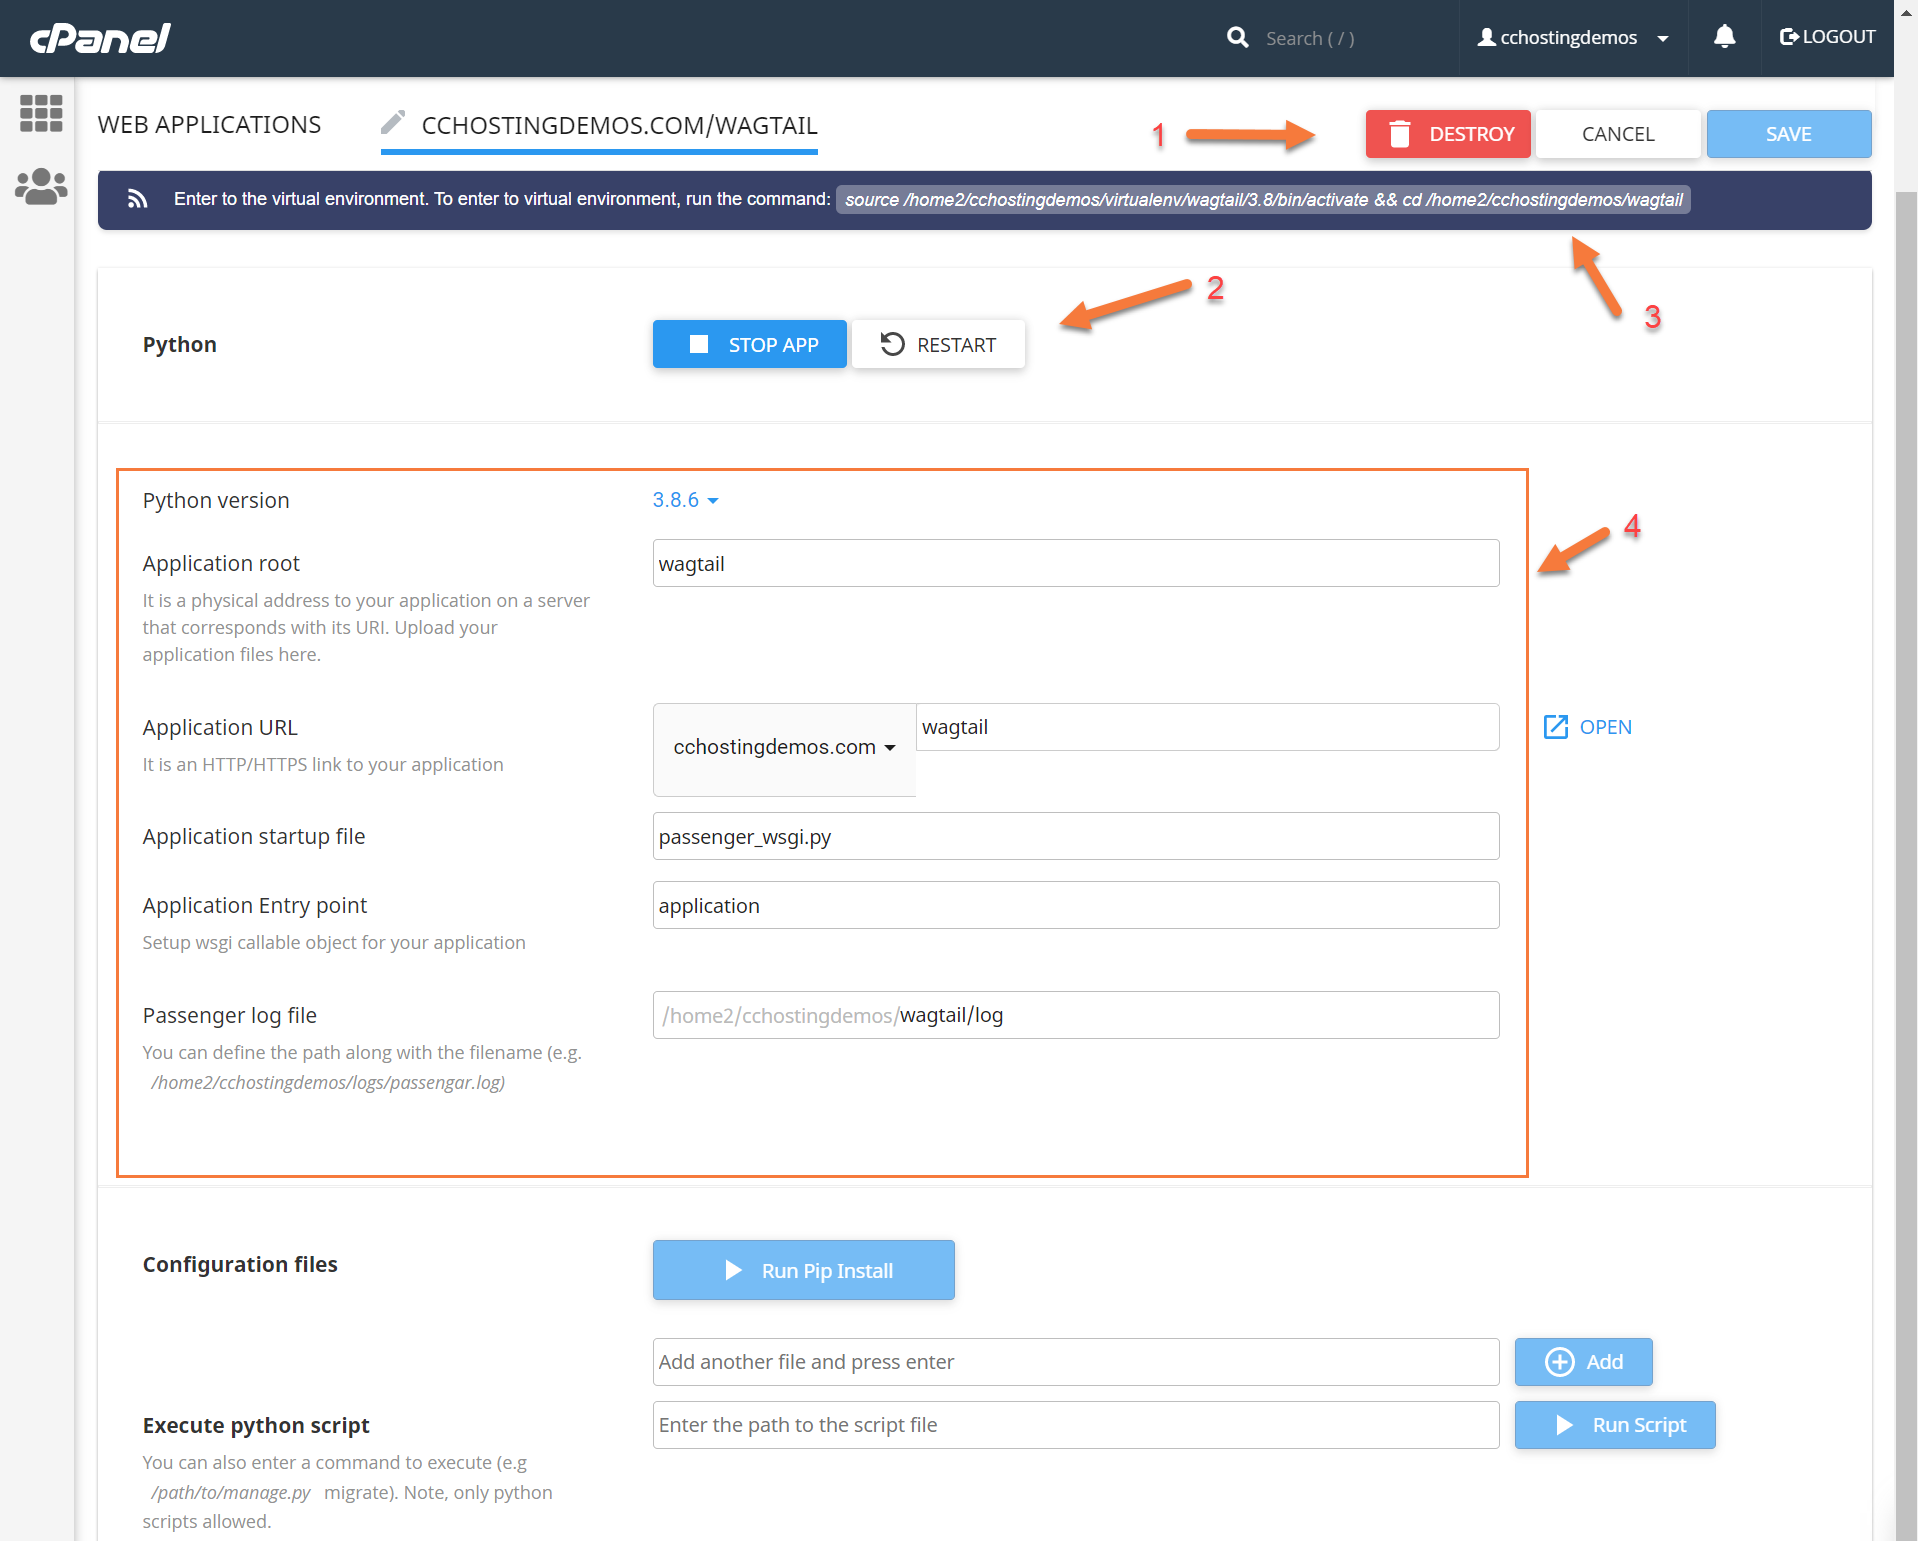
- At the top of the page is the option to destroy this application, cancel, or save any changes you made.
- The Restart and Stop App settings allow you to do as they say – Restart your app or Stop the app.
- The text at the top is the command line code you will use in the coming step to activate and enter the virtual environment for this Python app.
- The main settings allow you to control the following:
- Python Version
- Application root directory
- Application URL
- Application startup file
- Application Entry Point
- Passenger Log File
To proceed to the next step, we need to copy the command at the top of the page to our clipboard.

To do this, single-click the text. The ‘code’ is written on the page in such a way that a single click anywhere in the command that has a purple background will automatically be copied to your clipboard.
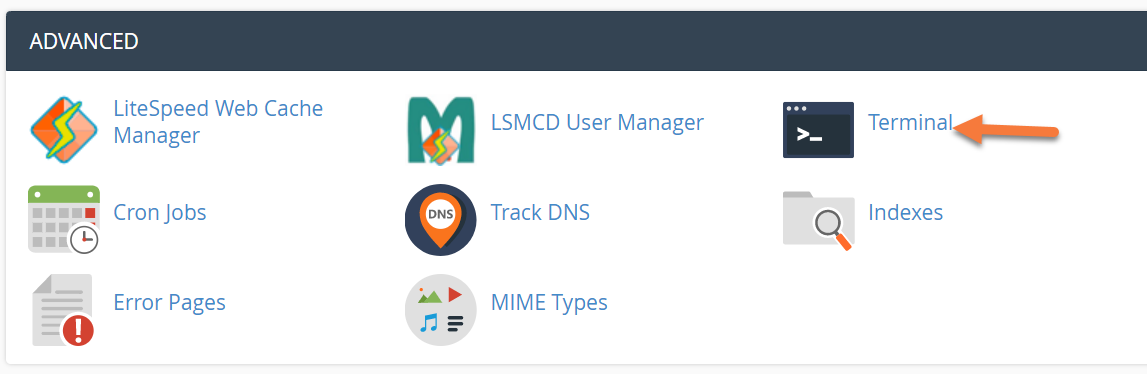
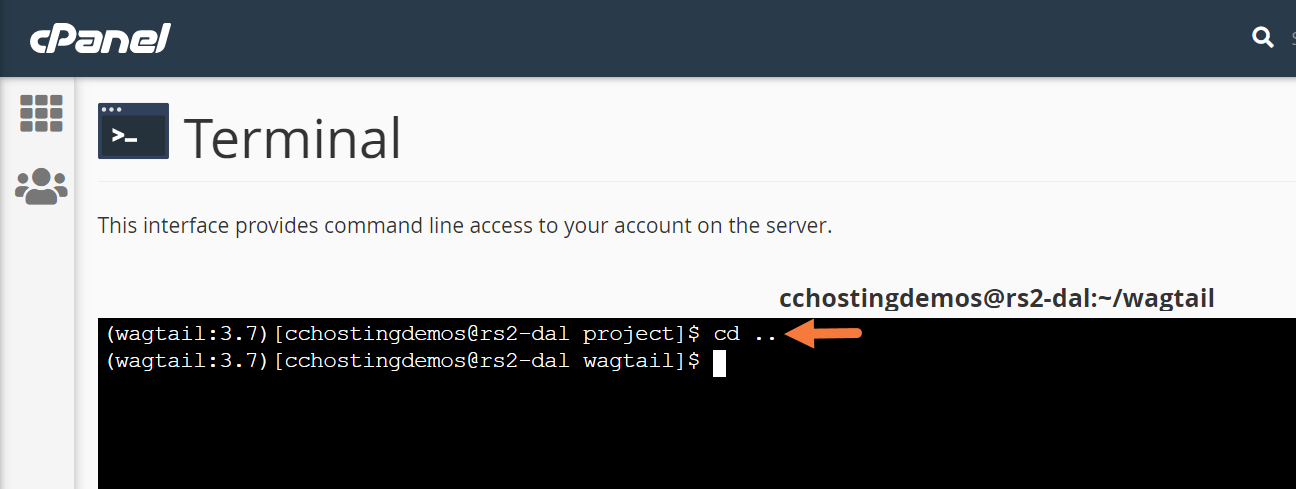
Step 6: Now, return to the cPanel Home Screen by clicking the 9 squared-square in the top left corner.
Once on the home screen of cPanel, scroll down to the Advanced section and click the Terminal app.
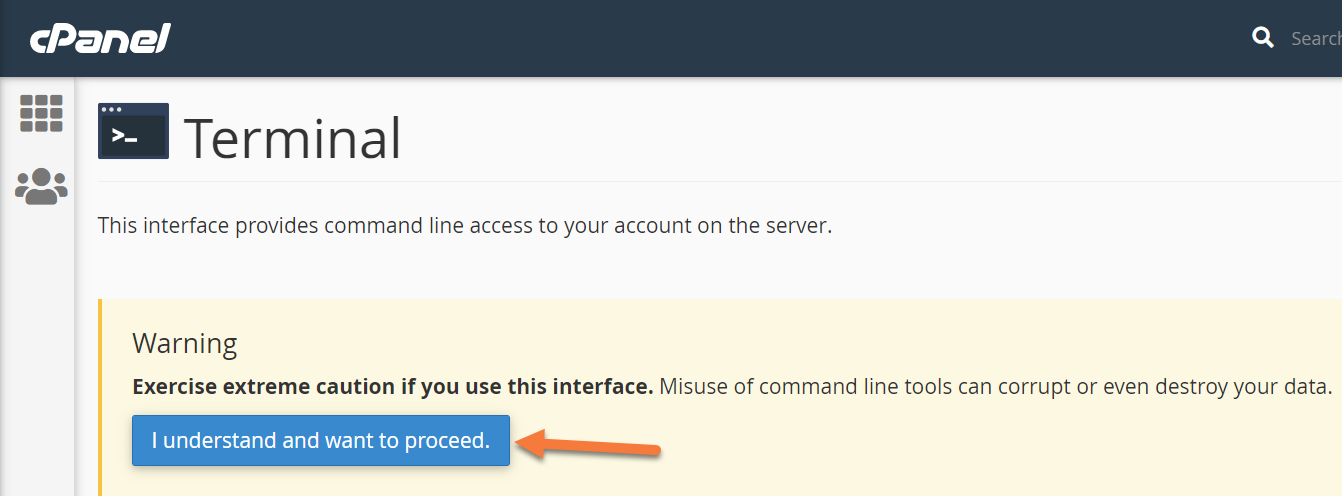
You will see a warning screen like the one below. Click I understand and want to proceed to continue.
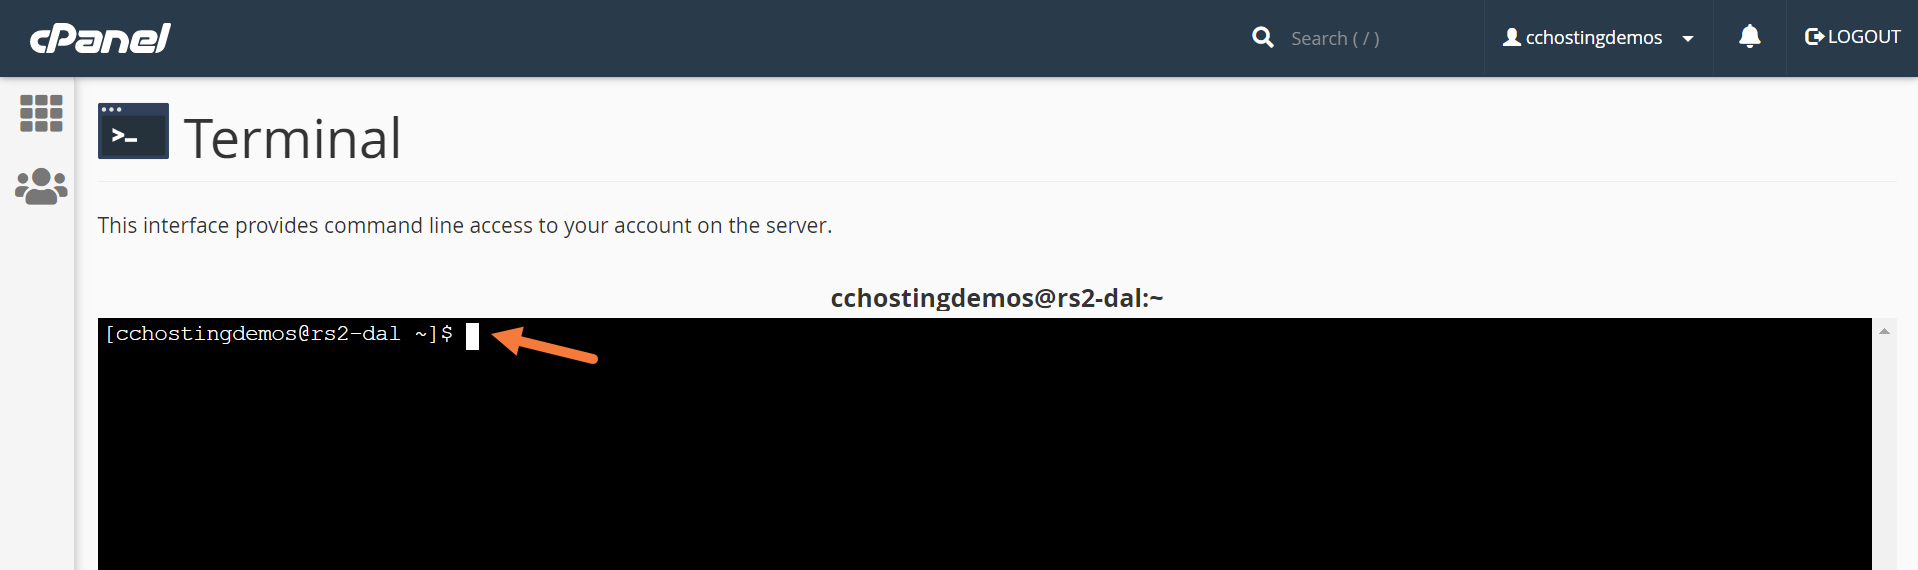
Step 7: The terminal will be open and you will be taken to your prompt:
Using your mouse, right-click in the black space of the terminal and choose paste to paste the command you copied earlier from the Python app:
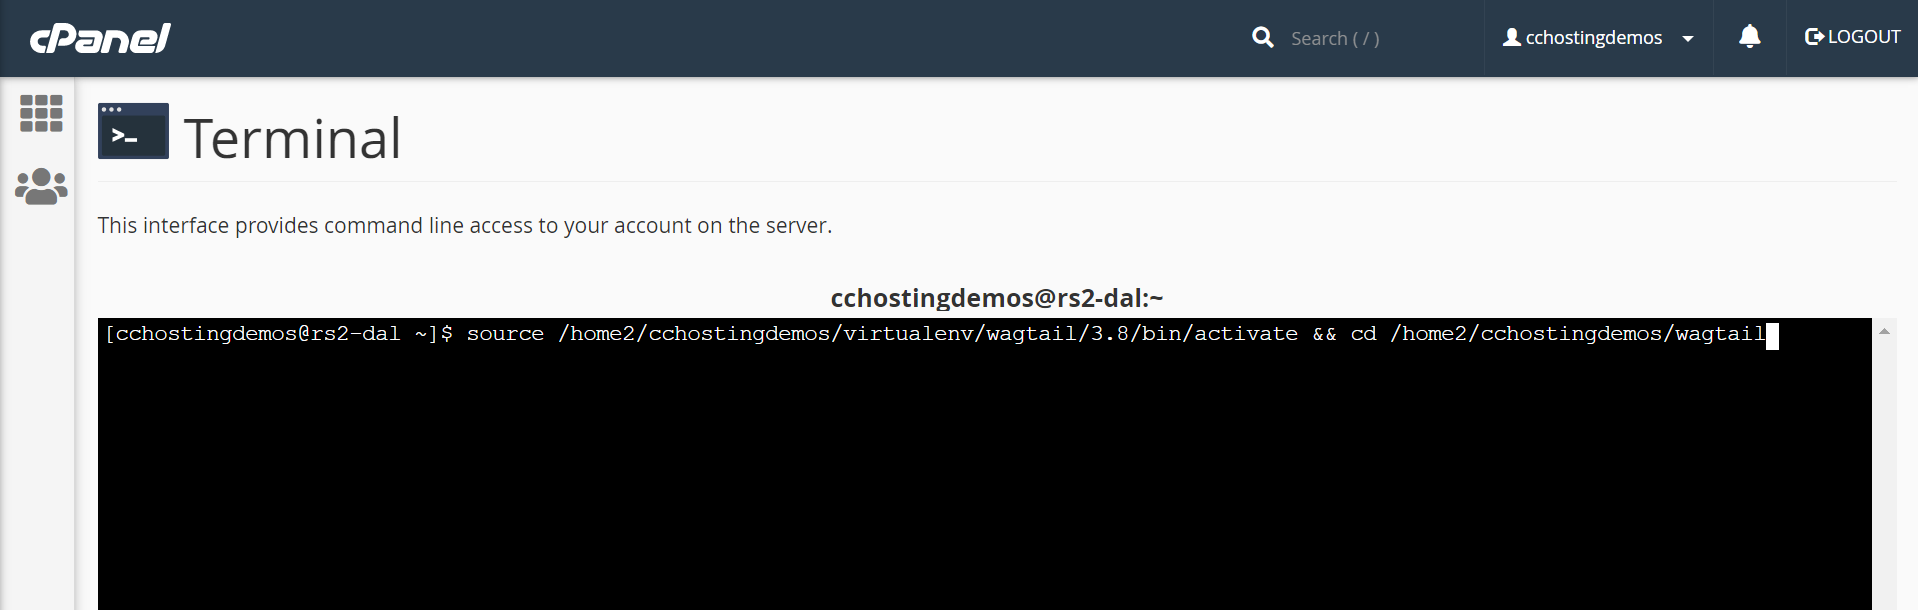
Once you’ve pasted in the test, press the enter/return key on your keyboard to run the command. Your Terminal Prompt should look similar to mine (below) after running the command.

Note on the new line, before my cPanel username is (wagtail:3.8). This indicates I’m now in the wagtail environment.
Step 8: Next you need to change the directory (cd) into the directory where your wagtail directory is located.
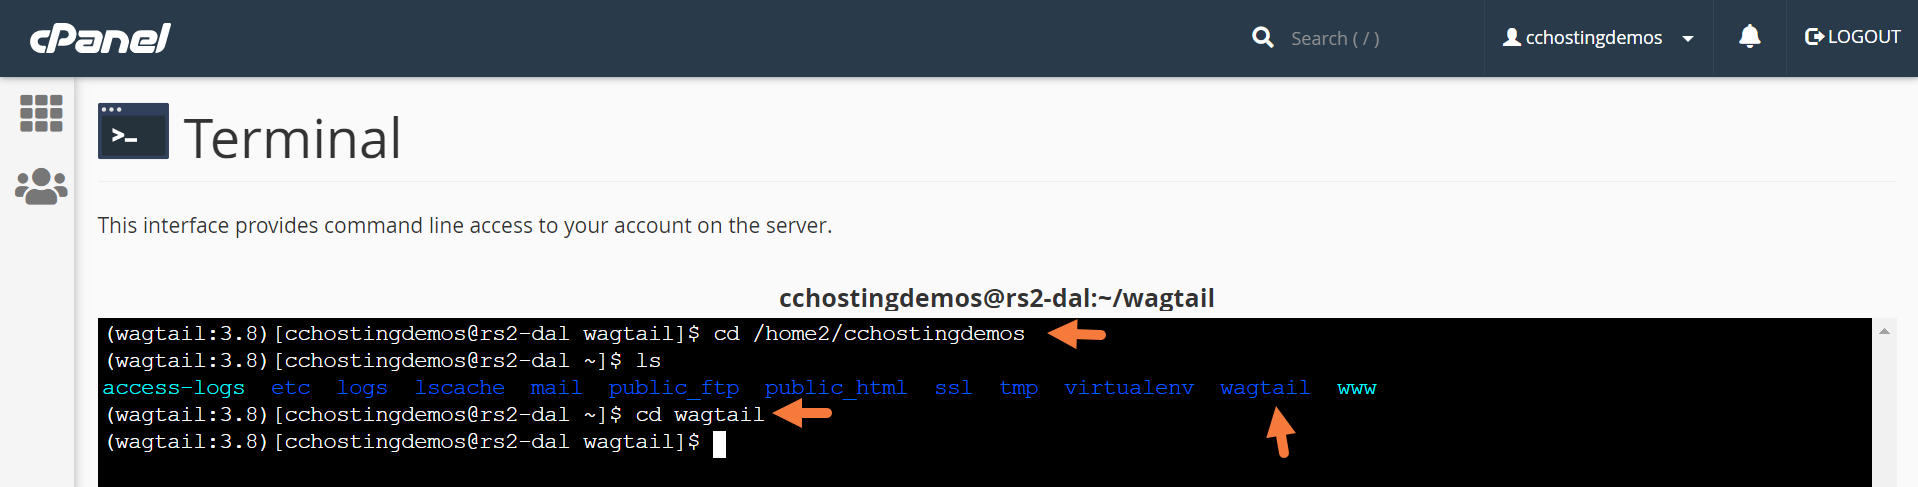
Let’s break down what you see in the image above, as many people aren’t really comfortable with the command line (Terminal):
- First I used the cd command to change directories into the directory where my wagtail directory is located. This command is cd /home2/mycpanelusername
- Following that I used the ls command to list the files/folders in the directory /home2/cchostingdemos. The output of that is what you see in a few different colors and as you can see, the wagtail directory is listed.
- Next, I used the cd command again to change directories into the wagtail directory.
- As you can see in the end, I am now in the wagtail directory.
Step 9: Now we need to upgrade pip. PIP is the package manager for Python. If you are familiar with apt or yum on Linux, it’s very similar.
To do this, type the following command in your Terminal then press return/enter on your keyboard to execute the command.
pip install --upgrade pip
Your Terminal should run a couple of commands, then send you back to prompt. It should look like this, or very very similar:

As long as you see a message like this:
Successfully installed pip-(version number here) and you are sent back to a ready prompt, you’re good to go!
Step 10: Next you need to install Wagtail. To do this, run the following command in your Terminal prompt:
pip install wagtail
Your prompt should look like this when done:
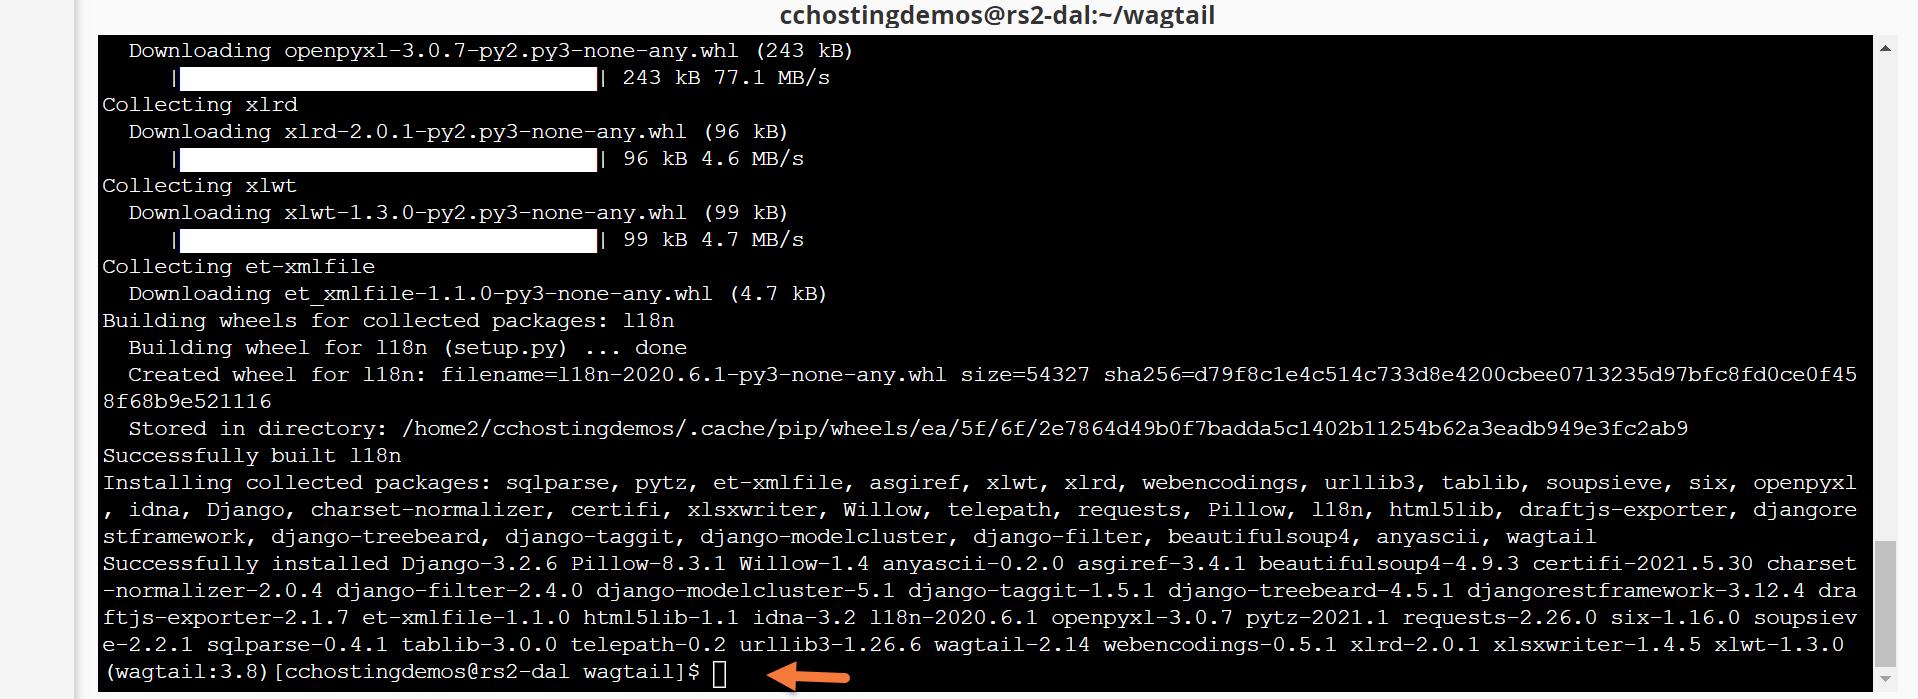
Congrats, now you’ve installed Wagtail!
Step 11: Next, you need to create a project. To do this, use the following command in your terminal:
wagtail start project
Except replace the word project with the name of your Wagtail project.
Your terminal output should look similar to the output below:
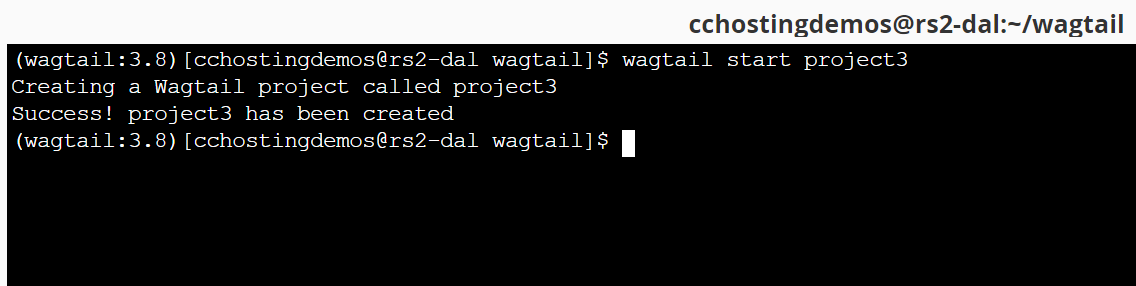
Perfect, my project called project3, has been created.
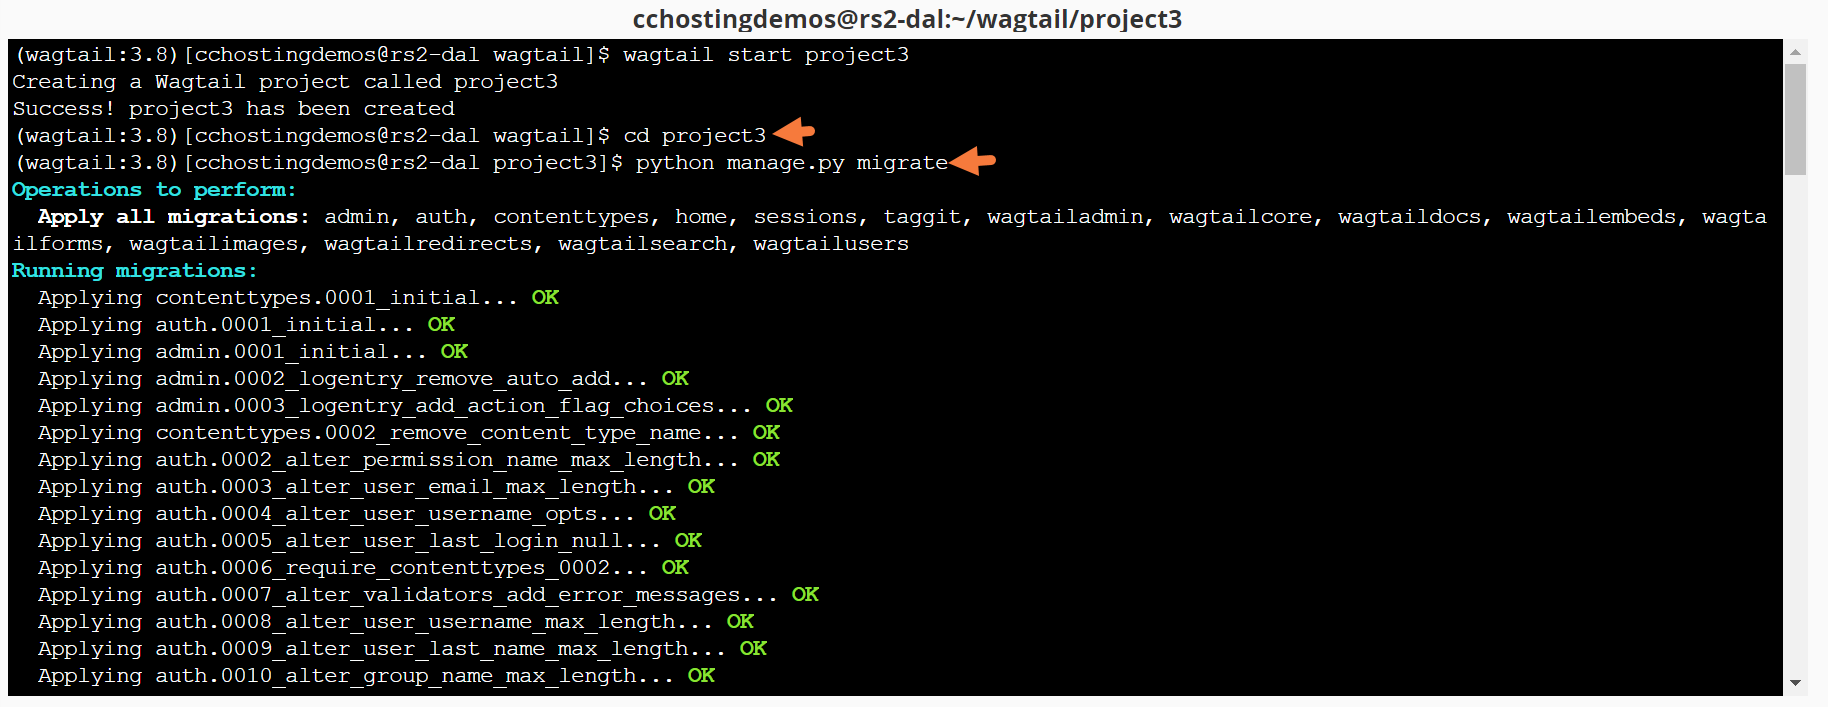
Step 12: Next, you need to navigate to the project folder and run migrations. To do this, run the following command:
cd project3 (replace project3 with the name of your project)
Followed by this command:
python manage.py migrate
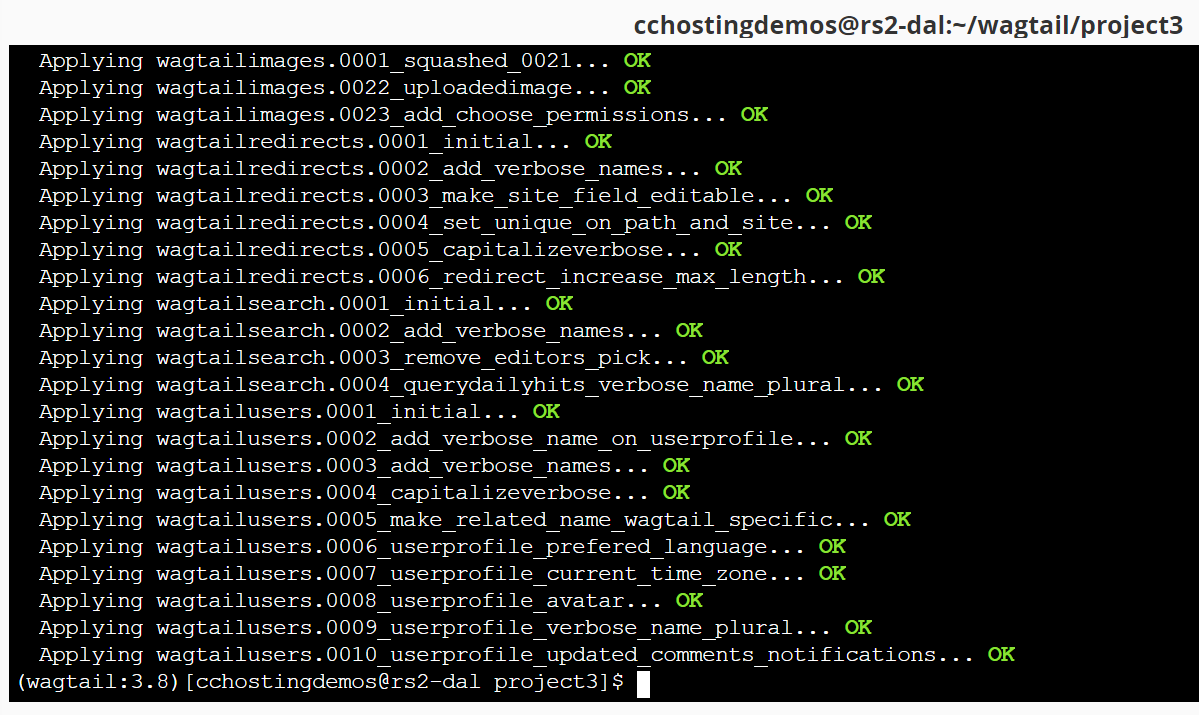
I won’t paste the entire output here because it’s too long, however, before pressing enter/return on your keyboard to run the above command, your terminal should look like this:
When the migration is finished, you will be returned to a blank prompt:
 Step 13: Next you need to create a superuser to login to the admin of Wagtail.
Using the Terminal, run the following command:
python manage.py createsuperuser
First, you will need to create a username:
(wagtail:3.8)[[email protected] project3]$ python manage.py createsuperuser
Username (leave blank to use 'cchostingdemos'):
Following this you will need to enter an email address:
(wagtail:3.8)[[email protected] project3]$ python manage.py createsuperuser
Username (leave blank to use 'cchostingdemos'):
Email address:
And lastly, you’ll need to give this superuser account a secure password.
You will be prompted to re-enter the password a second time to ensure it matches, and after that the superuser will be created. Your terminal will look similar to this:
 Step 14: Now you need to test that you can access your app. My app was installed at https://wagtail.cchostingdemos.com, so when I visit that in my browser, I see the following:
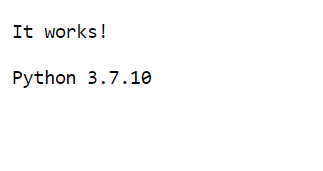
Congrats, that means your app is setup properly. Now we need to configure some other settings.
We’ll be using a command line text editor called nano to make these final changes, so pay attention to the steps below very carefully.
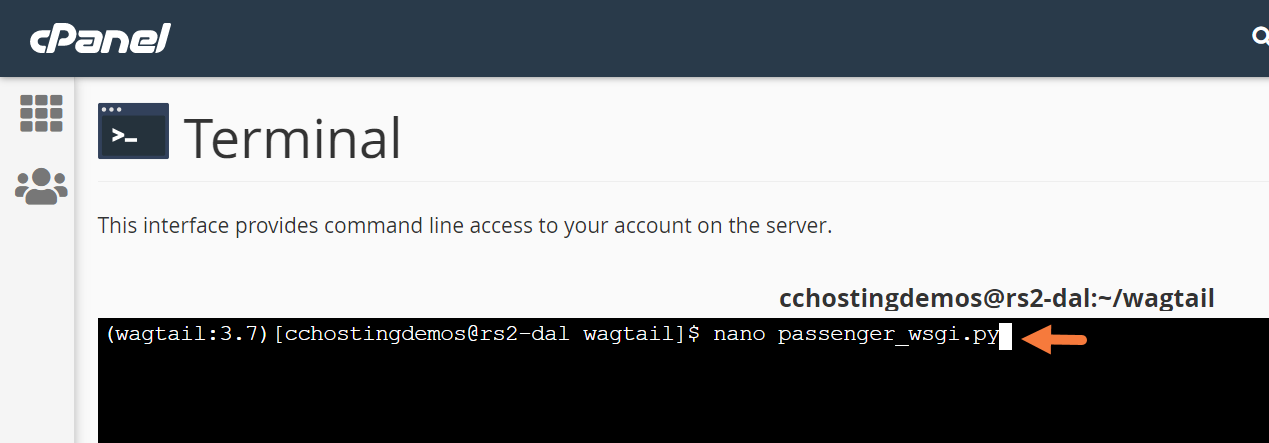
Step 15: In your terminal, type the following command, then press enter/return on your keyboard:
Next, type the following command, then press return:
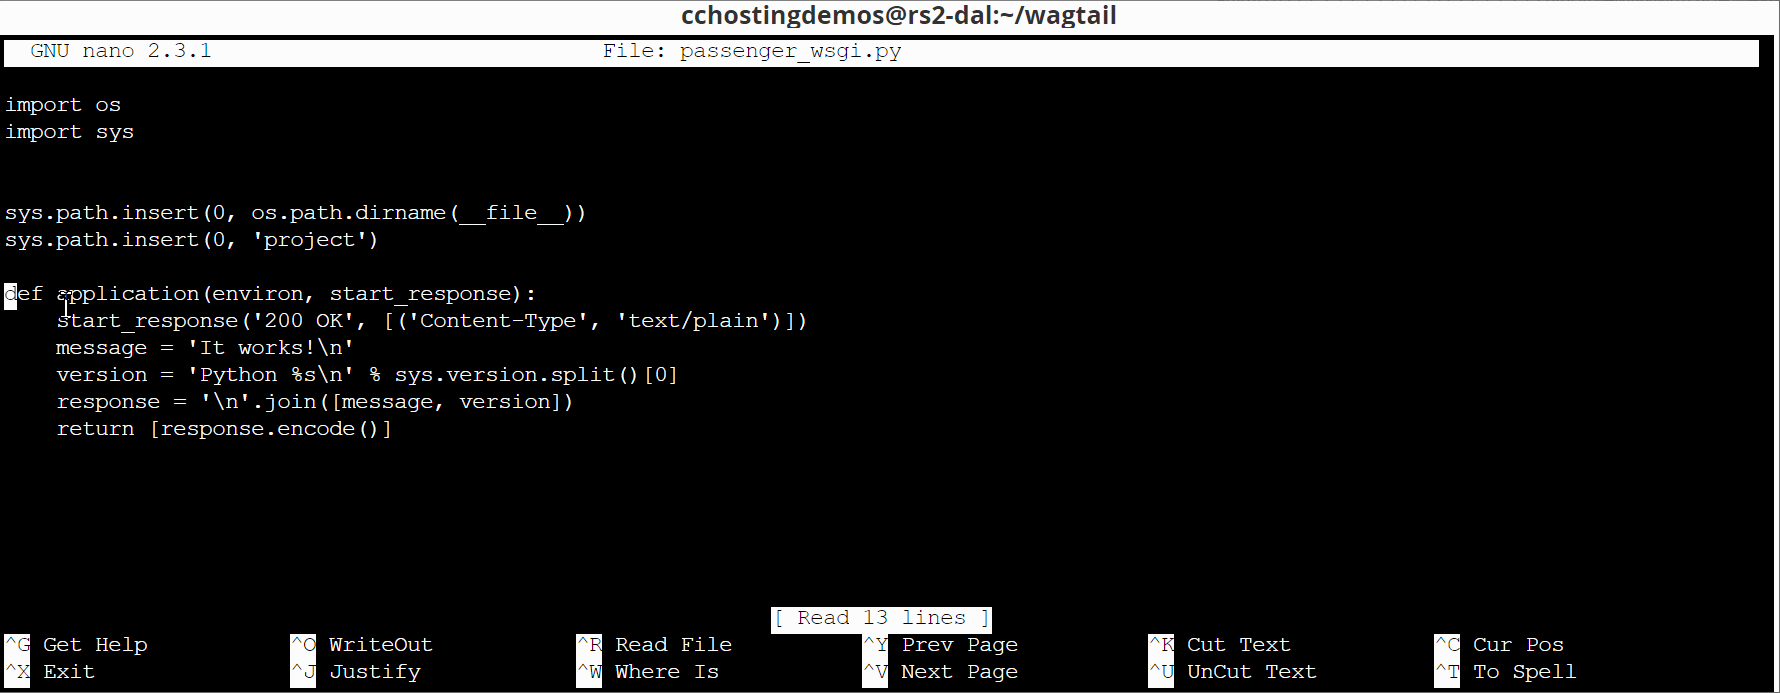
Nano will open and it will look like the screenshot below:
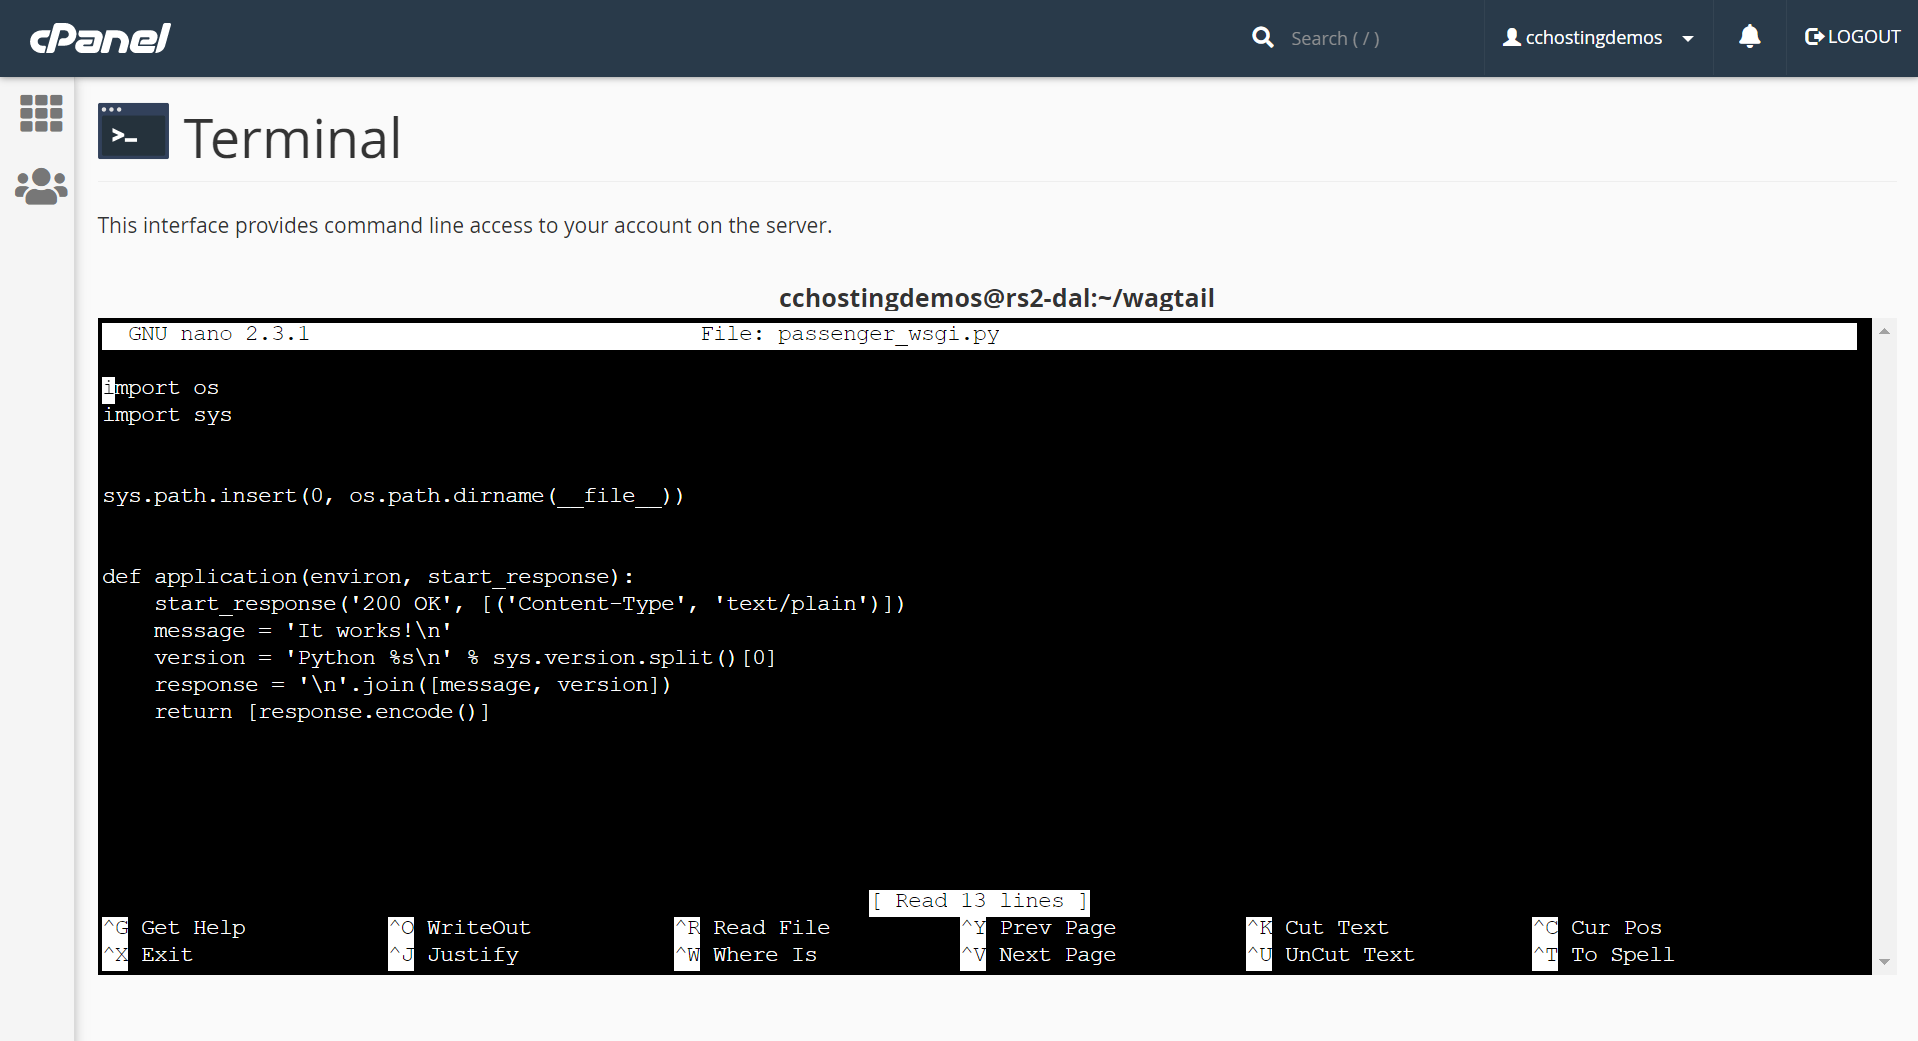
Nano is a command line text editor. You’ll be using your up and down arrow keys to move to the lines we need to access.
Use your down arrow key to position your cursor below the line that says:
sys.path.insert(0, os.path.dirname(__file__))
Your terminal window should look like this once your cursor is positioned properly:
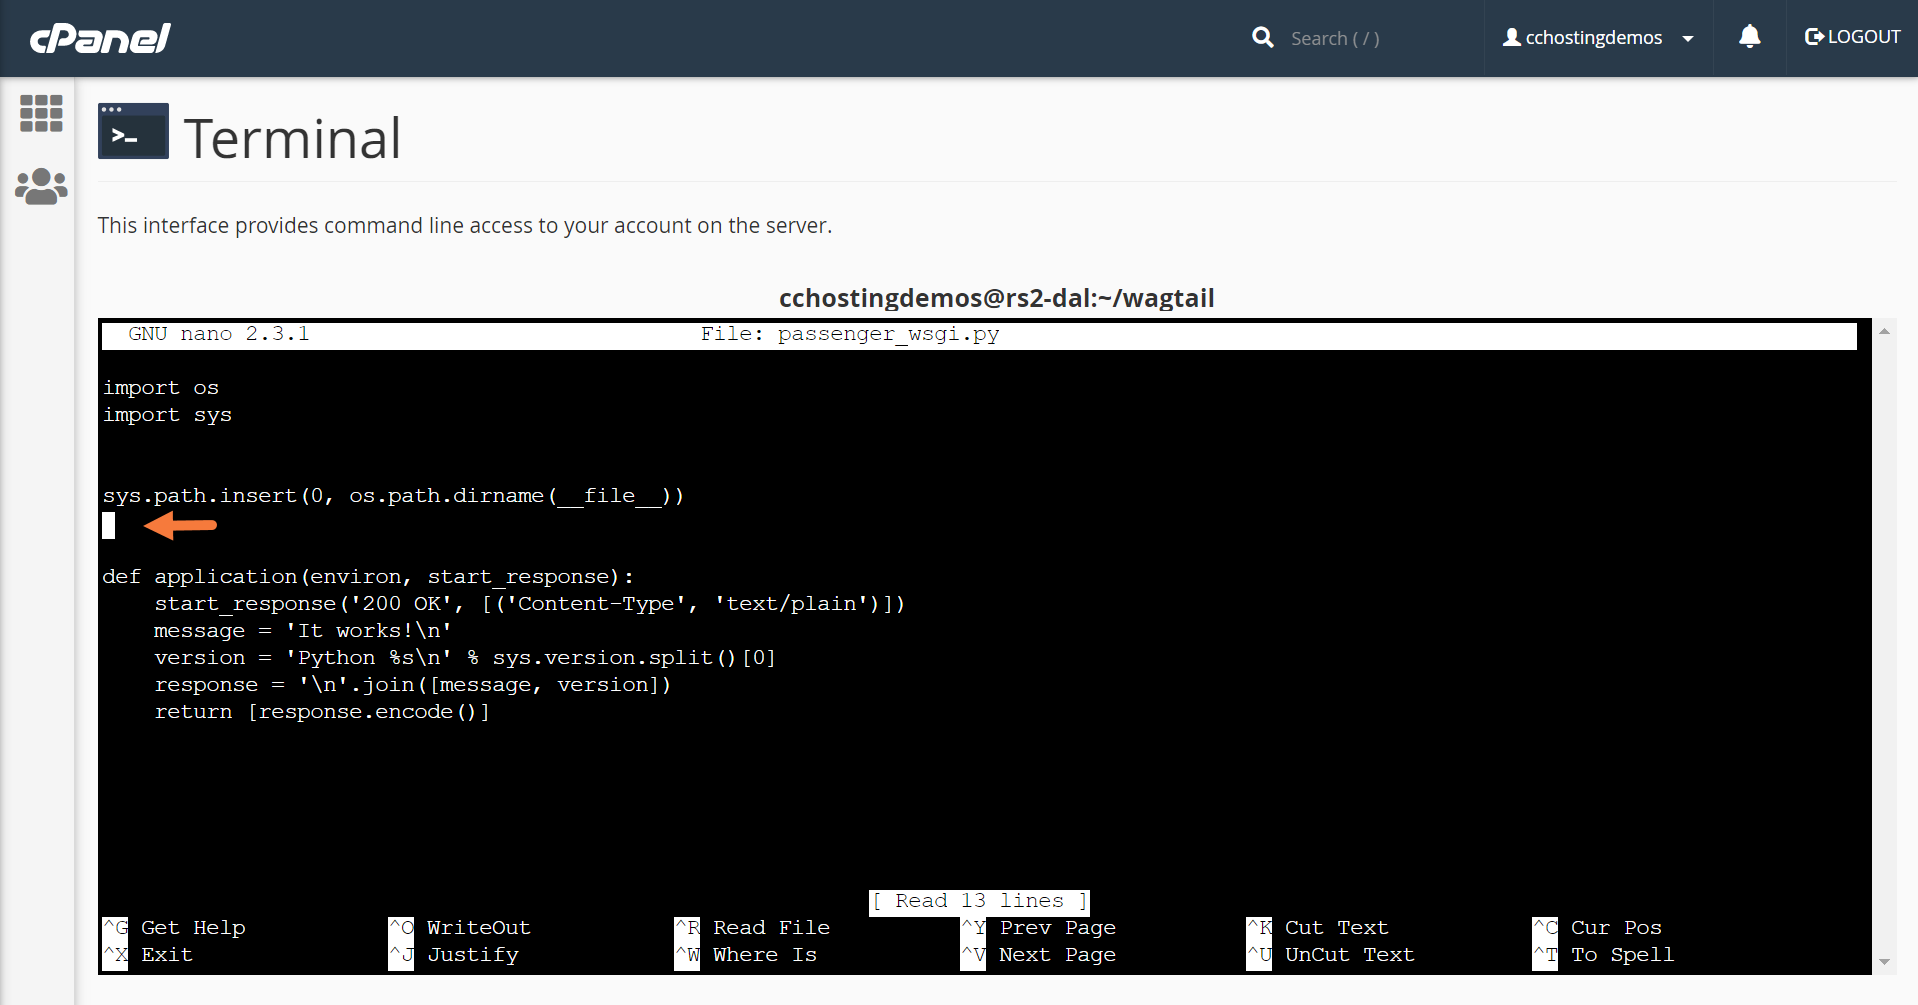
On the line where your cursors is, enter the following text:
sys.path.insert(0, ‘project’)
Except replace ‘project’ with the name of your wagtail project.
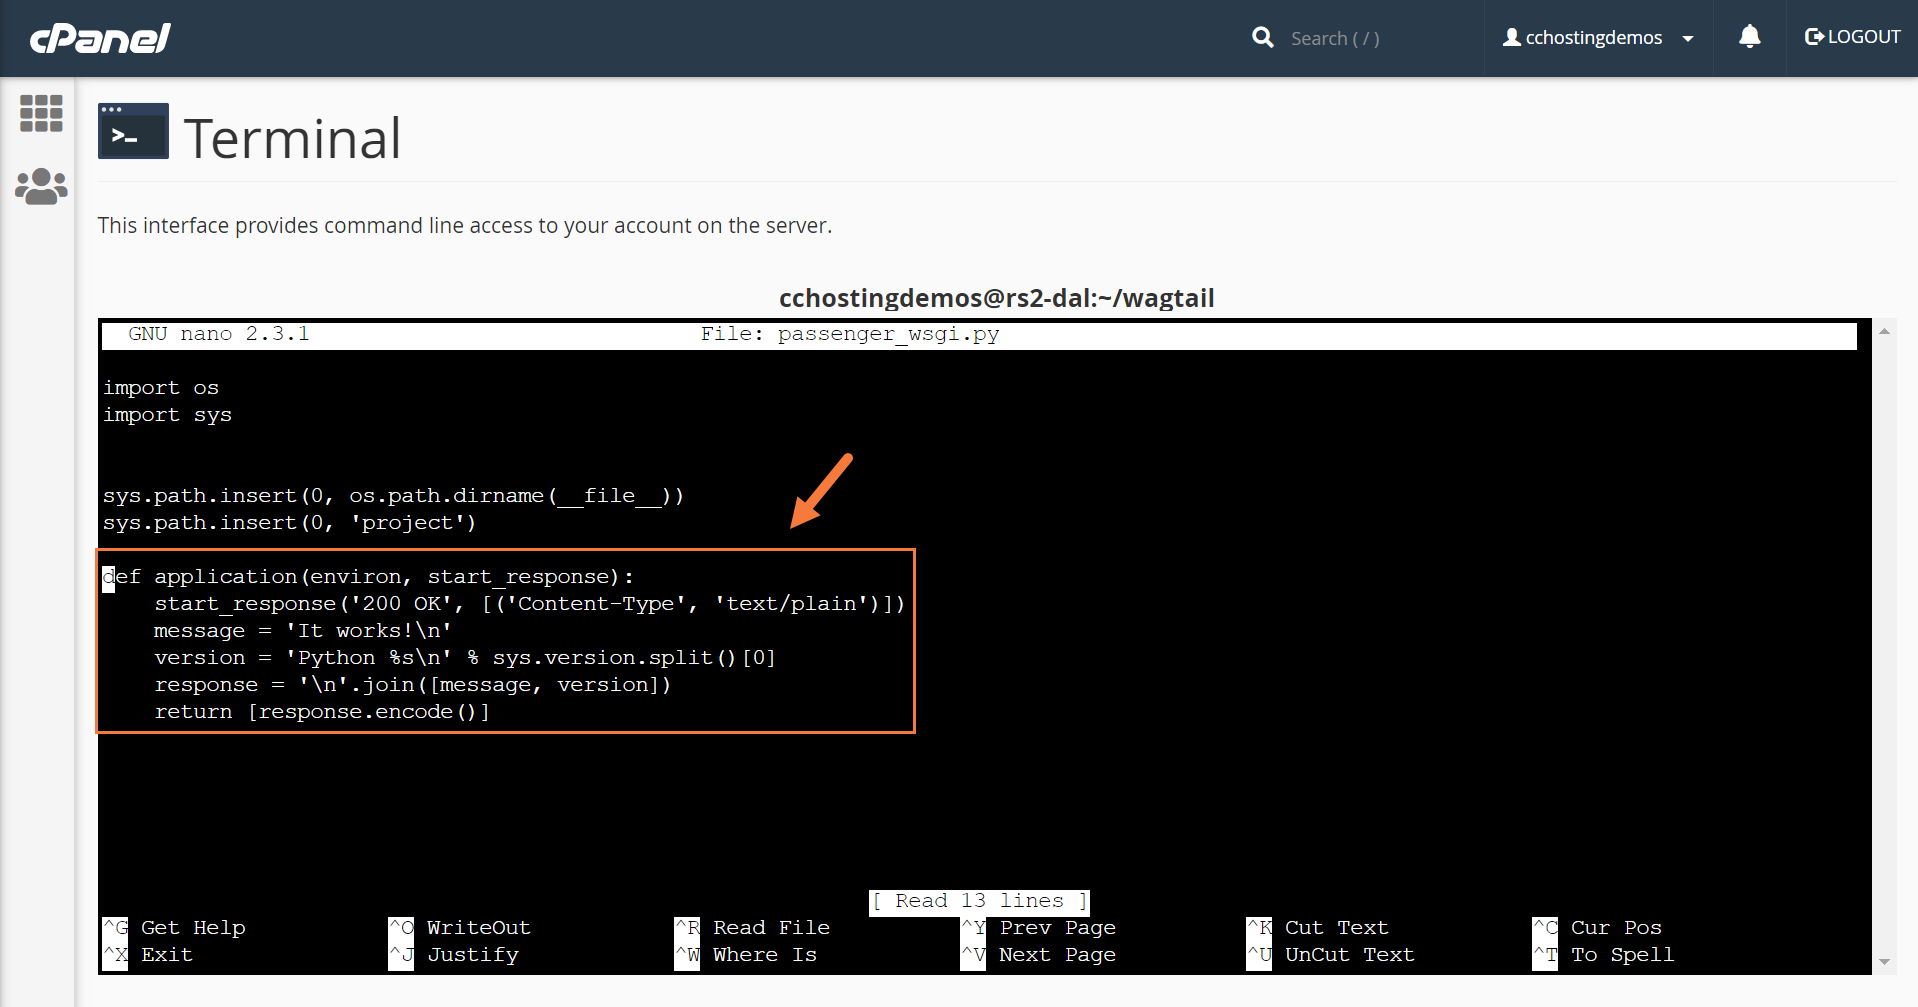
When entered, your command line window should look like this:

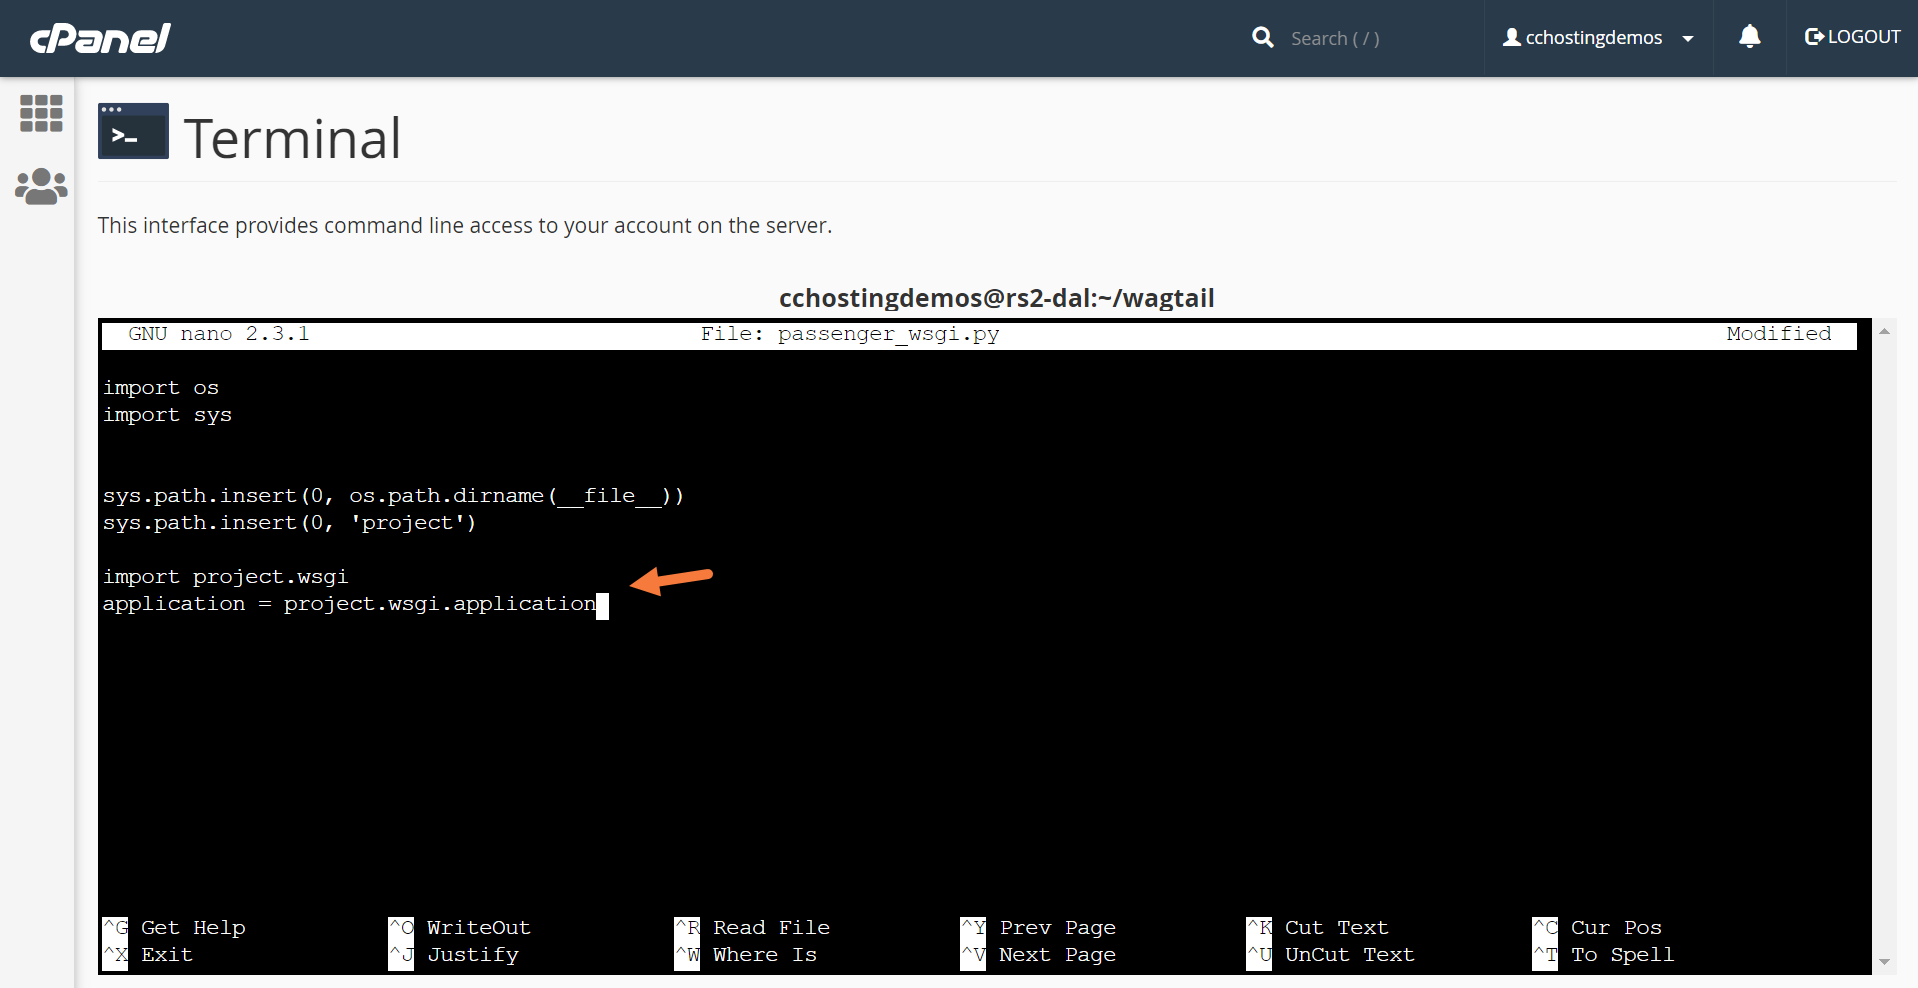
Step 16: Next, you need to move your cursor down 2 lines to the line where def application(environ, start_response): is printed and delete all of the text. You will be deleting the text highlighted in the screenshot below:
To delete, hold down the Delete key on your keyboard at the start of the line. All of the other lines will collapse into the start of the line and be deleted. It will look like the gif below while the text is being deleted:
Step 17: Now that you have deleted the extraneous text, you will want to enter the following text:
import project.wsgi (where project is the name of your wagtail project)
application = project.wsgi.application (where project is again, the name of your wagtail project)
The text should look like this when entered into the terminal window:
Now you are ready to exit Nano and save your changes to this file.
To exit nano, you need to push Control X on your keyboard. This is the exit command. Your command line window will look like this after pressing that keystroke combination:
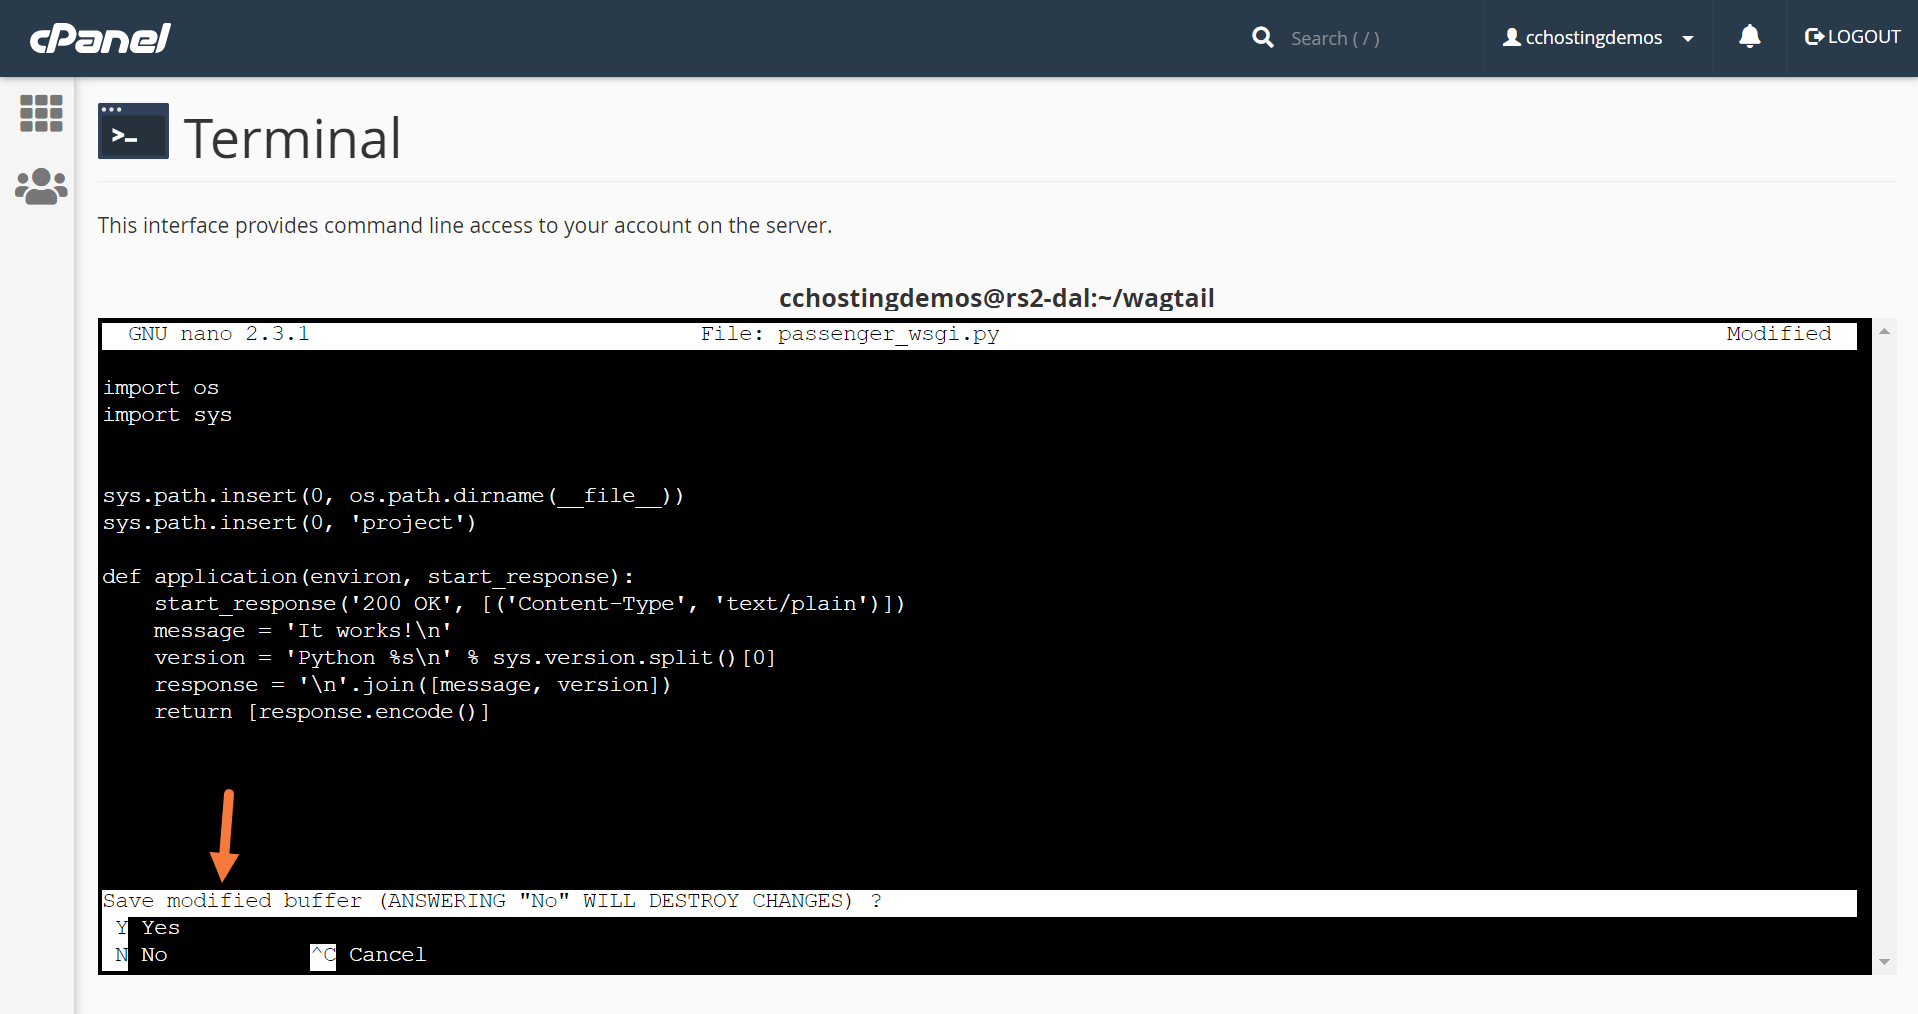
Notice at the bottom, you are being prompted to save your file.
Push Y on your keyboard to save.
After pressing Y, nano will ask you to enter the name of your file. It will look like this:

As you are not changing the name of the file, only the contents within the file, press enter/return on your keyboard to use the existing name.
You will be returned to a blank prompt, and if all went well, your command line window will look like this:

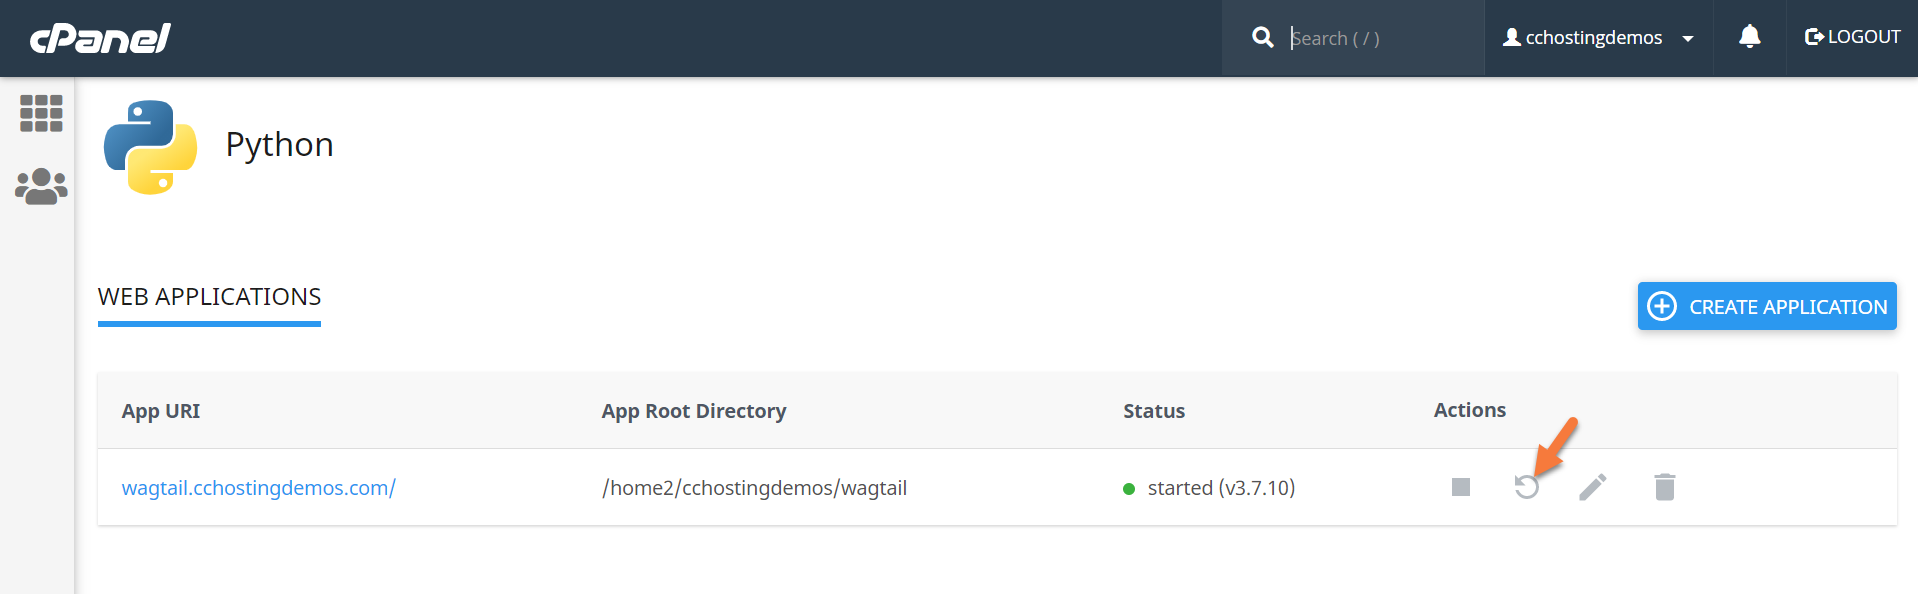
Step 18: And we’re almost done, you just need to return to your cPanel and open the “Setup Python App” section again:
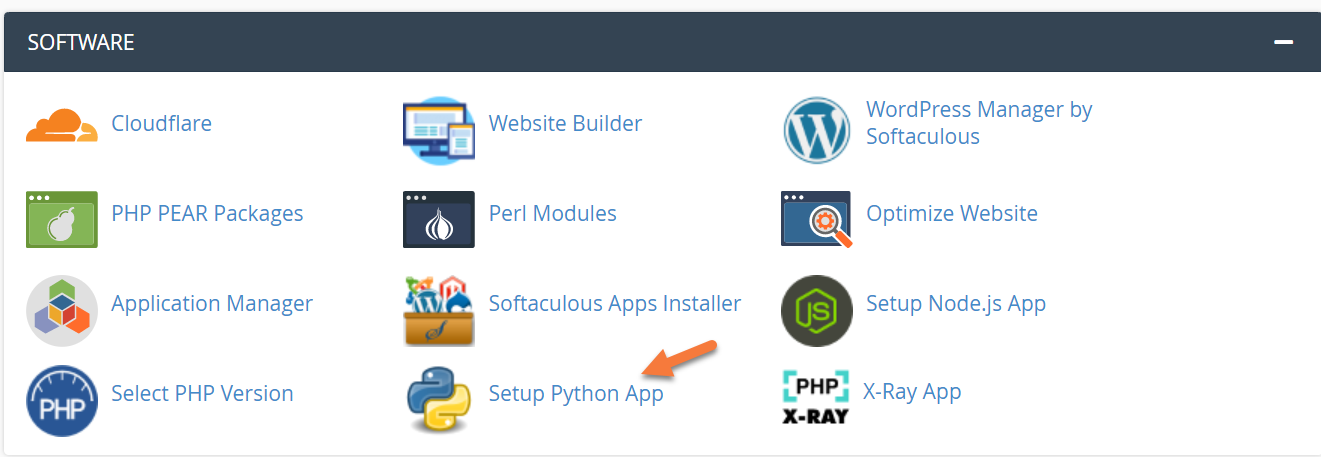
Once the list of Python apps loads, click the circle-arrow icon to restart your Python app.
And now you’re done!
To admin your app or login, visit https://yourappname.yourdomain.tld/admin and login using the SuperUser credentials you created in the earlier steps!
Congrats, that’s how to install Wagtail at ChemiCloud!
We hope you found this tutorial helpful! Let us know in the comments.
https://chemicloud.com/kb/article/install-wagtail-without-root-access/