Introduction
Postfix is a free, open-source mail transfer agent (MTA) used for routing and delivering emails. The utility uses the Simple Mail Transfer Protocol (SMTP) to transfer emails between servers. The tool is a fast, secure, and light email service solution for Linux servers.
In this tutorial, you will learn how to configure Postfix to use an external SMTP provider.

Prerequisites
- A system running Linux.
- An account with root privileges.
- Access to the terminal (Ctrl+Alt+T).
Step 1: Install Postfix
Depending on which system you are using, run one of the following commands to install Postfix:
- For Debian-based distributions:
Update the system package repository:
sudo apt updateInstall Postfix on Ubuntu/Debian/LinuxMint by running:
sudo apt install postfix -yThe command installs Postfix, and the -y flag answers Yes to any prompts during the installation.
The configuration wizard appears after installation. Move on to step two to configure Postfix.
- For RHEL-based distributions:
Update the system package repository:
sudo yum updateInstall Postfix on CentOS/RHEL/Rocky Linux by running:
sudo yum install postfix -yAfter installation, check the Postfix service status by running:
sudo service postfix status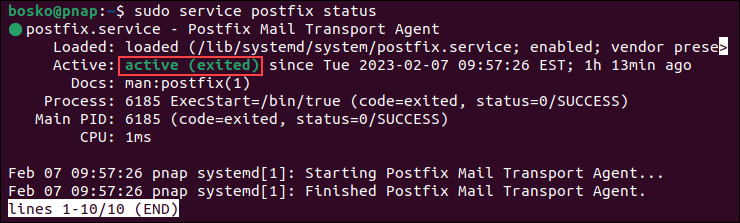
The output states that Postfix is active.
Step 2: Configure Postfix
Postfix uses the relay host configuration directive to send emails to external domains. The directive must contain the hostname or IP address of the remote SMTP server or SMTP service you want to use. For example, use SendGrid, Mandrill, Mailgun, or any other external SMTP provider.
Important: The latest update from some major providers (including Google, Microsoft, and Yahoo) complicates the setup as they no longer allow less secure apps to sign into the account. This update causes the mail delivery to fail.
The Postfix configuration files are main.cf and master.cf, located in the /etc/postfix/ directory.
After the installation, the Postfix configuration wizard appears. If it does not show up automatically, run the following command to start it:
sudo dpkg-reconfigure postfixFollow the steps below to set up Postfix:
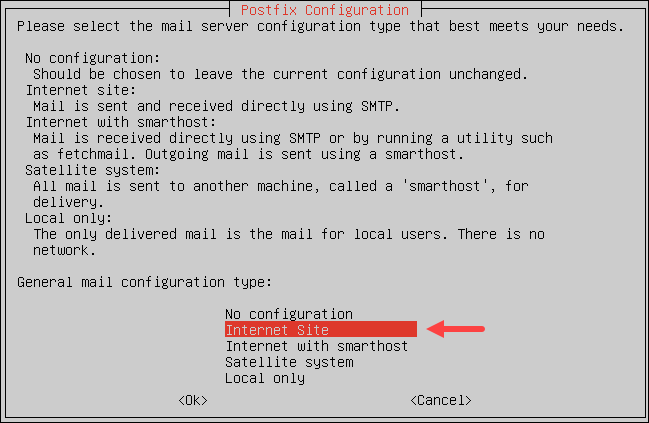
1. Select the configuration type:
Choose the Internet Site mail configuration type. Press TAB to select Ok and Enter to confirm.
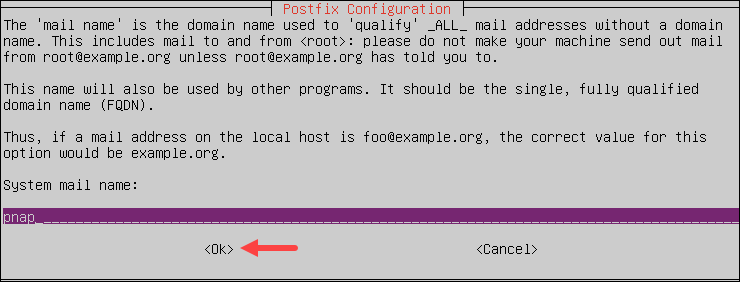
2. Enter the system mail name:
The system mail name is a fully qualified domain name (FQDN) that the system uses in banners, delivery status notifications, etc.
Enter the system mail name and press Tab to select Ok and Enter to confirm:
Postfix is now set up with the default configuration. Then, you must edit the /etc/postfix/main.cf configuration file to get it to work with external SMTP.
Enable Authentication
Install the pluggable authentication modules within the libsasl2-modules package on Debian-based systems or the cyrus-sasl-plain package for RHEL systems. The packages enable authentication when using Postfix.
- Run the following command on Debian-based systems:
sudo apt install libsasl2-modules postfix- For RHEL-based systems, run:
yum install cyrus-sasl-plainEdit the Configuration Files
Use a text editor to edit the /etc/postfix/sasl_passwd and /etc/postfix/main.cf configuration files to complete the setup.
Follow the steps below:
1. Configure SMTP username and password:
The /etc/postfix/sasl_passwd file contains the usernames and passwords for the external SMTP server. Open the /etc/postfix/sasl_passwd file, and the text editor creates it if the file doesn’t exist:
sudo nano /etc/postfix/sasl_passwdAdd the following line to the file:
[mail.isp.example]:587 username:passwordReplace [mail.isp.example] with the provider’s hostname.
Replace username and password with the SMTP provider credentials. You can also specify an API key if the provider allows it.
Save the changes and exit.
2. Create Hash Database File:
Create a Hash database sasl_passwd.db file in the /etc/postfix/ directory using the postmap command. This file is used for querying Postfix lookup tables.
Run the following command:
sudo postmap /etc/postfix/sasl_passwd3. Set up Hostname:
Set up the hostname parameter and relay server in the /etc/postfix/main.cf configuration file. Run:
sudo nano /etc/postfix/main.cfFind the myhostname parameter and ensure it is the FQDN you configured in the wizard after the installation.
4. Set up Relay Server:
The final edit in the /etc/postfix/main.cf file is related to the settings needed for Postfix to use the external SMTP server. The settings instruct Postfix to deliver emails via a relay host, which is an external SMTP server.
Find and update the following line of the configuration file as follows:
relayhost = [SMTP-SERVER-ADDRESS]:587- Replace
SMTP-SERVER-ADDRESSwith the SMTP server IP address or hostname.
Add the following lines to the end of the file:
smtp_sasl_auth_enable = yes
smtp_sasl_security_options = noanonymous
smtp_sasl_password_maps = hash:/etc/postfix/sasl_passwd
smtp_use_tls = yes
smtp_tls_CAfile = /etc/ssl/certs/ca-certificates.crt
Save the changes and exit the editor.
Secure the Credentials
Secure your email password and hash DB files to ensure only the root user can access them.
Run the following commands to change the file permissions for sasl_passwd and sasl_passwd.db:
sudo chown root:root /etc/postfix/sasl_passwd /etc/postfix/sasl_passwd.db
sudo chmod 0600 /etc/postfix/sasl_passwd /etc/postfix/sasl_passwd.db
Restart Postfix
Complete the configuration by restarting the Postfix service to make sure the changes take effect. Run:
sudo systemctl restart postfixBy default, the SMTP protocol runs at port number 25. Verify that TCP port 25 is in a listening state on 127.0.0.1. Use the netstat command:
sudo netstat -tulpn | grep :25
The output shows that port 25 is in the listening state, which means the port is open.
Step 3: Test SMTP Server
Test the SMTP server by sending an email. Use the mail command, available as part of the mailutils package, or use Postfix’s sendmail utility. Both options include an interactive mode and accept piped input.
For example, the syntax for using the interactive sendmail utility is:
sendmail [email protected]
From: [email protected]
Subject: Email subject
This is the email body.
To send the email and exit interactive mode, press Ctrl+D.
Alternatively, send an email by piping the echo command output to the mail command. Use the following syntax:
echo "This is the email body." | mail -s "Email subject" -a "From: [email protected]" [email protected]After sending the email, verify that it was sent by checking the mail log file with the tail command:
sudo tail -f /var/log/mail.log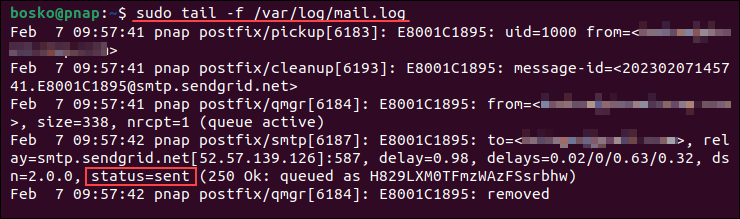
The output shows that the email was sent, which relay server was used, and the recipient and sender addresses.
Step 4: Set up Email Forwarding
Email forwarding is useful when aggregating messages from different mailboxes into a single account. Postfix allows users to set up email forwarding by making a few changes in the main configuration file.
Follow the steps below to set up email forwarding in Postfix:
1. Open the /etc/postfix/main.cf configuration file and paste the following lines at the end of the file:
virtual_alias_domains = domain.com
virtual_alias_maps = hash:/etc/postfix/virtual
Replace domain.com with the domain Postfix uses to receive emails. Specify multiple domains by separating them with a space.
The virtual_alias_maps parameter contains the path to the file that specifies the mapping for email forwarding.
2. Create the /etc/postfix/virtual file and add the emails you want to forward and the destination emails.
For example, to forward emails from [email protected] to [email protected], enter the following line in the file:
[email protected] [email protected]Save the file and exit.
3. Update the Postfix lookup table:
postmap /etc/postfix/virtual4. Reload the Postfix service:
sudo systemctl restart postfixStep 5: Enable SMTP Encryption
SMTP encryption involves the installation of a TLS certificate for your domain name. Depending on your preferences, use a paid certificate or a free one from Let’s Encrypt.
Important: Enforcing TLS encryption can cause mail delivery issues for SMTP hosts that don’t have TLS configured or don’t support TLS.
Follow the steps below to enable SMTP encryption:
1. Install the certbot client to configure the certificate:
- On Debian-based distributions, run:
sudo apt install certbot -yWait for the installation to complete.
- On RHEL-based distributions,
certbotis not available in the default repository. First, enable the EPEL repository, and then installcertbot:
yum install epel-release
yum install certbot python2-certbot-apache mod_ssl
2. Configure the firewall:
Allow port 80 and enable domain verification. If you are using the ufw firewall, run:
sudo ufw allow 80
The output states that rules have been updated, which means HTTP is now allowed on port 80, and certbot can bind TCP to port 80.
3. Obtain the certificates:
When issuing certificates on a server that isn’t running as a web server, run certbot with the --standalone flag. The syntax is:
sudo certbot certonly --standalone --rsa-key-size 4096 --preferred-challenges http -d your.domainReplace your.domain with your domain name.
An interactive configuration script starts.
4. Configure certbot:
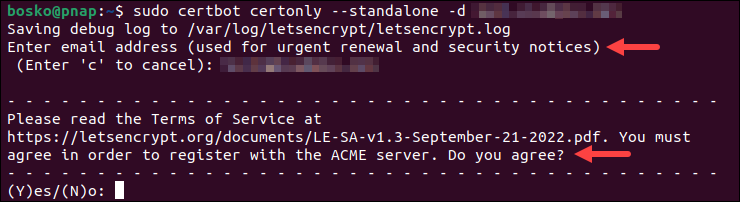
The certbot configuration script prompts to provide the necessary information. Enter a contact email for the domain and agree to the Terms of Service.
After the process completes, the certificates are stored under /etc/letsencrypt/live/
5. Add the new certificates to the Postfix configuration file:
Use the syntax below:
sudo postconf -e 'smtpd_tls_cert_file = /etc/letsencrypt/live/your.domain/fullchain.pem'
sudo postconf -e 'smtpd_tls_key_file = /etc/letsencrypt/live/your.domain/privkey.pem'
Replace your.domain in the commands with the email server’s domain name.
6. Apply the changes by restarting Postfix:
sudo systemctl restart postfix7. Send an email to test the setup.
Follow the steps outlined in the Test SMTP Server section to send a test email. This time the email is less likely to end up in spam since it is no longer unencrypted.
Conclusion
This tutorial showed how to install and configure Postfix to use an external SMTP server to send and receive emails. You also learned how to add SMTP encryption and forward emails.
If you are using Office 365, check out our tutorial for backing up Office 365 emails, or learn why you should back up Office 365 data.
https://phoenixnap.com/kb/postfix-smtp
:max_bytes(150000):strip_icc()/registration-3938434_1280-e2aa7e5d57264ae19b69027f14c85c2f.jpg)