

Usually, people who want to build their first website get shared or free website hosting services. This type of web hosting is easy to manage and costs the least compared to the rest, making it suitable for beginners and users with little to no technical knowledge.
As the new site grows, the number of required resources like storage space and bandwidth will increase based on the traffic volume it attracts. Once it reaches the assigned limit, one of the most effective ways to scale the site is to migrate from shared servers to another type of hosting with more resources.
This tutorial will show you how to migrate WordPress sites from shared to Virtual Private Server (VPS) hosting for better performance, support, and security.
First, let’s explore what VPS hosting is and why it can be the natural next step in your hosting journey.

Why You Need VPS Hosting
VPS is one of the most popular hosting services for large websites and projects.
When comparing VPS and shared hosting, they function similarly in that multiple users share a single physical server.
However, VPS uses virtualization technology to divide the server into partitions, providing isolated dedicated resources for each user. As a result, VPS users have more freedom to configure individual systems.
Here are the advantages you can get if you move from a shared hosting environment to VPS hosting:
- Server resources ‒ a VPS hosting plan offers higher CPU, RAM, and storage space resources than shared hosting, increasing speed and scaling your site for higher traffic volumes.
- Dedicated server space ‒ unlike shared hosting, you will have your own dedicated server space for your website or project instead of just an account. This will grant you more privacy over your website.
- System management ‒ a VPS plan provides users root access and a dedicated IP address, giving you complete control of the server technology, such as the ability to install software and operating system (OS) freely.
- Self-healing environment – VPS is built on a self-healing environment, meaning that if there’s any configuration or system failure, VPS deploys an automatic fail-over. VPS uses a cloud platform that constantly customizes and reconfigures resources – not even dedicated servers have this helpful feature.
- Privacy and security ‒ with shared hosting, security issues happening on the server affect all sites hosted on it. VPS prevents this issue by having partitions that separate one user from the others.
If you’re planning to scale a business or a project and value freedom to manage it above all else, upgrading from shared to VPS hosting can be an excellent solution.
Another benefit of VPS is that it’s more affordable than a dedicated server. Web hosting providers offer VPS hosting plans for different prices depending on the features and allocated resources.
You can choose between unmanaged and managed VPS. With unmanaged VPS, you will have to handle all the configuration and maintenance yourself. With managed VPS, the hosting company will configure the new virtual server and perform security patching for you.
Many hosting providers offer both shared hosting and VPS. Check whether your current hosting company offers VPS hosting plans.
Hostinger, for example, has eight VPS hosting plans that cost between $3.99–$77.99/month. Each includes IPv4 and IPv6 support, 24/7 assistance, and a 30-day money-back guarantee.
Hostinger VPS also comes with pre-installed control panel templates for CentOS, Ubuntu, Fedora, Debian, and Suse operating systems.

Follow the steps below carefully to migrate a website from shared hosting to VPS.
Step 1 – Creating a Site Backup
When making any changes to a site, creating a backup is necessary to prevent data loss in case anything goes wrong. Doing this will also make it easier to transfer your site files and databases from one host to another when migrating to a different type of hosting.
This tutorial will show you how to back up your site through Hostinger’s hPanel. If you use another hosting provider with backup features, the steps should be similar.
- Log in to hPanel. Navigate to Files → Backups.
- Select Files backups and check the time and date of the latest backup from the dropdown list. Click Prepare to Download.
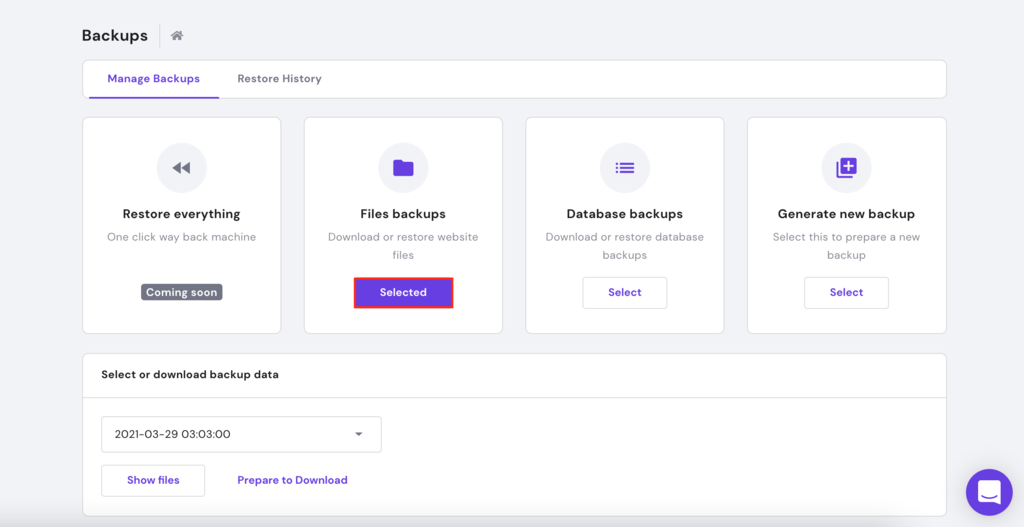
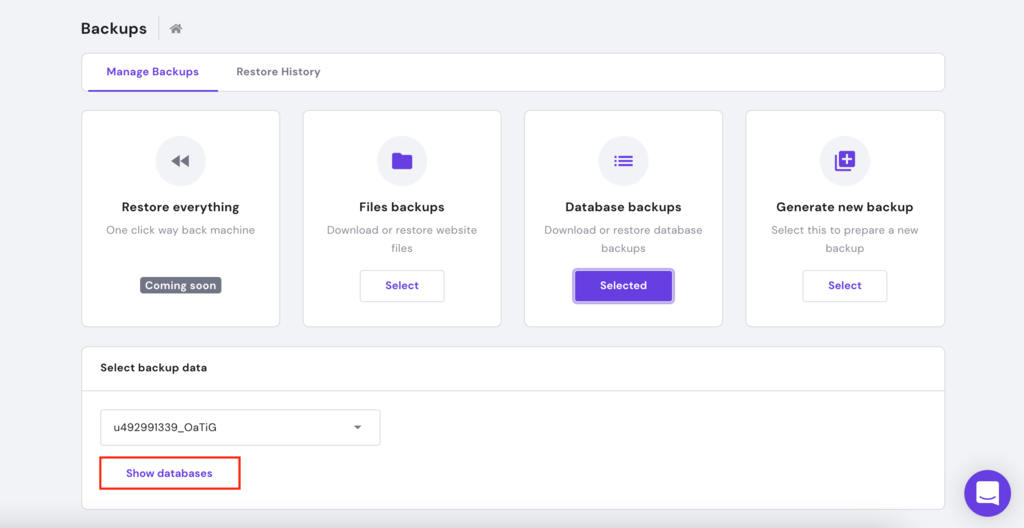
- Select Database backups and click Show databases. Find the website’s database backup with a date and time of creation that matches the files backup. Click Prepare to Download.
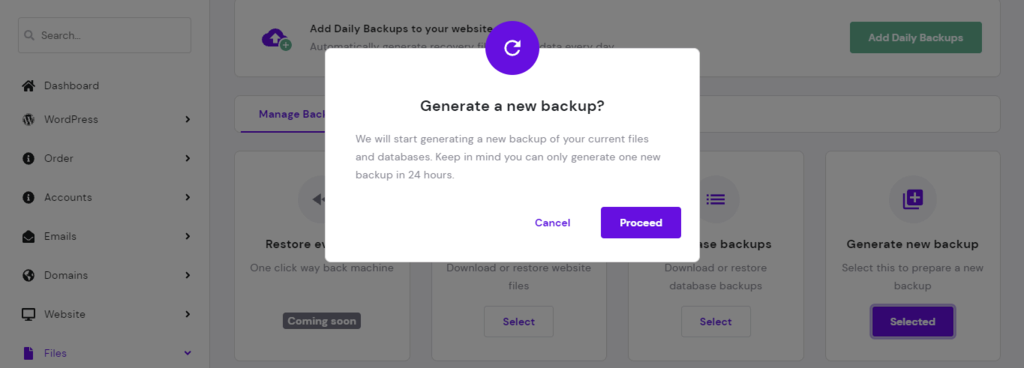
- If there are no backups available, select Generate new backup → Proceed.
- Once the backup is generated, choose the Prepare to Download option. After a few seconds, it will turn into the download button. Leave it that way since we’ll use the download link later in the VPS migration process.
Step 2 – Setting Up a Virtual Private Server
Before you can proceed with migration, you’ll need to setup the VPS. We recommend choosing a server template with the Linux, Apache, MySQL, and PHP (LAMP) stack and Webmin/Virtualmin pre-installed. It will make server management easier or a server which comes with the control panel pre-installed, like Hostinger’s Cyberpanel VPS hosting.
Alternatively, you can set up your stack without a GUI. We have several helpful tutorials on how to install different stacks on various UNIX-based operating systems:
To change your VPS OS and pre-installed software, follow the steps below:
- Head to the VPS tab of hPanel, select your VPS, and click on the Operating System button.
- Change the OS to Ubuntu 18.04 64bit with Webmin/Virtualmin/LAMP, and click Change OS. Remember that the new system might take a few minutes to start.
Accessing Webmin/Virtualmin
Webmin is web-based frontend software for UNIX system administration. It allows the admin to manage the system remotely through any modern web browser.
Virtualmin is a Webmin plugin that makes managing multiple domains easier. Working similarly to cPanel and other site management tools, this web hosting control panel supports Linux and other UNIX-based systems.
Here’s how to access Webmin or Virtualmin:
- Once the new OS is installed, go to the Overview section to obtain your VPS IP, port, and username.
- If you don’t know your root password, you can reset it and create a new one by going to the Settings section.
- To access Webmin or Virtualmin, add http:// before your SSH IP address and :10000 port at the end of it. If your address is 31.220.62.131, then the full address will be http://31.220.62.131:10000.
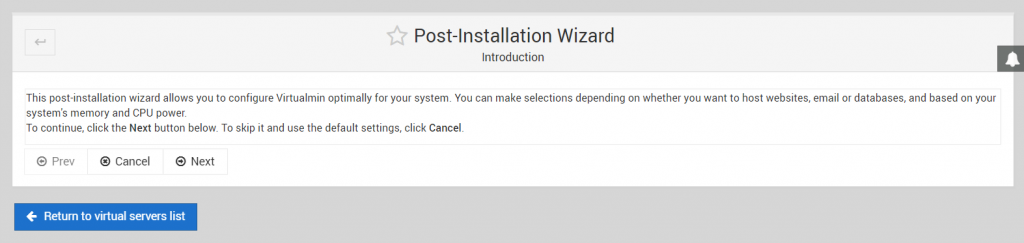
- Once you see the login page, enter the SSH credentials.
- In the post-installation wizard, click Next to set up Virtualmin.
Setting Up Virtualmin
Follow these steps to configure Virtualmin:
- Memory
- Preload Virtualmin libraries? ‒ we recommend choosing No as most of the process is done through SSH.
- Run email domain lookup server? ‒ if you want to run an Email Server on your VPS, choose Yes. Keep in mind that this feature uses more RAM.
- Virus Scanning ‒ enable the ClamAV virus scanner.
- Spam filtering ‒ if you plan to run an Email Server on your VPS, it’s best to enable SpamAssassin.
- Database servers – this is the selection of the database you want to use. We recommend enabling the MySQL database server and disabling PostgreSQL.
- MySQL password ‒ enter the password for the root user.
- MySQL database size ‒ determine the website’s database size based on the system’s usage. Leave the default settings if you’re not sure what to choose.
- DNS configuration ‒ select Skip check for resolvability. Later, you can point the domain name to the VPS via hPanel’s DNS Zone Editor.
- Password storage ‒ select the Only store hashed passwords option as it will encrypt all of your stored passwords for better security.
Once the configuration process is complete, click on the Re-check and refresh the configuration button to test whether the server has been set up correctly.
Creating a Virtual Private Server
Next, you’ll have to create a new user, MySQL database, and directory for your website. Here are the steps to do it using Virtualmin:
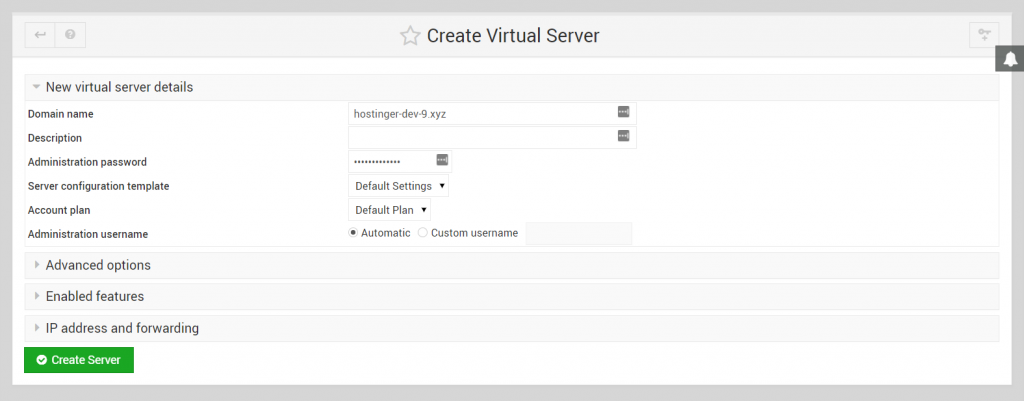
- Navigate to List Virtual Server → Create Virtual Server.
- Enter your domain and admin password and select Create Server. Doing so will create a simple server, enough to host a website.
Step 3 – Transferring Website Files to the VPS
Once you have set up the new server, it’s time to transfer the files and databases from shared hosting to VPS.
We’ll use the wget command to download the backup archives that we created in Step 1. Here’s how to do it:
- Connect to your new VPS account via an SSH client.
- Access the working directory where you will store all your files. Since Virtualmin automatically creates a directory based on the domain name, the command should look like this:
cd /home/hostinger-dev-9/public_html/Remember to replace hostinger-dev-9 with the appropriate domain name.
- Head back to hPanel → Backups and copy the download link of your backup archive. To do this, right-click the Download button and choose Copy link address.
- Use the wget command to download the backup to the VPS. If you can’t paste the link into the SSH client, transfer it to a text editor first. Here’s an example of what the command will look like:
wget http://srv167.main-hosting.eu:8080/download-backup/fe26ee2e4159db037c3106c37fa3ffb5b2072662/backup-file-name.tar.gz- Then, extract the archive using the tar command:
tar -xvf backup-file-name.tar.gzIn this and the previous commands, replace backup-file-name.tar.gz with the appropriate file name.
- We’ve just created a new public_html folder. We’ll move its contents to the original public_html directory. Begin by accessing the extracted public_html folder using the cd command:
cd database-name/public_html/Remember to replace database-name.
- Then, move all the contents to the public_html folder created by Virtualmin using the mv command:
mv -v /home/hostinger-dev-9/public_html/database-name/public_html/* /home/hostinger-dev-9/public_html/- Navigate back to the public_html directory that Virtualmin created using the cd command:
cd /home/hostinger-dev-9/public_html/- Use the ls command to verify that the folder contains all the moved files. You should see something similar to this:
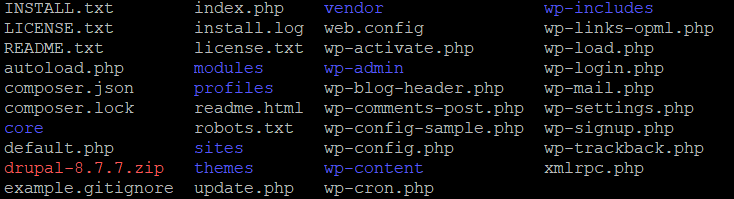
- Virtualmin also automatically creates a user and group based on the domain name. Change the ownership of the files and folders to match the credentials from Virtualmin using the chown command:
chown hostinger-dev-9:hostinger-dev-9 -R *Step 4 – Transferring Database Files to the Virtual Private Server
We’ll use the wget command to download the database backup from your shared hosting account to the VPS like in the previous step.
Keep in mind that the server will have already created a MySQL database during the VPS configuration. Therefore, you won’t need to make additional databases.
Checking MySQL Database Name and Password
To transfer the MySQL database backup, you need to collect the newly created database’s name, username, and password. Go to Virtualmin control panel → Edit Databases section to retrieve them.
In this example, our MySQL details are:
- MySQL Database Name – hostinger_dev_9
- MySQL Username – hostinger-dev-9
Downloading and Importing the MySQL Backup
Once you have the MySQL database name, import the MySQL backup following these steps:
- Navigate to the Backups section of your shared hosting account and copy the download link.
- Go back to the VPS control panel. Create a new directory called “sql_backup” and enter it using the following command:
mkdir sql_backup && cd sql_backup- Once you’ve switched directories, use the wget command to download the file from the hosting backup and save it on the new server:
wget http://srv167.main-hosting.eu:8080/download-backup/60a7e64afb1a769b1de4f2139aa0a27c2c2ecb01/backup-file-name.sql.gz- Extract the compressed file using the gunzip command:
gunzip backup-file-name.sql.gz- You will get a file with the same name in the .sql format. Move it to the new database using the command below. Remember to replace the MySQL database archive’s name with your own.
mysql -u root -p hostinger_dev_9 < MySQL-database-name.sqlStep 5 – Making Some Final Changes
Even though we’ve transferred all of the files and databases, the VPS migration process isn’t done just yet.
If the Error establishing a database connection message appears, you will need to edit the wp-config.php file and update it with the new MySQL database details. This is how to do it:
- Enter the directory where all your site data are stored using the cd command:
cd /home/hostinger-dev-9/public_html/- There, you will see all the files present in the current folder. Check if the wp-config.php file is present in the directory using the ls command.

- After confirming that the file is present, you can edit it with the Nano text editor by running the following command:
nano wp-config.phpScroll down until you find these lines:
// ** MySQL settings – You can get this info from your web host ** //
// ** MySQL settings - You can get this info from your web host ** //
/** The name of the database for WordPress */
define('DB_NAME', 'database-name');
/** MySQL database username */
define('DB_USER', 'username');
/** MySQL database password */
define('DB_PASSWORD', 'password');
/** MySQL hostname */
define('DB_HOST', 'mysql');
- Enter your database details in these fields:
- DB_NAME – database name.
- DB_USER – username.
- DB_PASSWORD – password.
- DB_HOST – enter “localhost” here since the MySQL database is on the same server.
- Once you have made the changes, press CTRL + X and Y for confirmation.
Lastly, point the domain name to VPS from the shared hosting server. The easiest way to do this is to update the A record of your DNS provider, domain registrar, or your hosting account’s DNS settings.
Domains registered with us resolve to Hostinger’s nameservers, so you can set the A record by going to hPanel → DNS Zone Editor. Fill in your VPS IP address as the A record and press the Save Changes button.
A similar procedure applies to domains registered with any other registrar.
Alternatively, you can also email your domain name registrar to point your domain name to VPS for you.
Important! It can take up to 24 hours for DNS changes to fully propagate worldwide.
Conclusion
Many users who want to scale their website migrate from shared to Virtual Private Server (VPS) hosting.
A VPS plan offers the ability to manage resources and guarantees better security and more stable performance. This makes VPS hosting ideal for a site with medium to high traffic. Many web hosting providers that offer shared hosting services provide VPS plans too.
In this article, you have learned how to migrate a website from shared hosting to VPS. The migration process comprises five steps. Here’s an overview:
- Back up your website files and database via hPanel.
- Set up and access the VPS using Virtualmin.
- Download and transfer your site files from shared hosting to the VPS hosting account.
- Download and transfer your database data to the new VPS account.
- Make final changes to the databases and point your domain name to the VPS.
Good luck! Be sure to leave a comment if you have any questions or remarks.

Jordana is a digital marketing and web development enthusiast. She loves spending her time in front of her laptop, working on new projects and learning new things. When she's not busy with work, you can find her traveling the world in search of the best sushi!
https://www.hostinger.com/tutorials/migrate-website-from-shared-hosting-to-vps


