

If you run a business that sends and receives hundreds or even thousands of emails per day, the idea of having a personal email server may be tempting.
A self-hosted mail server stores information on an in-house physical server. This dedicated server type functions like a hosted email solution. However, it utilizes a static IP address instead of a dynamic one, giving you access to the geolocation data and faster download and upload speed.
Since your local computer serves as a mail server, incoming emails are stored in your disk drive. Having complete control over your own mail server makes optimizing security and troubleshooting easier.
You will have the total freedom to make all sorts of improvements to your private email servers. With the dedicated resources you won’t share with other users, this email server type offers faster response time and a more scalable email infrastructure than public email service.
Also, creating unlimited email accounts mainly benefits team-based projects as you can assign an unlimited number of accounts to them.
This article will provide you with a step-by-step tutorial on how to host your personal email server on a VPS via CyberPanel. The guide will cover how to set up a VPS, point your domain name to VPS, set up your own email server, and create your email address.
How to Set Up a Virtual Private Server?
After purchasing VPS hosting, the next step is to install CyberPanel, a web hosting control panel. This cPanel alternative is an ideal choice for setting up a self-hosted email server since it makes generating DNS records an easy task.
CyberPanel supports CentOS 7, Ubuntu 18.04, and Ubuntu 20.04 operating systems. The initial setup requires a minimum of 1 GB of RAM and 10 GB of disk space.
Follow these steps to install CyberPanel on your VPS:
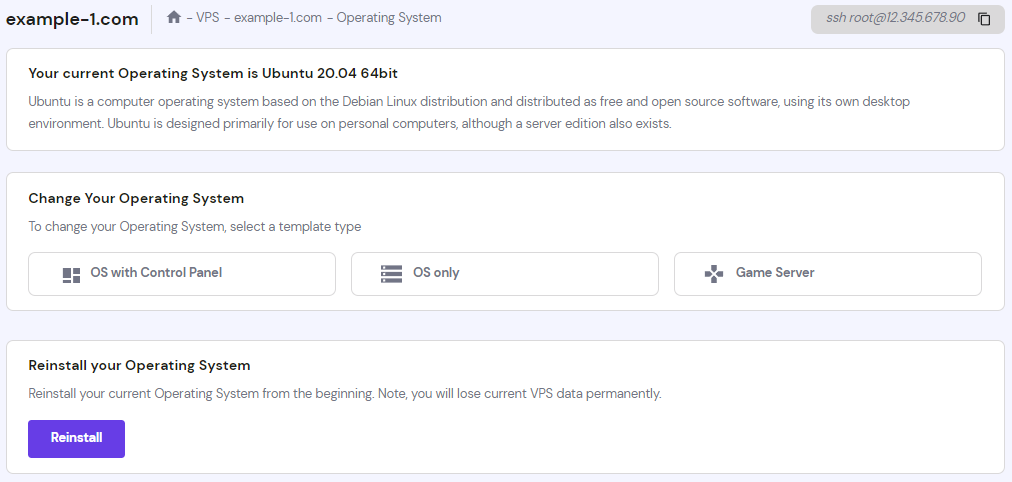
1. Ensure your virtual server’s operating system is compatible with CyberPanel. If you’re using Hostinger, navigate to the VPS section, select your VPS, and open the Operating System tab.
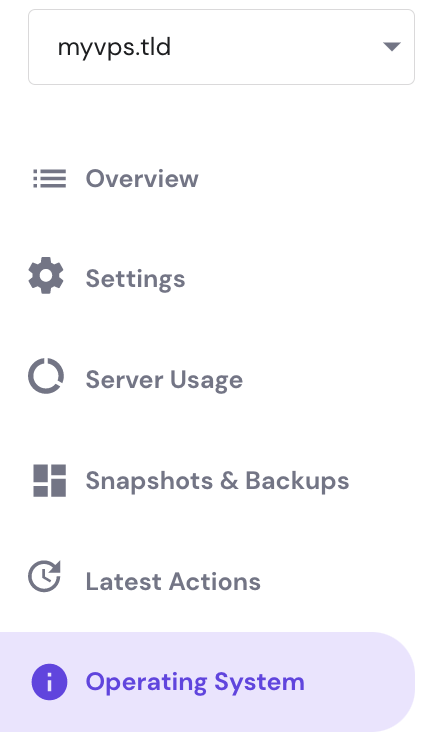
2. Once there, check the window with your current operating system. In case it’s not compatible with CyberPanel, you can change it.
3. Access your server via an SSH client like PuTTY and run the following command:
sh <(curl https://cyberpanel.net/install.sh || wget -O - https://cyberpanel.net/install.sh)
4. CyberPanel will run an installation wizard. Type in the following options to the command prompt in an orderly manner to properly configure the control panel:
- 1 ‒ install CyberPanel with OpenLiteSpeed. It’s a free option that doesn’t require a license key.
- Y ‒ complete installation.
- N ‒ remote MySQL. Choosing “Y” will prompt you to provide the database connection credentials.
- s ‒ set custom login credentials. Opting for “d” will make CyberPanel use its default password, while the “r” option will give a randomly generated password.
5. CyberPanel will offer to install the extensions of a memory-caching system Memcached and in-memory data structure store Redis as well as set up a WatchDog. Enter “Y” if you wish to use them, but be aware that WatchDog is still in beta.
Consider going with Hostinger CyberPanel VPS hosting to streamline this step. Costing between £3.49–£8.99/month, all of our hosting plans come with CyberPanel pre-installed.

Point the Domain to Your Mail Server
Once your VPS is up and running, point your domain to the virtual server by changing the DNS records, either via child nameservers or the DNS A records.
Point the Domain to the VPS via Child Nameservers
This method requires setting up a new DNS zone on your virtual server. Doing so will force all DNS changes to be made through the new zone.
To do it, follow the steps below:
1. Create new child nameservers through your domain registrar. In Hostinger, do so through the domain management panel. Make sure to create corresponding A records as well.
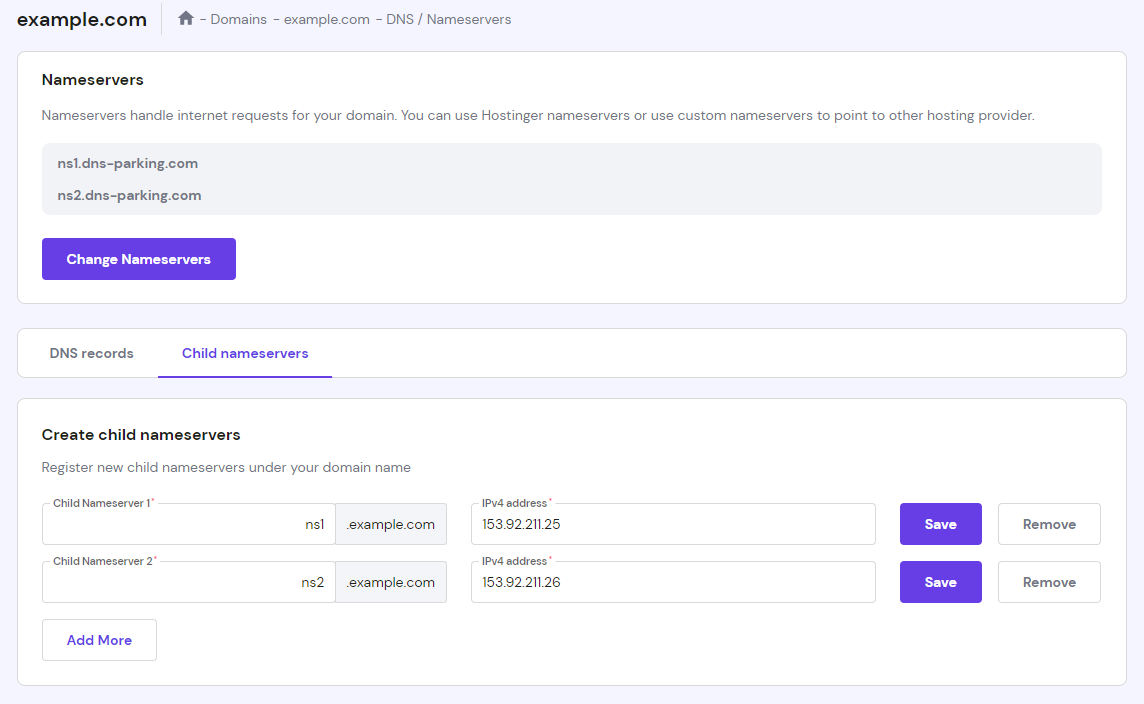
2. Set up a DNS record on the virtual server, then create a separate folder for your DNS zone files. Point a domain to VPS to complete the steps.
3. Change your domain nameservers to the newly created ones. The DNS propagation can take up to 24 hours, but flushing the DNS cache and clearing the browser cache may speed up the process.
Point the Domain to the VPS via Cloudflare
If your VPS already comes with Cloudflare, the hosting company will make all the necessary changes. Otherwise, you need to purchase a plan from an external DNS provider first.
This method skips changing the location of your DNS zone. Your DNS zone file and other information like MX record and CNAME will reside within the current DNS provider.
To point a domain to VPS via A record, follow these steps:
1. Navigate to your DNS zone, and add DNS records using two A records or an A and a CNAME record. One record is for the domain, and the other record is for the www subdomain.
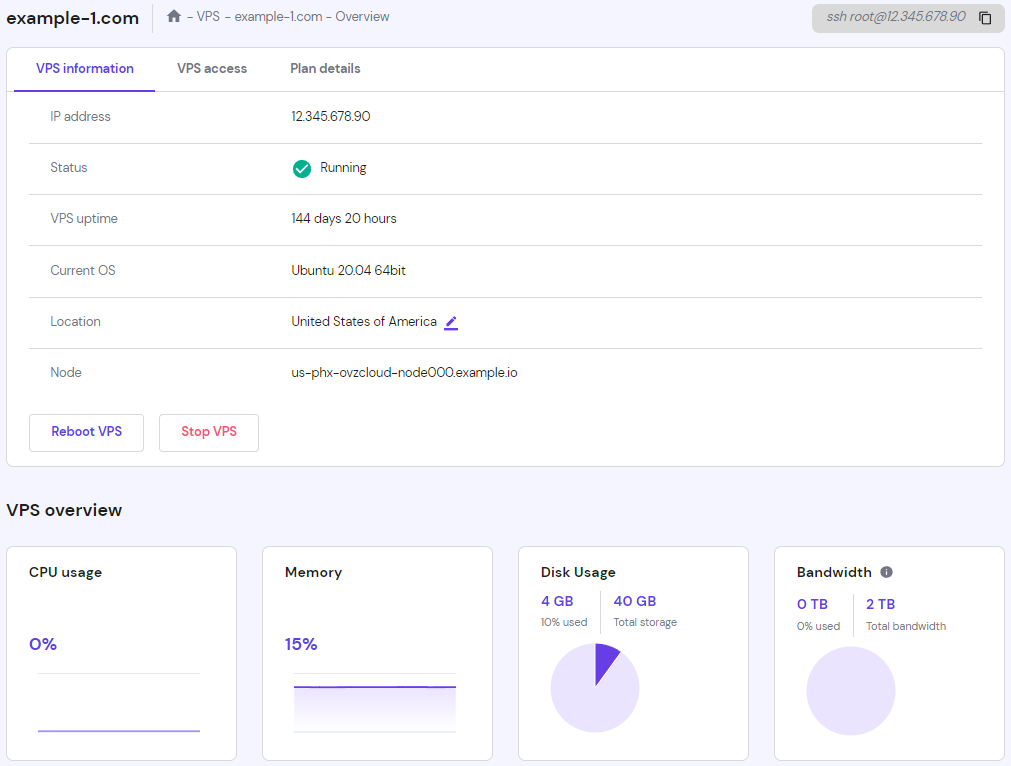
2. Replace the A record value with your dedicated IP address. In Hostinger, your virtual server’s dedicated IP address is located within the VPS information section of the server management dashboard.
3. Perform DNS lookup to verify the status of the records. Use a DNS checkup tool or execute the following dig command via your terminal. Keep in mind that the DNS propagation can take from just a few minutes to up to 24 hours to complete.
dig A +short your_domain
4. You’ll know the process is successful if the A record displays your server’s dedicated IP address.
How to Set Up Your Own Mail Server
After pointing your domain to the new virtual server, you’re now ready to set up an email server. The process begins with creating a website container and nameservers in CyberPanel. After that, issue an SSL certificate for your domain.
Check the following section for the breakdown of each step.
1. Create a Website Container
Creating a website will associate your domain with CyberPanel. While you can add content to it in the future, this step only requires a website as a container.
1. Go to Websites → Create Website from your CyberPanel dashboard.
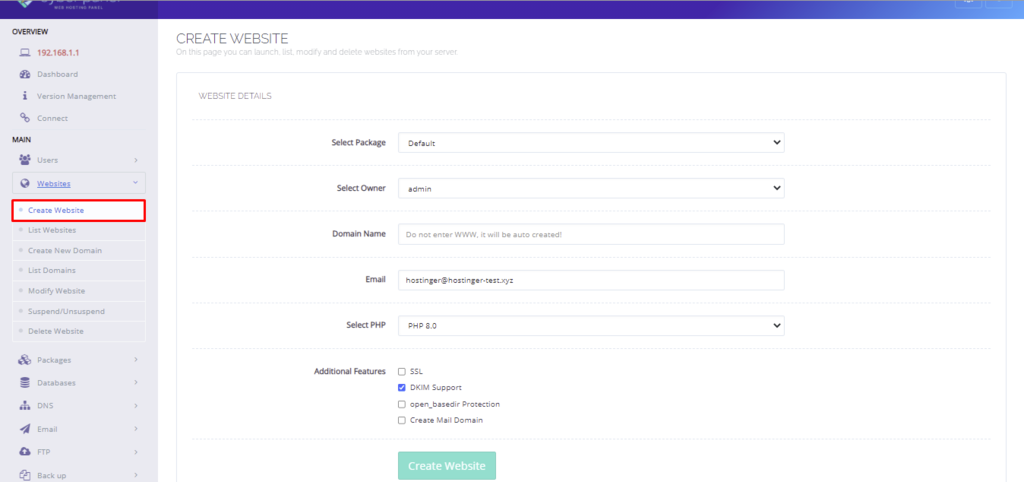
2. Add your domain to the form and tick the DKIM Support box. Enabling DomainKeys Identified Mail will increase your mail security, prevent spoofing, and ensure that emails don’t end up in the spam folder.
3. Click Create Website to complete the process.
2. Create Nameservers in CyberPanel
Follow the steps below to create nameservers in CyberPanel:
1. Navigate to DNS → Create Nameserver from your CyberPanel dashboard.
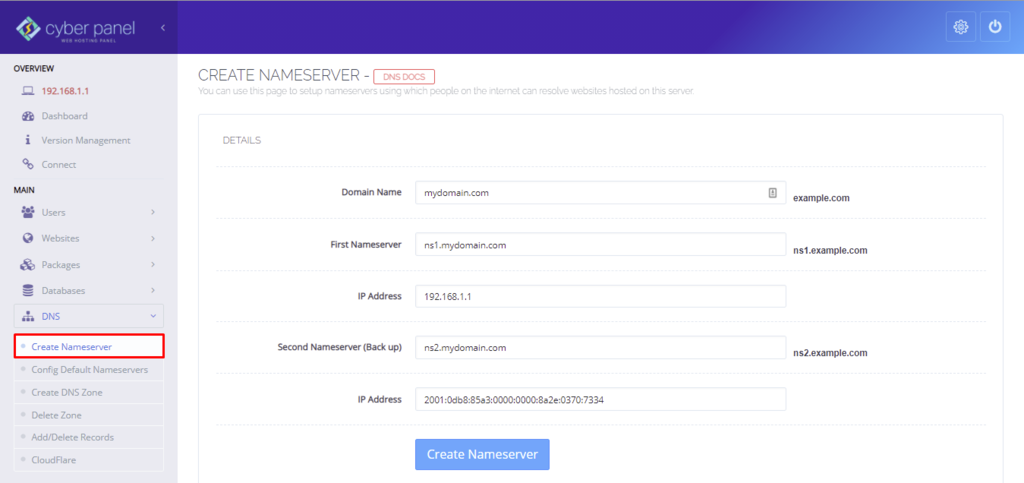
2. Add the nameservers you created when pointing the domain to the new virtual server and your server IP address.
3. Select Create Nameserver. Keep in mind that the propagation may take up to 24 hours to complete.
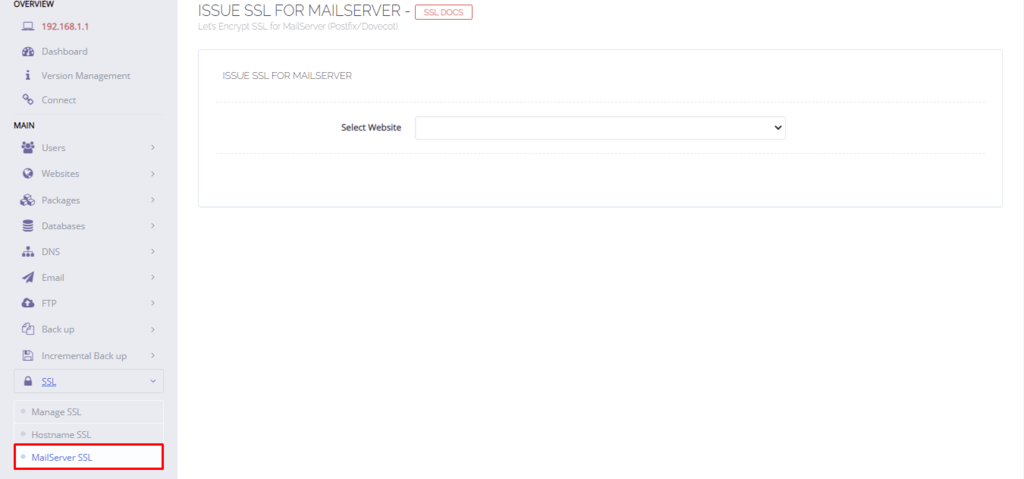
3. Issue an SSL Certificate for the Domain
Installing an SSL protection will help secure your email server. Since CyberPanel provides unlimited and free Let’s Encrypt SSL, you only need to install it.
Perform the following steps to do it:
1. Go to SSL → MailServer SSL from your CyberPanel dashboard.
2. Select your domain from the dropdown list, then select Issue SSL.
Set Up Reverse DNS for Your VPS
Setting up a reverse DNS record lets you track the hostname of an IP address. Doing so also increases your email deliverability because mail servers like Gmail and Yahoo use this method as a primary spam filter for incoming emails.
Hostinger provides a more accessible shortcut to streamline the process at the bottom of the server management dashboard. To configure a DNS pointer record (PTR), add the domain associated with the IP address and click Save changes.
The propagation may take a couple of hours to complete. Execute the following syntax on your Linux terminal to perform the PTR lookup. Remember to change the placeholder with your mail server’s IP address.
dig -x ip_address
If you’re using a Windows operating system, run this syntax on the command prompt:
nslookup ip_address
If the process is successful, the new PTR record will appear under the ANSWER SECTION.
;; ANSWER SECTION:
xx.192.168.1.in-addr.arpa. 250 IN PTR
ec2-192-168-1-xx.compute-1.mydomain.com
Create Your Email Address
Once you have the server set up, it’s time to create your mail address.
1. Go to Email → Create Email from your CyberPanel dashboard.
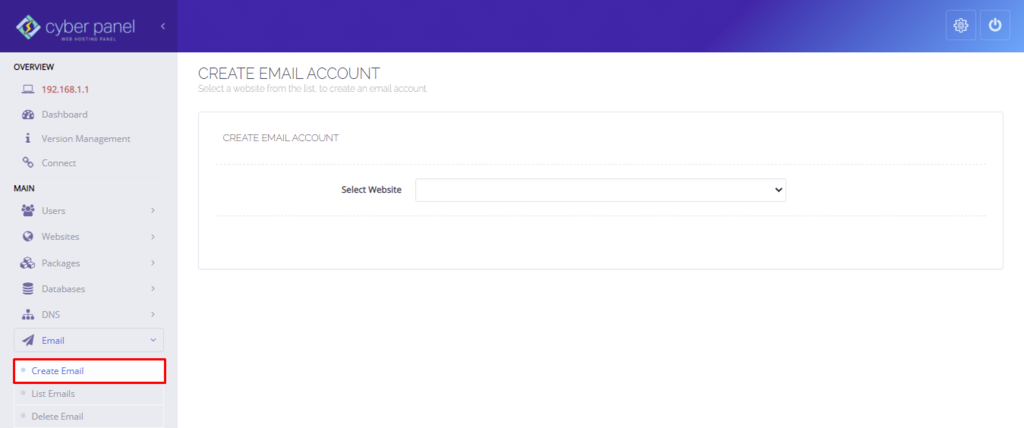
2. Select your email domain from the dropdown list, then add your email address and password.
RainLoop, CyberPanel’s default mail client, supports IMAP and SMTP protocols that use an external SMTP server to improve your email deliverability.
To do so, configure the external SMTP of your choice using RainLoop.
Test Your Email Address
Sending and receiving a test email will ensure that the new mail server is up and running properly.
Here’s how to send mail through the new mail server:
1. Go to Email → Access Webmail from your CyberPanel dashboard.
2. You will be redirected to RainLoop’s login page. Input your email credentials, hit Enter. Click on the Mobile version link if you want to log in from your mobile phone.

3. Compose the test email and send it to another email address. If you can reply to that test email, then the email server configuration is successful. The new mail server is now ready to send and receive mail.
Test the spam filters of your email server using an email checker tool like Mail Tester. After sending an email to the appointed address, the tool will rate your email deliverability from the server side.
Integrate public email accounts like Gmail and Yahoo into RainLoop webmail for easier multiple email management.
Alternatively, use the Google Fetcher feature to integrate your private email address into your Gmail account.

Conclusion
Self-hosting your private email server on a separate computer provides complete freedom in managing the server’s resources and security. However, it requires additional security measures to hide your IP address as static IP addresses don’t change like its counterpart.
That said, this scalable email structure provides better performance and support for team-based projects than a generic email address.
Here’s a recap of the steps to host a private email server on a VPS:
- Set up the virtual server.
- Point the domain to the server.
- Set up the email server.
- Initiate reverse DNS for the same server.
- Create and test your new email address.
If you have any comments or further questions, don’t hesitate to leave them in the comments section below.

Jordana is a digital marketing and web development enthusiast. She loves spending her time in front of her laptop, working on new projects and learning new things. When she's not busy with work, you can find her traveling the world in search of the best sushi!
https://www.hostinger.co.uk/tutorials/how-to-host-your-own-email-server-on-a-vps-with-cyberpanel


 with Email Verification on NTA")


