If you need to play multiplayer co-op with associates, you will want to arrange both an area server or a devoted server. We’ve received you coated with guides on each.
Updated on September twenty ninth, 2022
Valheim from Iron Gate is taking the survival style by storm on Steam, and for a lot of, it’s best performed with associates. If you favor multiplayer co-op with associates as a substitute of going out on the earth of Valheim alone, then that you must both arrange an area server or a devoted server.
How to arrange an area server in Valheim
Setting up an area server in Valheim is way simpler than a devoted server, so we are going to begin with this feature to play multiplayer co-op with associates.
Keep in thoughts that is for individuals who have a few associates who plan on taking part in collectively. Choose the participant with the strongest gaming rig to arrange the native server in Valheim.
 (Picture: Iron Gate AB)
To arrange an area server in Valheim, comply with the straightforward steps under.
- Create a world and pair it with a customized or random seed.
- Choose “Start Server”.
- Enter your server’s password and easily click on begin.
Friends can be a part of your native server in Valheim by clicking on the Join Game tab. They will see your server if they’re Steam associates with you. Alternatively, you may be a part of by way of “Community Servers”.
The most vital side is solely to share the native server’s password with your mates, permitting for a painless expertise.
Valheim Dedicated Server: How to arrange
If you need your very personal Valheim devoted server, you will want to leap by way of a number of technical hoops.
While it’s potential to host a devoted server for Valheim with a robust gaming PC and be a part of the server with the identical one, it’s endorsed you utilize a distinct, devoted PC for the server.
You will want a beefy PC (i7 or Ryzen 7) with no less than 16GB of RAM for a easy Valheim Dedicated Server expertise. You may even want a stable web reference to, for instance, 100/50mbps fibre. The extra gamers becoming a member of your devoted server, the upper the necessities will develop into.
This information additionally assumes you know the way to do Port Forwarding in your router.
 (Picture: Steam)
Follow the directions under to arrange your Valheim devoted server:
- Get the Port Forwarding out of the way in which. In your router settings, open ports 2456-2458 TCP/UDP. The server internet hosting port ought to be 2456. If there is a firewall on the PC, examine to ensure if these ports are open.
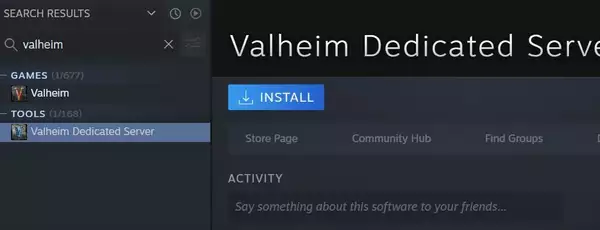
- Head into Steam and seek for Valheim Dedicated Server app. Install this app.
- Find the folder the place you put in Valheim Dedicated Server. The default is: Program Files(x86)>Steam>steamapps>widespread>Valheim Dedicated Server)
- In the folder, you’ll discover a file known as “start_headless_server“. Right-click and edit this file.
- You will see a line within the file which reads: “begin valheim_server -nographics -batchmode -name X -port 2456 -world X -password X -public 1“
- Change the “X” portion to the Valheim devoted server identify you wish to use. The X after -world is the identify of your world save, which might’t be the identical as your server identify.
- Add your distinctive password after the -password textual content changing the X.
- If you need your devoted Valheim server to indicate up in neighborhood servers, maintain it as public 1. If you need it fully personal for associates to seek for by way of Steam servers, change it to 0.
- Save the “start_headless_server” file and again it up. Otherwise, after a recreation replace, you will want to repeat the method once more.
- Start your individual Valheim devoted server by double-clicking “start_headless_server” file. Logs will seem, so simply depart them open. Closing the window will shut your server.
If you’ve got adopted all these steps accurately, your server ought to seem locally servers checklist after lower than half-hour.
The IP deal with on your Valheim devoted server is your server PCs exterior IP, which is able to look one thing like this: XXX.XXX.X:2457 with the server port 2457 on the finish.
It is vital to notice that in the event you modified the -public worth to 0, your mates must be a part of by way of the Steam server browser, the place they might want to add your server IP.
Following these steps, it’s best to be capable to arrange your very personal Valheim devoted server for associates to affix.
Remember, whilst you can presumably host it on the identical PC you’re taking part in the sport on, a devoted server PC is beneficial for a easy expertise.

Written by Wessel Minnie
As the Acting Senior Editor at GINX, Wessel scouts out the newest content material for our readers. When not working, he watches esports tournaments, dies repeatedly in Soulsborne titles, and contemplates spending one other 100 hours in Stardew Valley.
https://www.ginx.television/en/valheim/valheim-dedicated-server-local-server-how-to-set-up-requirements