
Everyone has an e-mail tackle—they’re important to operate within the interconnected world of the mid twenty first century. Most individuals have their e-mail addresses both by their employer or by one of many tech giants resembling Google or Microsoft. But you’ll be able to run your personal e-mail server with your personal area title from a easy pc resembling a Raspberry Pi.
Why Run an Email Server on Your Raspberry Pi?
Emails are the fashionable equal of a letter—they’re personal communications, however by utilizing a free supplier resembling Gmail, you are giving a predatory promoting and monitoring firm license to rifle by your life, your appointments, private contacts, journey plans, and reservations. Google sells these intrusions as options, however to some, it is an uncomfortable degree of snooping.
By operating your personal e-mail server, your information is in your personal arms and by yourself {hardware}, with no oversight from shadowy company entities. And if you really want to lose an e-mail in a rush, you’ll be able to at all times simply swallow the microSD card (do not really do that).
A Raspberry Pi is ideal for this mission as a result of its low energy draw—an e-mail server will have to be powered on 24/7, so something extra highly effective is cash wasted. Email as a know-how has been round for the reason that Seventies and may very well be used on the computer systems of the time. Anything extra highly effective than a Raspberry Pi is overkill.
Is It Difficult to Create a Raspberry Pi Email Server?
Configuring an e-mail server from scratch might be sophisticated: it includes putting in and configuring a number of parts, together with Postfix, Dovecot, openDKIM, SpamAssassin, and Sieve. It will take up a big quantity of your day, and is a course of fraught with peril, and one by which it’s straightforward to make errors.
Fortunately, there are scripts which may make it straightforward to put in an e-mail server in your Raspberry Pi, which implies that you would be able to have your e-mail server up and operating in underneath an hour!
What You Will Need for Your Email Server
To full this mission, you’ll need:
- A Raspberry Pi (any mannequin will do)
- An Ethernet cable
- A static IP tackle
- A website title—if you happen to don’t have already got one, listed below are some useful tips on choosing a domain name
- Knowledge of your Pi’s native IP tackle
- Another PC
Setting Records and Opening Ports
Navigate to the Advanced DNS part of your registrar and delete any data already in existence. Click Add New Record. For the kind, choose A document, for the host, set @, and within the worth discipline, set your public IP tackle. Save, after which click on Add New Record once more.
In this document, for the kind, choose A document; for the host, set *; and within the worth discipline, set your public IP tackle. Finally, add a brand new MX document, with @ because the host, mail.your-domain.tld as the worth, and set the precedence to 10. Save the brand new DNS data.

Open up your router admin menu. This is normally finished by typing 192.168.1.1 right into a browser. If this doesn’t be just right for you, seek the advice of your router guide. Locate a piece titled both Port Forwarding, Port Mapping, or Port Management, then create 4 new entries:
- The first is for HTTP requests. Set each the native and public port to 80, and the native IP tackle to the IP tackle of your Pi.
- The second is for HTTPS requests. Set each the native and public port to 443, and once more, the native IP tackle to the IP tackle of your Pi.
- The third is for IMAP requests. Set each the native and public port to 993, and once more, the native IP tackle to the IP tackle of your Pi.
- The fourth is for SMTP requests. Set each the native and public port to 587, and once more, the native IP tackle to the IP tackle of your Pi.

Prepare Your Pi!
After installing a Debian-based operating system on your Raspberry Pi (Raspberry Pi OS will just do wonderful), join it to your router with an Ethernet cable.
- Log into the Raspberry Pi utilizing Secure Shell (SSH) both through a terminal if you happen to’re utilizing Linux or macOS, or with PuTTY if on Windows.
ssh pi@your.pi.native.ip.tackle - Update and improve any packages:
sudo apt replace
sudo apt improve - You can be utilizing Apache as a reverse proxy to your mail subdomain, and Certbot to acquire safety certificates. Install Apache with:
sudo apt set up apache2 - Add the Certbot repository, then replace and set up Certbot:
sudo add-apt-repository ppa:certbot/certbot
sudo apt replace
sudo apt-get set up python3-certbot-apache - Change listing:
cd /and many others/apache2/sites-available/ - Use nano to create a brand new conf file to your mail subdomain:
sudo nano mail.confAnd paste:
<VirtualHost *:80>
ServerName your.area
</VirtualHost>
Save and exit nano with Ctrl + O, then Ctrl + X
- Change listing and duplicate the default Apache configuration file to the title of your new area and an additional copy to the title of your subdomain:
cd /and many others/apache2/sites-available/
sudo cp 000-default.conf your-domain.conf
sudo cp 000-default.conf mail.conf - Edit your-domain.conf with nano:
sudo nano your-domain.confAnd, underneath the road
, add one other line: ServerName your-domain.tld - Save and exit nano with Ctrl + O, then Ctrl + X. And repeat the method for mail.conf.
- Enable each conf information with:
sudo a2ensite your-domain.conf
sudo a2ensite mail.conf - Restart Apache:
sudo service apache2 restart - Run Certbot to acquire safety certificates and keys for each your major area and mail subdomain.
sudo certbotYou can be requested to your e-mail tackle, for affirmation that you just conform to the Terms of Service, whether or not you’d be prepared to share your e-mail tackle with the EFF, and eventually, which names would you prefer to activate HTTPS for. Press Return to pick out all domains, and when requested whether or not or to not redirect HTTP visitors to HTTPS, select 2 to redirect.

Install the Email Server Software
Follow these steps to put in the e-mail software program.
- Move to your house listing and obtain the emailwiz set up script:
cd ~
curl -LO lukesmith.xyz/emailwiz.sh - It’s at all times good apply to know what a script does earlier than operating in your Raspberry Pi, so:
cat emailwiz.sh…to verify for any nasties.
- Make the script executable after which run the script:
sudo chmod +x emailwiz.sh
sudo ./emailwiz.sh - The script will obtain and set up Postfix, Dovecot, openDKIM, and SpamAssasin, and you can be required to work together with the set up at varied levels.
- The set up wizard will ask you to decide on a mail server configuration sort. Use the arrow keys in your keyboard to pick out Internet website, then press the Tab key in order that OK is highlighted and hit Enter.
- Next, you can be requested to produce your Fully Qualified Domain Name. Don’t add www or http to the area title—simply enter the area title itself.
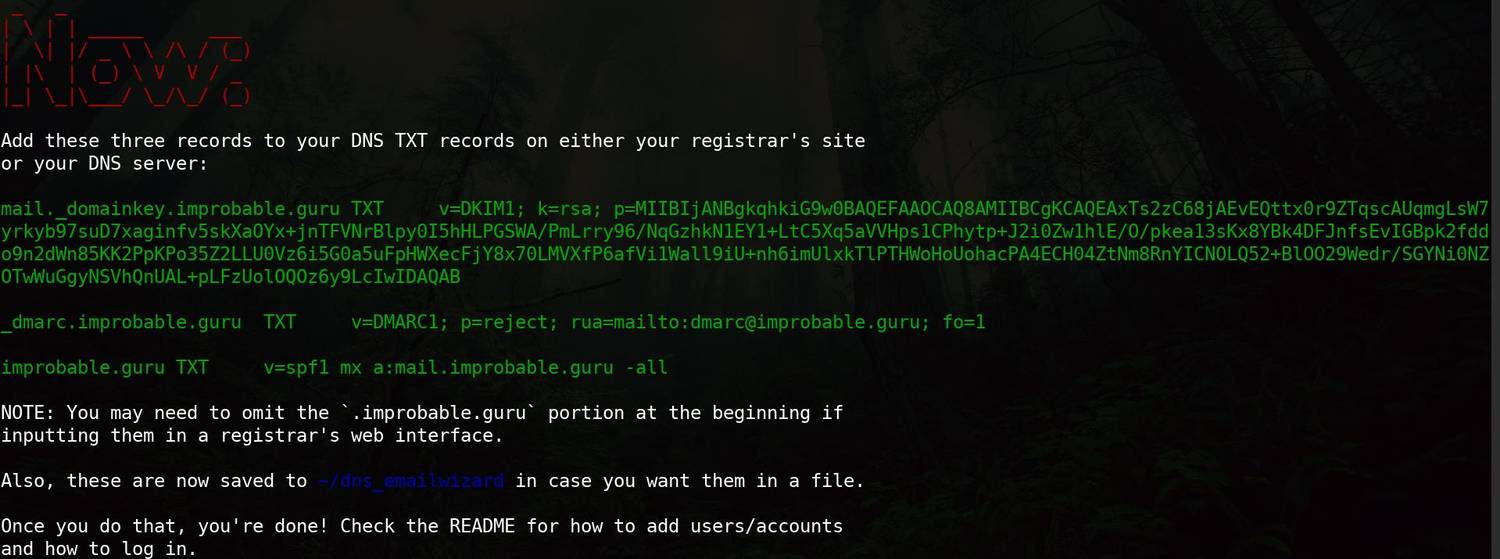
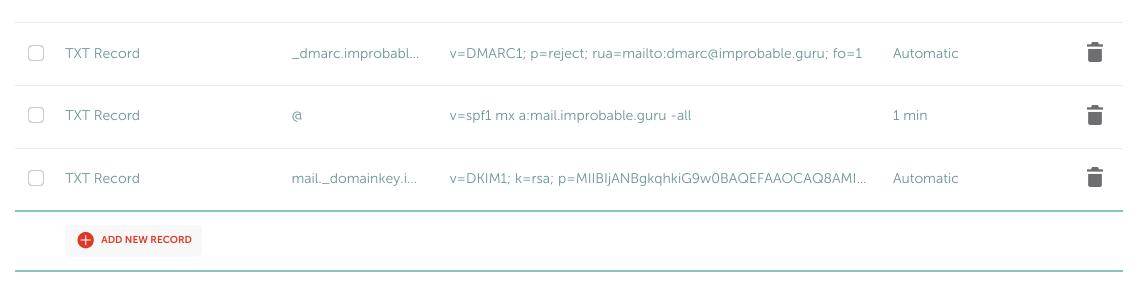
- Once the set up has accomplished, you can be introduced with three textual content data highlighted in inexperienced, together with the host and values.
- Open a browser once more, head to your registrar’s Advanced DNS web page, and create three new TXT data, and paste every document into the corresponding discipline. These will make sure that your e-mail stays out of different individuals’s spam field.
- Any person added to the mail group can be given an e-mail account with their Pi username and password. Add your Pi person to the mail group:
sudo usermod -G mail -mIt’s so simple as that!

Connect to Your Email Server With a Client on Mobile or Desktop
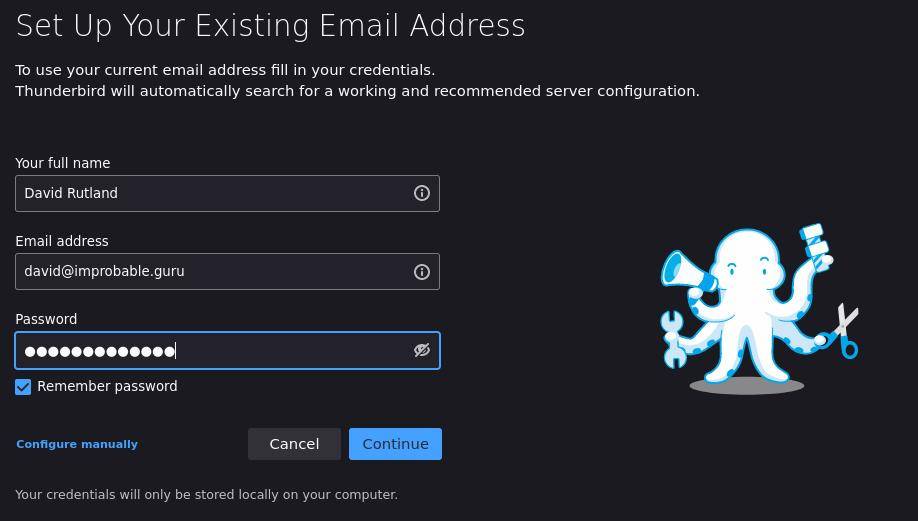
Your e-mail server is absolutely practical and able to go. It’s protected in opposition to intruders and any person account in your Pi can use it. It’s time to hook up with it with an e-mail consumer—though at this level, any emails despatched are prone to land within the recipient’s spam field. We’re utilizing Thunderbird e-mail for this, though the process can be comparable for any cellular or desktop e-mail consumer.
In your e-mail consumer, click on on Add Account, and you can be invited to Set Up Your Existing Email Address. Enter your title, your e-mail tackle, and your password. Your e-mail tackle is your username on the Pi plus the area title; e.g., [email protected]. Your password would be the password your person employs to log into the Pi.
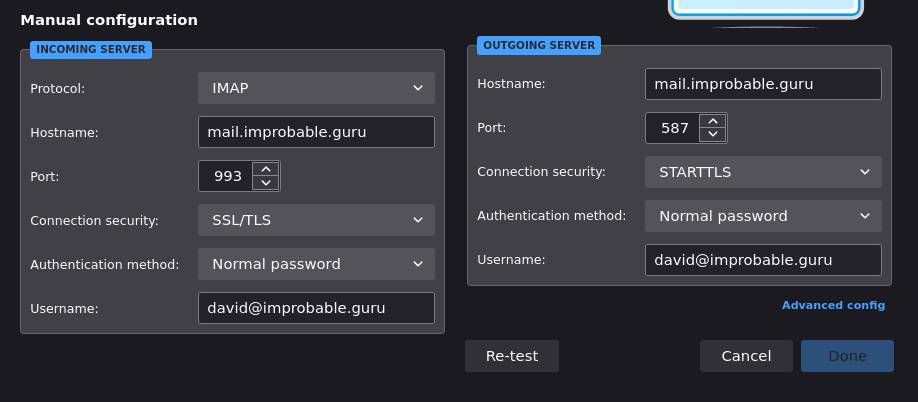
Instead of clicking the Continue button, as a substitute click on on the Configure manually hyperlink. You might want to fill in particulars for each the incoming and outgoing server. For these, the hostname or server title is mail.your-domain-name.tld, the login title is your full e-mail tackle, and the password is… your password. Set the IMAP port to 993 and the SMTP port to 587. Connection safety must be set to STARTTLS and the authentication methodology to regular password.
You Can Now Send and Receive Email Through Your Raspberry Pi Email Server!
Running your personal e-mail service implies that you need not depend on anyone else. You are utterly self-sufficient and out from the purview of tech giants. Even so, if you happen to use your e-mail server for evil functions—resembling bulk emails or spam, you’ll find your self blacklisted by different suppliers. So watch out.
https://www.makeuseof.com/make-your-own-raspberry-pi-email-server/
![Top 6 Server Management Software and Tools Compared [2023]](https://ta-relay-public-files-prod.s3.us-east-2.amazonaws.com/icp/product_images/23db1d70048ad120d46c9ea0e43f22e5.png)


:max_bytes(150000):strip_icc()/registration-3938434_1280-e2aa7e5d57264ae19b69027f14c85c2f.jpg)
