

Note: This put up gives technical steerage solely. Testing described on this put up is finished at the reader’s personal threat and may solely be performed on gadgets and networks that you’ve permission to check on.
Introduction
In order to audit the privateness and safety practices of the apps we use every day, we want to have the ability to examine the community site visitors they’re sending. An app asking for permission to your location could solely use it to ship it to your associates, or it might be monitoring your each transfer. Without realizing precisely what site visitors is being despatched, you’d never know. Traditionally, this has been the job of dynamic evaluation – operating the app and capturing site visitors as the consumer interacts with it. A typical setup may contain a take a look at gadget the place the app runs, linked to a wi-fi entry level operating mitmproxy, Burp Suite or one thing equally tasked with recording site visitors. An extra management laptop computer is likely to be added to the combine, which is linked to the take a look at gadget by way of USB, to run adb instructions on the gadget or overload Java strategies utilizing the dynamic instrumentation toolkit Frida. HTTPS site visitors could be intercepted on this manner by overloading the app calls to Java’s TrustManager and offering our personal, which accepts the proxy certificates that we offer. In mixture, this gadget schema gives a robust setup to research site visitors in a stationary, managed setting.
But what if we don’t have the luxurious of a testing lab? What if the app habits adjustments based mostly on your location, or interplay with the outdoors world? For occasion, in the event you use an app to hire a automobile or unlock a door to a shared office, the real-time habits of the app will probably be totally different from what you may replicate in a lab. For these sorts of complicated interactions, a roaming Machine-in-the-Middle (MitM) schema is required. In reality, all three elements of the earlier schema (take a look at gadget, interceptor, and management gadget) will must be consolidated right into a single gadget operating the software program required for all three elements. If the app being audited is a type of disciplinary technology – that’s, a surveillance app that one individual installs on the gadget of one other individual – then the auditor may also must surreptitiously seize site visitors being despatched by the app, which can pose extra testing issues.
This put up will element the steps concerned to configure an Android gadget to audit the site visitors of any app put in on it, requiring no different gadget to be bodily current. The gadget must be rooted with the intention to set up the software program required for this setup. All of the software program required on this put up is freed from price and open-source, not requiring an additional penny of funding above and past that of the gadget itself. The finish outcome will enable the consumer to open an app in a specialised manner that permits the site visitors to be logged, with out attaching extraneous gadgets or requiring the gadget to be linked to any particular community or entry level.
Requirements
- A rooted Android gadget
- A fundamental understanding of the Linux command line
- A fundamental understanding of ipv4 networking
- A PC or VM with Linux (we use Debian 11
x86_64beneath) for cross-compilation steps throughout setup
We breeze by means of a few of the steps beneath for the sake of brevity, however nearly all are well-documented elsewhere. Where there isn’t adequate documentation obtainable, we’ve gone into additional element and supplied screenshots.
Setup
Overview
In the setup part, the intention is to permit the consumer to launch an app in a manner that its site visitors could be intercepted. The consumer mustn’t must concern any instructions themselves to do that. We will assume there’s a third social gathering auditor concerned in the setup, who we wish to have the ability to remotely entry the gadget and concern instructions. This permits the auditor, who has a level of technical proficiency, to be separate from the consumer, who could have particular entry to app performance (resembling logging in with their credentials). The consumer ought to solely be concerned in the course of to open and work together with the desired app. In this instance, the app id is com.instance.android – substitute this for the app you need to audit.
To add an extra complication to our setup, we wish this to be as automated a course of as potential. The consumer mustn’t must manually begin providers upon gadget boot.
In order to offer the third social gathering auditor entry to the gadget from a distant location, we must cope with the probability of community switching and being behind a NAT router, not having a publicly routable IP handle. Perhaps the easiest solution to resolve this concern is to attach the gadget to a Wireguard VPN, which we’ll element beneath. If the auditor and the gadget operator are one and the identical, this step won’t be vital – they will concern instructions themselves to organize for interception domestically.
To open the app in a manner that permits interception, we’ll want frida-server daemonized on the cellphone and frida-tools obtainable to run domestically. A frida-server module is out there for the nice low-level Android software Magisk which robotically runs the server at boot. Allowing frida-tools to run domestically is a little more difficult. We must deploy a full Linux distribution on the gadget, and set up frida-tools on prime of that.
To enable the consumer to simply launch the app in an interceptable manner, on the Linux container we’ll arrange an SSH server which runs a customized frida command when a consumer with a particular SSH key’s linked to it. We will then use the common Android SSH shopper ConnectBot to generate this SSH key and set off launching the app.
Finally, we’ll want mitmproxy put in on the gadget to view and document the site visitors we encounter.
We suggest the gadget stay plugged in throughout this setup part to keep away from varied issues the place Android will background processes to save lots of battery life.
Clearly, a variety of these instruments function at a low degree inside the Android OS. This being the case, the first step is to put in a customized Android OS which supplies us this degree of entry.
Flashing the Required OS / Apps
First, you’ll must flash a recovery picture to your take a look at gadget. We suggest TWRP.
Next, boot into restoration mode. You can discover instructions specific to your device.
Connect your gadget to a PC or VM, and ensure adb is put in. For debian-based distros, it’s so simple as apt-get set up adb.
Next, you’ll must obtain, push, and flash the following:
- LineageOS. Again, reference the installation guide for your device to obtain the right construct.
- Magisk. This needs to be an identical flash course of to LineageOS above.
- (Optional) Open GApps. This could or is probably not required, relying on the particular app you’re auditing. Note: these apps are closed-source.
Setup inside Android
Reboot the gadget into the newly put in Lineage OS, and connect with your community.
If you might be testing an app which requires set up from the Google Play Store, it’s possible you’ll need to join the gadget to your Google account for comfort. This shouldn’t be strictly required. You can use the apkeep software we developed to bypass this requirement and set up the app of your alternative with out Google Play being put in on the gadget.
Install F-Droid from its website. You’ll be prompted to permit putting in functions from the browser.
Configuring WireGuard
The following steps are solely required if you wish to enable a 3rd social gathering (resembling a researcher) to remotely monitor connections.
On a VPS of your alternative, arrange a WireGuard peer (server) to connect with. Follow these directions for a break-down of the course of.
Open F-Droid and set up the WireGuard app. You’ll be prompted to permit putting in functions from F-Droid.
Open WireGuard and arrange a connection to your VPS WireGuard occasion. For instance:
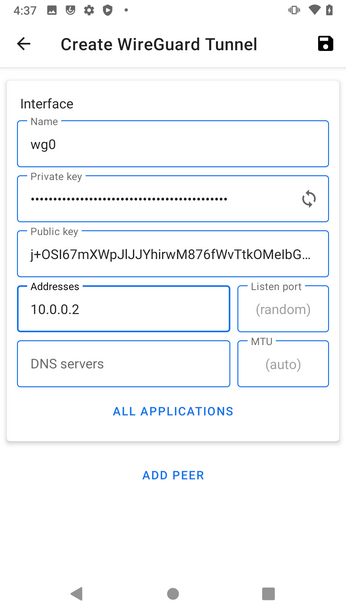
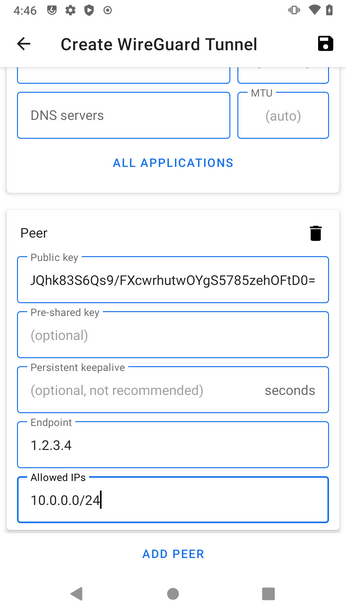
Once that is performed, connect with the VPS peer and permit the permission for the app to behave as a VPN. In Settings -> Networks & web -> Advanced -> VPN, set WireGuard to be an Always-on VPN.
Now, so long as the gadget is linked to the web, the third social gathering will have the ability to attain it. This is helpful in the cell context the place there’s frequent switching of community connections.
Configuring ConnectBot
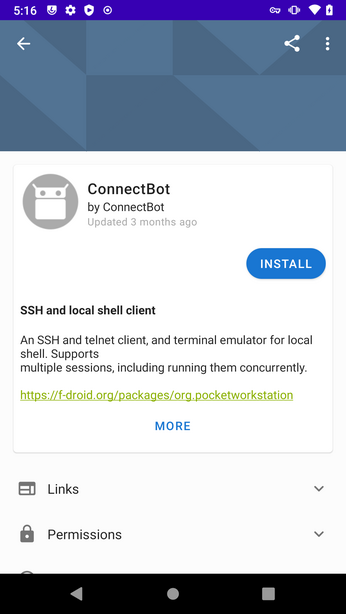
ConnectBot is an Android SSH shopper, and can enable our consumer to launch the app in a particular manner that permits monitoring.
Open F-Droid and set up the ConnectBot app.
In ConnectBot, generate a brand new SSH keypair.
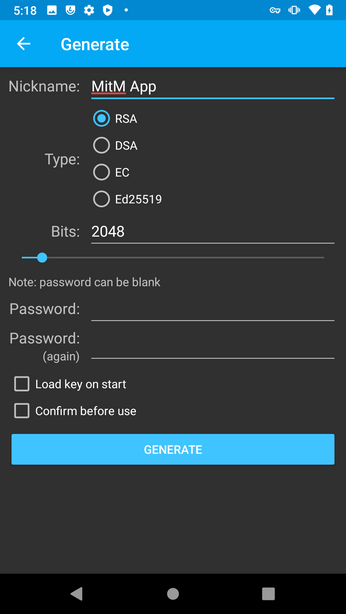
Note the public key, as you have to it later.
Next, add a brand new host to connect with:
Protocol: ssh
android@localhost
Nickname: MitM App
Use pubkey authentication: 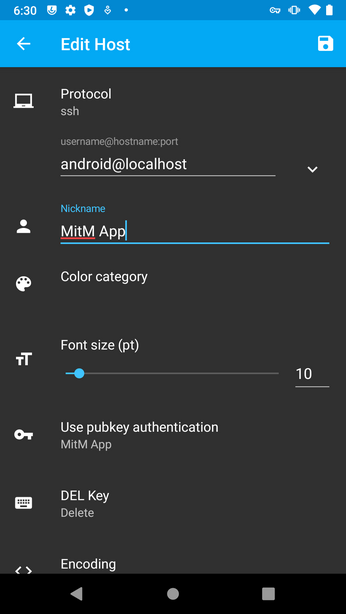
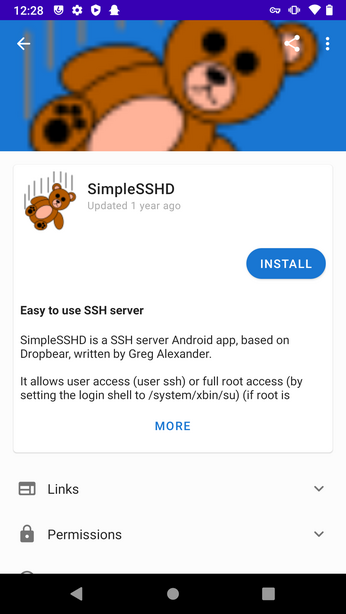
Installing SimpleSSHD
We will want SimpleSSHD to switch information from the Linux container later.
Open F-Droid and set up the SimpleSSHD app.
Open SimpleSSHD and begin the SSH daemon. In the app settings, allow “Start on Boot.”
Installing Magisk and Frida Server
Now you’ll want to set up a Magisk module to start out the Frida server upon gadget boot.
First, obtain the newest launch of magisk-frida to your gadget. This could fail to obtain the right zip file in the default browser. If this occurs, attempt downloading it in one other browser.
Previously, we flashed Magisk to our gadget once we had been in restoration mode. This ought to have added a Magisk app to our put in apps. Open it, and proceed to put in the full app when requested.
Installing the full Magisk app will overwrite the bootstrap app. Open Magisk, and go to the Modules tab. Tap “Install from Storage” and choose the zip you beforehand downloaded to put in it. You might want to reboot the gadget.
Deploying Linux on the Device
We might want to set up a full distribution of Linux on the gadget with the intention to launch apps by way of Frida domestically in a manner that permits interception of community site visitors.
Install Linux Deploy from its GitHub repo.
Before configuring or putting in Linux from the default configuration, a number of settings must be modified. Tap the lower-left nook of the display to enter settings for this configuration, and alter the distribution to debian steady. The picture dimension needs to be no less than 4G. Enable the init system and SSH server. Copy the password for the consumer as properly.
Now you may choose “set up” from the top-right menu, then “begin” to start out the container.
Lastly, go into the app-wide settings and allow autostart. We’ve discovered it handy to vary the autostart delay to 10 seconds.
Android Linux Container
Using ConnectBot, it is best to have the ability to log in to the Linux container with the profile we beforehand arrange and the password you copied in a previous step.
Use the following instructions to put in our dependencies:
sudo apt set up tmux python3-venv python3-dev gcc-arm-linux-gnueabihf python3-pyasn1 python3-flask python3-urwid libxml2-dev libxslt-dev libffi-dev python3-pip libssl-dev zlib1g-dev iptables rustc
pip set up mitmproxy prompt_toolkit pygments
and permit us to connect with the host Android SSH occasion with a brand new SSH key:
ssh-keygen # enter, enter, enter
scp -P 2222 .ssh/id_rsa.pub localhost:./authorized_keys
In the SimpleSSHD app, you will notice a brand new non permanent password to enter at the immediate. Next:
editor ~/.ssh/authorized_keysSwitch again to the ConnectBot keystore and duplicate the public key we beforehand famous. Using this public key, enter the following into the editor and save:
command="/residence/android/frida_*/bin/frida -H 127.0.0.1 -f com.instance.android -l frida-android-repinning.js --no-pause",no-agent-forwarding,no-x11-forwarding,no-port-forwarding CONNECTBOT_PUBKEY_HERELastly, create the frida-android-repinning.js script referenced above to the residence listing. You can discover the script here. Special because of @pcipolloni for writing it.
You can log off of the container. Now, once we connect with our native Linux host with ConnectBot, it should robotically try and concern a command to open our desired app with frida. The subsequent step is to put in the frida-tools inside our Linux container.
Compiling Frida Tools for Android
Unfortunately, we run into some issues when putting in frida-tools the typical manner, by way of pip:
ImportError: /residence/android/.native/lib/python3.9/site-packages/_frida.cpython-39-arm-linux-gnueabihf.so: fallacious ELF class: ELFCLASS64It appears to be like like putting in the instruments by way of pip on an Android platform isn’t anticipated. Fortunately, there’s one other solution to construct and set up. We can compile the instruments straight from the Frida repository. We’ve discovered compiling straight on an Android gadget to take a prohibitively very long time, so on this instance we’ve opted to cross-compile on a extra highly effective machine. Here, we’re utilizing a Debian 11 x86_64 construct setting. Even for arm64 / aarch64 gadgets, we’ve had higher luck compiling to armhf. Instructions for gadgets with Intel-based chipsets will probably be totally different.
sudo dpkg --add-architecture armhf
sudo apt replace
sudo apt set up curl git npm pkg-config gcc-arm-linux-gnueabihf g++-arm-linux-gnueabihf libpython3.9-dev:armhf
git clone --recurse-submodules https://github.com/frida/frida.git
cd frida && make tools-linux-armhf
Once that is completed, we can have frida-tools obtainable in a format runnable on the gadget. Copy it over:
scp -r construct/frida_thin-linux-armhf/ android@device_ip:.Finally, again on the Android gadget, run the following line:
ln -s /residence/android/frida_thin-linux-armhf/bin/* .native/bin/This ought to add the frida-tools binaries to your $PATH so you may run them straight in a shell. You can take a look at whether it is connecting to the native frida-server by operating
frida-ps -H 127.0.0.1If you see a listing of processes, frida is working correctly. If you see an error, one thing has gone fallacious.
Real-Time Interception
With setup full, we now have all we have to begin a real-time interception. The following steps are run each time an interception is made.
With Wireguard set as much as auto-connect at boot, the auditor ought to have the ability to SSH to the cellphone with no drawback. We need to make sure that the auditor is ready to re-connect to any instructions operating on the gadget ought to they turn out to be disconnected. Luckily, we’ve put in the terminal emulator tmux above.
Start a brand new tmux session with tmux new -s interception. Here, arrange iptables guidelines to redirect any site visitors of the desired app to our mitmproxy occasion. In Android, every app has a novel UID assigned to it. To discover it, you may reference the file /knowledge/system/packages.xml from an Android terminal (not inside the Linux container). Alternatively, merely run the app and inside the Linux container concern a ps aux | grep com.instance.android. With this UID useful, we are able to concern the following instructions:
APP_UID=10154 # modify this line
sudo iptables-legacy -t nat -A OUTPUT -p tcp --dport 80 -m proprietor --uid-owner $APP_UID -j DNAT --to 127.0.0.1:8080
sudo iptables-legacy -t nat -A OUTPUT -p tcp --dport 443 -m proprietor --uid-owner $APP_UID -j DNAT --to 127.0.0.1:8080
mitmproxy --mode clear
iptables will now solely be intercepting site visitors generated by our desired app, which ignores all different system site visitors.
In a second tmux session, we’ll set up the solid certificates generated by mitmproxy into the host system. Copy the certificates:
cat ~/.mitmproxy/mitmproxy-ca-cert.cerThen set up the certificates as the shell consumer:
ssh -p 2222 localhost
su - shell
echo "PASTED_CERTIFICATE_HERE" > /knowledge/native/tmp/cert-der.crt
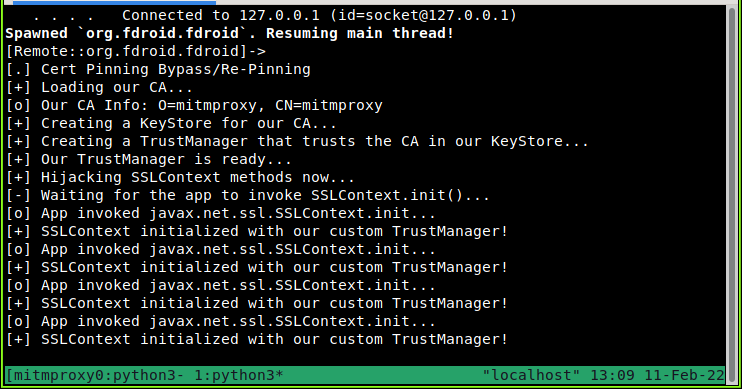
chmod o+r /knowledge/native/tmp/cert-der.crtNow that we now have the certificates put in the place the host Android OS can entry it, we are able to take a look at whether or not all of it works! Back in the Linux container, run:
frida -H 127.0.0.1 -f com.instance.android -l frida-android-repinning.js --no-pauseNow change to the mitmproxy tmux session and observe site visitors rolling on by means of.
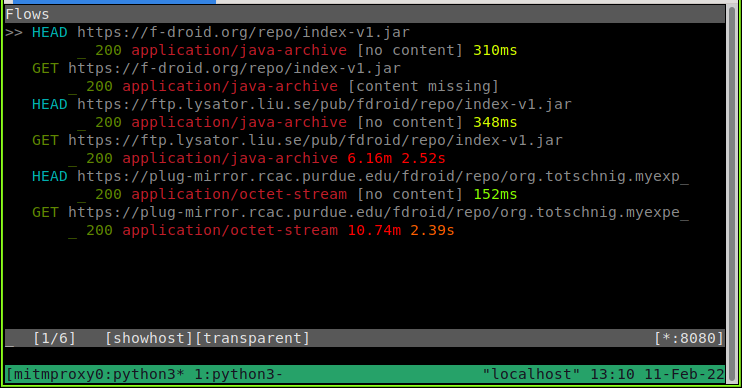
Now that we’ve confirmed all the pieces works collectively seamlessly, we gained’t must run the frida command manually. Just have the auditor arrange the iptables guidelines and mitmproxy to run after boot (or automate this with the init system in the Linux container). Then, the consumer can open the app when they need it audited.
Conclusion
Lots of apps that we use on a regular basis spy on us with out our data. One solution to battle again is to reveal the spying by analyzing an app’s community site visitors. But testing an app in a managed lab shouldn’t be at all times potential or fascinating. But as we now have demonstrated, we are able to nonetheless carry out an audit of an app, and observe how its behaviors may change when run on the go. We hope this demonstration will show fruitful for these investigating the safety and privateness properties of apps in real-world conditions.
https://www.eff.org/deeplinks/2022/04/mobile-mitm-intercepting-your-android-app-traffic-go


