Ever puzzled how to arrange your individual server in Valheim? Valheim is greatest performed in co-op, and native servers devoted could cause video games to lag and produce other connection points. It might be an arduous process, however establishing your individual devoted server has quite a lot of advantages on your personal taking part in expertise and that of your folks. Changes to devoted servers have been additionally made in the newest patch replace.
Valheim’s newest patch?: https://t.co/QfyItR6YhS
— Valheim (@Valheimgame) March 2, 2021
The most important good thing about internet hosting your individual Valheim server is that it’ll run for so long as you need, and different gamers might be taking part in even whereas the host is offline. Hosting such a server requires numerous work from a pc, and it’s steered that you simply use a wholly separate PC for the only real goal of operating the server. This means establishing your individual server might be very pricey when it comes to {hardware}, electrical energy, and bandwidth.
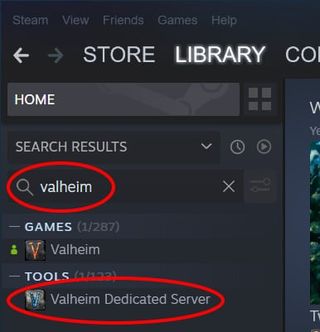
There are many steps to establishing and becoming a member of your individual devoted server. The first step is to discover the Valheim Dedicated Server instrument on Steam. After, the next steps are:
- Right click on the Valheim Dedicated Server on Steam; click on Properties, Local Files, then Browse
- Back up the “start_headless_server” file in case any errors are made
- Right click on the unique “start_headless_server” file and click on Edit; this can deliver up Notepad
- Change the -name tag from “My server” to what you need your server to be known as; be sure that the brand new title remains to be surrounded by citation marks
- Change the -world tag from “Dedicated” to one thing apart from your server title; preserve citation marks
- Change the -password tab from “Secret” to no matter you need your password to be
- Forward your host PC’s ports to 2456-2458 TCP/UDP; this course of is completely different for each consumer relying on their router
- Run the Valheim Dedicated Server on Steam and look forward to the sport server to join
- After a while, your newly created server will seem in Valheim’s listing of group servers
- Run the Valheim shopper and wait on your server to seem in the Community Server listing
- Once your server has appeared, click on on it and enter the password to be a part of
- Find out the exterior IP Address and forwarded ports from the server host
- Click View in the top-left of Steam and open the Favourites tab
- Click “Add a Server” and sort in the IP Address and port info as such: “IP ADDRESS: PORT”
Who can relate??️
Made by u/baffledgado on Reddit#Valheim #Survival #Vikings #Valheimmemes pic.twitter.com/Pmtnlp33XW— Valheim (@Valheimgame) February 22, 2021
After finishing these steps, your server ought to be up and operating and prepared to be a part of. If it stays unavailable, be sure to have accomplished every step appropriately. Double-check when port forwarding since it may be difficult for individuals who’ve by no means achieved it.
Valheim is a Viking survival game presently in its early entry part. It is solely out there on Steam, the place it lately hit five million users.
https://www.dbltap.com/posts/how-to-set-up-your-own-dedicated-server-in-valheim-01ezx6y8pxhp