
We Take You Step-by-Step Through the Process for Acquiring and Implementing Your VMC, So You Can Start Showcasing Your Logo In Customer Inboxes As Quickly and Easily As Possible
Google recently announced their adoption of the Brand Indicators for Message Identification (BIMI) standard within Gmail, and have become the highest-profile mail service to supply assist for Verified Mark Certificates (VMCs). Yahoo Mail (as part of Verizon Media) and Fastmail have additionally joined in on the brand new initiative, signifying the primary main step in direction of mass adoption. With different prime suppliers like Comcast, Seznam, and Valimail both within the planning or pilot levels of assist, BIMI and VMCs will quickly be reside in a vital variety of inboxes around the globe.
To recap, the BIMI normal permits for logos to be displayed subsequent to the “sender” discipline inside an e mail. VMCs work together with BIMI by offering a verification mechanism that confirms that the particular emblem truly belong to that specific sender. They work collectively to assist firms increase model recognition and helps enhance e mail engagement charges by a mean of 10%. There’s safety advantages as effectively, as they assist cease phishing makes an attempt by stopping attackers from inappropriately utilizing logos they don’t personal in an effort to trick their targets.
In our earlier article on Gmail’s VMC assist, we touched on the method for buying and implementing a VMC certificates. The aim was to present readers an outline of get a verified mark certificates, what was concerned, and to assist decide whether or not or not VMCs had been proper for them. Today, we’re going to go a step additional. If you propose on shifting ahead with VMCs, you then’ll want a larger degree of element to really make all of it occur and in the end get your emblem displayed in your buyer’s machines.
So, what are the stipulations in your e mail server? How in regards to the specifics relating to your emblem? How do you configure BIMI settings? And get a verified mark certificates itself?
Let’s hash it out.
Step 1 – Be DMARC Complaint
The first step in getting ready in your VMC is changing into DMARC compliant. What is DMARC precisely? It stands for Domain-based Message Authentication, Reporting & Conformance and acts as a means for controlling domain-level insurance policies and settings for message validation, disposition, and reporting.
The DMARC requirement for VMCs advantages the complete e mail ecosystem as a complete as a result of it forces messages to endure validation checks, createing a larger degree of baseline safety. DMARC additionally dictates what is completed with emails once they fail the aforementioned checks, corresponding to quarantining or rejecting/deleting them.
Not positive the place you stand for the time being in relation to DMARC? There’s loads of free instruments out there that enable you test should you at the moment have DMARC in place in your area, like this one from MxToolbox. Below is an instance of what the outcomes ought to seem like in case your DMARC file and related settings are good to go:
The most essential factor to recollect is that your DMARC file should include “p=quarantine” or “p=reject”, which mainly means you aren’t permitting messages that fail authentication to make their approach by your e mail system as if there was nothing improper.
If your area is failing any of the above checks, don’t fear – now we’re going to let you know arrange DMARC in your area. If you handed the DMARC test, then effectively accomplished! You can now proceed to step 2 additional under.
How to Setup DMARC
1. Sender Policy Framework (SPF) have to be configured. It prevents spoofing by letting area homeowners mechanically approve IP addresses of servers which are permitted to ship mail on the area’s behalf. If a server tries sending mail and its IP deal with isn’t on the checklist, it gained’t move the SPF test.
2. Collect IP addresses which are used to ship e mail out of your area together with net servers, in-office mail servers, your ISP’s mail servers, and another third occasion mail servers.
3. Compile your sending and non-sending domains.
4. Make an SPF file in a .txt file for every area. For instance:
v=spf1 ip4:1.2.3.4 ip4:2.3.4.5 ip4:x.x.x.x -all
v=spf1 ip4:1.2.3.4 ip4:2.3.4.5 embody:thirdparty.com -all
Publish your SPF to DNS by including a new TXT file together with your SPF textual content.
5. Check the file by using an SPF check tool.
6. DKIM must be set up. It’s a normal that makes use of cryptography to signal emails, verifying the area it’s coming from and guaranteeing the e-mail hasn’t been tampered with whereas in transit.
7. Choose a DKIM selector, which is a user-defined string that’s added to your area identify to establish the DKIM public key. For instance:
“normal._domain.instance.com” = host identify
Then generate a public-private key pair in your area.
For Windows, you can use PUTTYGen.
For Linux and Mac, you can use ssh-keygen.
8. Create a TXT file that incorporates the general public key from the pair you simply generated. Publish it through your DNS console. For instance:
v=DKIM1; p=YourPublicKey
You test the file by utilizing a DKIM check tool. As in your non-public key, retailer that wherever your e mail platform specifies. Some e mail suppliers will instruct you to setup CNAME data for DKIM authentication. Overall, the DKIM steps can differ based mostly in your supplier, so make sure you test with them.
9. Configure the DMARC monitoring mode by creating a DNS file and naming it just like the next: “_dmarc.your_domain.com. For instance:
v=DMARC;p=quarantine;pct=100;rua=mailto:dmarcreports@you_domain.com
10. The instance above units “p=quarantine”. For your VMC, it may be set to both that or “p=reject”. If you aren’t positive which to decide on, one method is to first set it to “quarantine” after which have a interval of guide evaluate. Then, you’ll be able to replace your SPF file accordingly and in the end change the setting to “reject” as soon as your filtering is the place it must be. Reject means emails that fail DMARC shall be deleted.
The above instance additionally units “pct=100”. You can begin at a decrease worth (which can solely filter a sure share of messages) till you might be snug, ultimately working your approach as much as 100.
A pair different miscellaneous notes – you’ll wish to be sure to arrange SPF and DKIM authentication for all servers you utilize to ship e mail. If you skip a server, emails that it sends is not going to be delivered. Also, you don’t have to attend for DMARC to be set as much as begin the VMC course of – the DMARC test is a part of the certificates validation process to allow them to work in tandem to a point.
Step 2 – Use a Trademarked Logo
Now that your e mail is correctly configured, we will transfer on to the emblem itself. First off, the emblem have to be trademarked. The cause for this requirement is that a trademarked emblem is tougher to spoof. After all, it’s been vetted on the federal and/or worldwide degree.
If you aren’t positive about your group’s emblem, you’ll be able to seek for it on the World Intellectual Property Organization’s (WIPO) web site (https://www3.wipo.int/branddb/en/). It will let you know whether or not it’s listed as an energetic registered trademark.
Additionally, solely sure trademark workplaces are accredited for VMCs. Currently, eight are acknowledged:
If your emblem isn’t trademarked, then we suggest initiating the method instantly, as it may possibly take a whereas. The greatest place to begin could be to speak to your authorized staff. If you don’t have authorized illustration, it’s not essentially a requirement relying in your jurisdiction, however we’d extremely suggest it.
You want your mark to be within the right format to be registerable. This video from the USPTO explains get your mark prepared for submitting:
Then, you’ll must do the next:
- Identify the products and companies your group present , which is a part of the trademark necessities.
- Search within the acceptable jurisdictions to confirm your mark isn’t too just like any others. Each trademark workplace ought to have their very own search software, and you can find the USPTO’s here.
- Gather the knowledge required for the applying. Here’s the USPTO’s list of what’s needed.
- Start the submitting course of. Make positive you’re conscious of the deadlines, as they’re strict.
After you file, an examiner from the trademark workplace will evaluate your utility and ultimately attain out to you. Their requests will differ relying on the specifics of your case, however make sure you reply in a well timed method or else you threat having your utility cancelled. At the conclusion of the method, you’ll in the end obtain a discover of approval or denial.
Step 3 – Format Your Logo
Your emblem have to be within the Scalable Vector Graphics (.SVG) format and should adhere to the SVG Portable/Secure (SVG-P/S) profile. Unfortunately, there’s at the moment no export template for it in Adobe Illustrator. The excellent news, nevertheless, is that it solely requires a few additional steps to get your emblem within the correct format, which we define under:
- Convert your emblem to vector format. You can do that by saving your emblem as an acceptable filetype corresponding to ‘.ai’, ‘.eps’, ‘.pdf’, or ‘.svg’. Note – in case your emblem has complicated artwork, you could must do some tweaking to get it to show correctly.
- Export as SVG Tiny 1.2.
- Open your file in Adobe Illustrator
- Select “Save As”, then choose SVG from the “Format” dropdown menu.

Click “Save”.
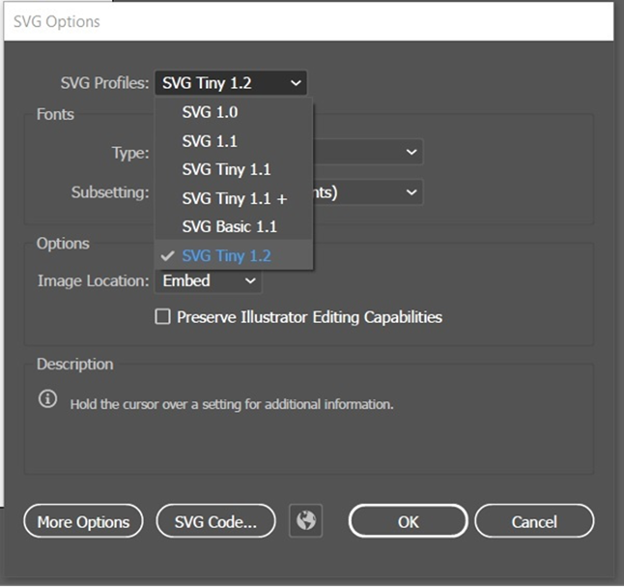
3. Another dialog field ought to seem. Choose “Tiny 1.2” from the “SVG Profiles” dropdown menu and click on “OK”.
Open your SVG file utilizing a textual content editor corresponding to Notepad. You may also use a code editor.
- Verify that you simply see the next someplace within the header:
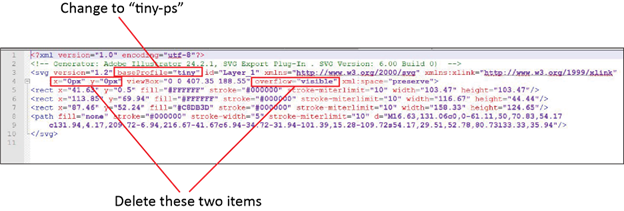
xmlns=http://www.w3.org/2000/svg, model=”1.2, baseProfile=”tiny-ps“
For instance, you might even see a string like this:
If you exported from Illustrator, you’ll want to vary the baseProfile to tiny-ps, and delete the x=, y= and overflow gadgets.
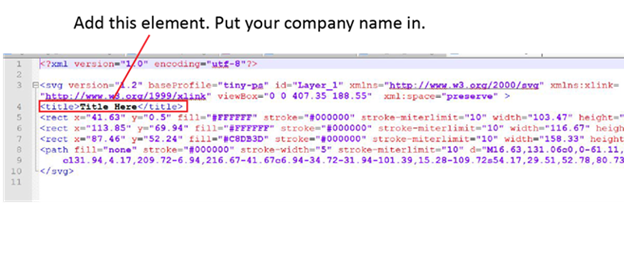
- Add the title aspect. Hit return after xml:area=”protect” and put the title aspect together with your firm identify there. Make positive that you simply don’t put the title contained in the graphic code itself.
- Save the file whereas ensuring to maintain it in SVG format.
There’s additionally an alternative choice out there that requires much less legwork. The BIMI working group has released an Adobe illustrator Export Script that lets customers mechanically convert an SVG Tiny 1.2 file into SVG P/S format
.
Finally, irrespective of which methodology you utilize, we suggest adhering to the next tips in an effort to get your emblem to show optimally:
- Use a 1:1 side artio
- Center your picture
- Use a non-transparent background
Next, we’ll cowl get a verified mark certificates.
Step 4 – Purchase Your VMC
Next, you’ll go about buying your VMC. The SSL Store is among the first trusted vendor’s to offer VMCs, and for a restricted time we’re providing particular introductory pricing on DigiCert VMCs.
Most organizations will solely want a single VMC for his or her area. Multi-SAN VMCs can be found for these securing a number of domains. If you might be utilizing a number of logos, nevertheless, you’ll want a VMC for every one. You can discover more details about using multiple domains with VMCs here.
After shopping for the VMC, you’ll undergo a validation process that’s just like that of EV SSL certificates. There’s a few additional steps although for added safety, corresponding to:
- Confirming your emblem is a registered trademark
- Providing notarized copies of ID paperwork pertaining to the person out of your group that’s making use of for the VMC
- An in-person or video name with a member of the certificates authority’s validation staff in an effort to verify your identification matches the offered ID paperwork
Once these steps are accomplished, your VMC shall be issued.
Step 5 – Upload the VMC To Your Web Server
Now that we’ve gone over get a verified mark certificates, the following step is to add the certificates to your server. After your VMC is issued, you’ll obtain an e mail containing your entity certificates Privacy Enhanced Mail (PEM) file. If you obtain another intermediate certificates out of your CA, then append them to the PEM file. Next, add your PEM file to your public net server and make be aware of the file’s URL, as you’ll want it within the subsequent step.
Step 6 – Add a BIMI TXT Record To Your Domain
Next, you’ll create your BIMI TXT file, which you’ll then add to your DNS in your internet hosting supplier:
- First off, create your BIMI file. You’ll want the PEM file location you wrote down earlier and the placement of your SVG emblem file. You’ll format your BIMI file as per the instance under:
v=BIMI1;l=https://photographs.yourdomain.com/model/bimi- emblem.svg;a=https://photographs.yourdomain.com/model/certificates.pem
- Add your BIMI file as a DNS TXT file together with your area supplier. The precise steps will differ relying in your supplier, however you’ll be getting into the next values:
| Field | Value | Description |
| Type | TXT | DNS file kind |
| Host | default._bimi.yourdomain.com | Enter “default._bimi” adopted by your root area |
| Value | v=BIMI1;l=https://photographs.yourdomain.com/model/ bimilogo.svg;a=https://photographs.yourdomain.com/ model/certificates.pem | Your BIMI file |
| TTL | 1 hour (3600 seconds) | Set to 1 hour |
- Then, permit as much as 48 hours in your emblem to start out being displayed through BIMI. You may also check your BIMI record with the BIMI Group’s tool.
- Confirm your emblem is being displayed correctly by sending a check e mail. Then, that’s it! You’re accomplished. Now you already know precisely get a verified mark certificates. That wasn’t so dangerous, was it?
Supporting the Evolution of Email
VMCs and BIMI are thrilling new improvements that deliver recent adjustments to the world of e mail, serving to organizations additional evolve within the digital world. Now that you understand how to get a verified mark certificates (VMC), you can begin having fun with the advertising and safety advantages that they supply. And in relation to your VMC, The SSL Store™’s award-winning Customer Experience Team has you lined each step of the best way with 24/7 knowledgeable assist, so you’ll be able to take advantage of these advantages.


:max_bytes(150000):strip_icc()/HowtoSpecifyaPreferredSMTPServerforaMacOSXMailAccount2016-01-04-568a7f403df78ccc153b7b78.png)