

@jack-ryanJack Ryan
I’m Jack Ryan, the Marketer & Coder. We share some tales about free smtp servers and programming.
Introduction
Postfix is a mail switch agent (MTA), an software used to ship and obtain emails. It will be configured in order that it will probably solely be used to ship emails by a native software. This is helpful in conditions the place you want to ship e mail notifications out of your purposes on a common foundation, or just in case you have a lot of outbound site visitors that a third-party e mail service supplier doesn’t enable. It can be a lighter various to operating a full SMTP server that maintains the mandatory performance.
In this tutorial, you’ll set up and configure Postfix as a send-only free SMTP server. It may even request free TLS certificates from Let’s Encrypt to your area and encrypt outgoing emails with them.
Previous necessities
- A Ubuntu 18.04 server configured in accordance to the Initial Server Configuration for Ubuntu 18.04 , with a non-root person.
- A completely registered area identify. For this tutorial, will probably be used your_domain always. You should buy a area identify, get a free one from Freenom, or use a area registrar of your alternative.
- A DNS document with your_domainoriented to the general public IP deal with of your server. You can use this introduction to DigitalOcean DNS to be taught extra about including them.
Note: Your server’s hostname and your Droplet’s identify should match your_domain, as DigitalOcean routinely units PTR information for the Droplet’s IP deal with primarily based on its identify.
You can confirm the hostname of the server by typing hostname on the command immediate. The consequence ought to match the identify you gave the Droplet when creating it.
Step 1: Install Postfix
In this step, you’ll set up Postfix. The quickest factor to do is set up the package deal mailutils, which bundles Postfix with some add-on applications that you’ll use to take a look at e mail supply.
First, replace the package deal database:
Next, set up Postfix by operating the next command:
$ sudo apt set up mailutilsNear the tip of the set up course of, you may be introduced with the Postfix configuration window:
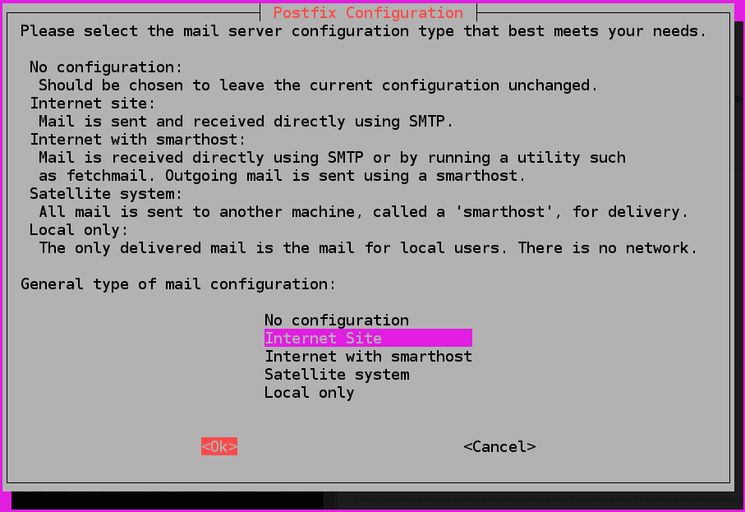
The default possibility is Internet Site. This is the beneficial possibility to your use case, so press TAB and then ENTER. If you solely see the outline textual content, press TAB to choose OK and then press ENTER.
If it does not present up routinely, run the next command to begin it:
$ sudo dpkg-reconfigure postfixThen you’ll obtain one other configuration message concerning System mail identify :
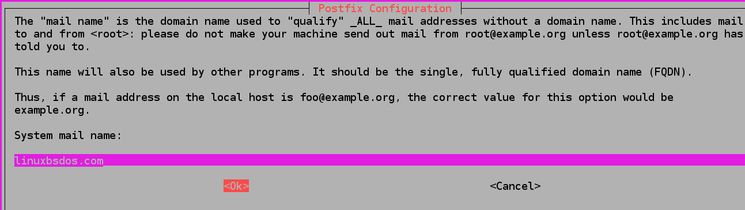
The system e mail identify should be the identical as the one you assigned to your server when creating it. When executed, press TAB and then ENTER.
Now, you may have Postfix put in and you might be prepared to begin configuring it.
Step 2: Configure Postfix
In this step, you’ll configure Postfix to ship and obtain e mail solely from the server it’s operating on; that’s, from localhost.
For that to occur, Postfix should be configured to pay attention solely on the loopback interface , which is the digital community interface that the server makes use of to talk internally. To make the mandatory adjustments, you’ll need to edit the principle Postfix configuration file, named principal.cf, discovered at and many others/postfix.
Open it to modify it together with your favourite textual content editor:
$ sudo nano /and many others/postfix/principal.cfLook for the next traces:
. . .
mailbox_size_limit = 0
recipient_delimiter = +
inet_interfaces = all
. . .
Set the worth of inet_interfaces to loopback-only:
. . .
mailbox_size_limit = 0
recipient_delimiter = +
inet_interfaces = loopback-only
. . .
Another directive that you’ll want to modify is
mydestination, which is used to specify the record of domains which can be delivered by the mail supply transport
local_transport. By default, the values are comparable to the next:
. . .
mydestination = $myhostname, your_domain, localhost.com, , localhost
. . .
Change the road to seem like the next:
. . .
mydestination = localhost.$mydomain, localhost, $myhostname
. . .
If your area is definitely a subdomain and you need your emails to seem like they had been despatched from the principle area, you’ll be able to add the next line to the tip of
principal.cf:
...
masquerade_domains = your_main_domain
The elective setting
masquerade_domainsspecifies for which domains the subdomain a part of the e-mail deal with can be eliminated.
When executed, save and shut the file.
Then restart Postfix by operating the next command:
$ sudo systemctl restart postfixYou configured Postfix to solely ship emails out of your server. Now, you’ll take a look at it by sending a pattern message to an e mail deal with.
Step 3: Test the SMTP server
In this step, you’ll take a look at whether or not Postfix can ship emails to an exterior e mail account utilizing the command
mail, which is a part of the package deal
mailutilsyou put in in step one.
To ship a take a look at e mail, run the next command:
$ echo "This is the physique of the e-mail" | mail -s "This is the topic line" your_email_addressYou can change the physique and topic of the e-mail as you want. Remember to substitute
your_email_addressa legitimate e mail deal with that you could entry.
Now, examine the mail on the e mail deal with you despatched this message to. You ought to see the message in your inbox. If you do not see it, examine your spam folder. At this level, the emails you ship are usually not encrypted, main service suppliers to suppose they’re doubtless spam. You will configure encryption later, in step 5.
If you obtain an error from the command
mail, or should you didn’t obtain a message after a lengthy time frame, examine that the Postfix configuration you modified is legitimate and that your server identify and host identify are set to your area identify.
Note that with this setting, the sector deal with
Fromfor take a look at emails that you simply ship can be in the format , the place is the identify of the server person underneath which you ran the command.
At this level, you despatched an e mail out of your server and verified that it was obtained appropriately. In the subsequent step, you’ll configure e mail forwarding for
root.
Step 4: Forward system emails
In this step, you’ll configure e mail forwarding for the
rootperson in order that system-generated messages despatched to you in your server are forwarded to an exterior e mail deal with.
The file
/and many others/aliasescomprises a record of alternate names of e mail recipients. Open it for enhancing:
In its default state, it seems to be like the next:
# See man 5 aliases for format
postmaster: root
The solely directive current specifies that system-generated emails be despatched to
root.
Add the next line to the tip of the file:
...
root:          your_email_address
With this line, you specify that emails despatched to the
rootperson are forwarded to a particular e mail deal with. Remember to substitute
your_email_addressto your private e mail deal with. When executed, save and shut the file.
For the change to take impact, run the next command:
Upon execution
newaliases, it should create a database of aliases that the command makes use of
mail, that are taken from the configuration file you simply edited.
Check that emails are despatched to the
rootperson by operating the next:
$ echo "This is the physique of the e-mail" | mail -s "This is the topic line" rootYou ought to obtain the mail at your e mail deal with. If you do not see it, examine your spam folder.
In this step, you configured the forwarding of system-generated messages to your e mail deal with. Now, you’ll allow message encryption so that every one emails despatched by your server are protected in opposition to tampering in transit and thought-about extra respectable.
Step 5: Enable SMTP Encryption
Now, you’ll allow SMTP encryption by requesting a free TLS certificates from Let’s Encrypt to your area (with Certbot) and configure Postfix to use it when sending messages.
Ubuntu contains Certbot in its default package deal repository, however it may be outdated. Instead, you’ll add the official repository by operating the next command:
$ sudo add-apt-repository ppa:certbot/certbot
Press
ENTERwhen prompted to settle for. Next, replace your server’s package deal supervisor cache:
Lastly, set up the most recent model of Certbot:
$ sudo apt set up certbot -y
In the conditions, you put in the easy firewall ufwas a part of the preliminary server setup. You will want to configure it to allow the HTTP port 80so that the area verification can full. Run the next command to allow it:
The consequence will seem like the next:
Output
Rule Added
Rule Added (v6)
Now that the port is open, run Certbot to get a certificates:
$ sudo certbot certonly --standalone --rsa-key-size 4096 --agree-tos --preferred-challenges http -d your_domainThis command instructs Certbot to difficulty certificates with an RSA key dimension of 4096 bits, to run a momentary stand-alone internet server (
--standalone) for verification, and to examine by port
80(
--preferred-challenges http). Remember to substitute
your_domainto your area earlier than operating the command and enter your e mail deal with when prompted to accomplish that.
The consequence will look one thing like this:
Output
Saving debug log to /var/log/letsencrypt/letsencrypt.log
Plugins chosen: Authenticator standalone, Installer None
Obtaining a new certificates
Performing the next challenges:
http-01 problem for `your_domain`
Waiting for verification...
Cleaning up challenges

IMPORTANT NOTES:
 - Congratulations! Your certificates and chain have been saved at:
   /and many others/letsencrypt/stay/your_domain/fullchain.pem
   Your key file has been saved at:
   /and many others/letsencrypt/stay/your_domain/privkey.pem
   Your cert will expire on 2020-07-11. To acquire a new or tweaked
   model of this certificates in the longer term, merely run certbot
   once more. To non-interactively renew *all* of your certificates, run
   "certbot renew"
 - If you want Certbot, please take into account supporting our work by:

   Donating to ISRG / Let's Encrypt:   https://letsencrypt.org/donate
   Donating to EFF: https://eff.org/donate-le
As said in the notes, your certificates and non-public key file had been saved in ./and many others/letsencrypt/stay/your_domain
Now that you’ve your certificates open
principal.cfto edit it:
$ sudo nano /and many others/postfix/principal.cfLook for the next part:
# TLS parameterssmtpd_tls_cert_file=/and many others/ssl/certs/ssl-cert-snakeoil.pem
smtpd_tls_key_file=/and many others/ssl/non-public/ssl-cert-snakeoil.key
smtpd_use_tls=sure
smtpd_tls_session_cache_database = btree:${data_directory}/smtpd_scache
smtp_tls_session_cache_database = btree:${data_directory}/smtp_scache
Modify it to seem like this, changing your_domainwith your area the place wanted, which can replace your TLS settings for Postfix:
# TLS parameters
smtpd_tls_cert_file=/and many others/letsencrypt/stay/your_domain/fullchain.pem
smtpd_tls_key_file=/and many others/letsencrypt/stay/your_domain/privkey.pem
smtp_use_tls=sure
smtpd_tls_session_cache_database = btree:${data_directory}/smtpd_scache
smtp_tls_session_cache_database = btree:${data_directory}/smtp_scache
When executed, save and shut the file.
Apply the adjustments by restarting Postfix:
$ sudo systemctl restart postfixNow strive sending an e mail once more:
$ echo "This is the physique of an encrypted e mail" | mail -s "This is the topic line" your_email_addressThen examine the mail from the e-mail deal with you supplied. You may even see the message in your inbox immediately, as a result of e mail suppliers are more likely to classify unencrypted messages as spam.
You can examine the technical details about the e-mail message in your shopper to see that the message is certainly encrypted.
Conclusion
Now, you may have a Postfix send-only e mail server. Encrypting all outgoing messages is a good first step in order that e mail suppliers don’t straight classify your messages as spam. If you might be doing this in a growth state of affairs, this measure needs to be ample.
However, if you’d like to ship emails to potential website customers (for instance, affirmation emails for sign-up to a message board), take into account setting SPF records in order that emails out of your server are extra doubtless to be thought-about respectable.
Tags
Create your free account to unlock your customized studying expertise.
:max_bytes(150000):strip_icc()/registration-3938434_1280-e2aa7e5d57264ae19b69027f14c85c2f.jpg)