
Some firms, usually smaller ones, nonetheless use software program that sends messages. For instance, it could be custom functions or older CRM methods. These methods ship messages with out a consumer or unauthenticated. The identical drawback can happen with older multifunctional units. These have a scan-to-mail performance however use it with out authentication. In on-premises Exchange environments, we had been capable of configure the suitable connector to permit the methods or units to do that. After such firms have made a migration to Exchange Online, and this migration has been applied with out a hybrid, these units and methods can now not ship messages. The purpose for that is that Exchange Online doesn’t permit the sending of unauthorized messages.
Depending on the software program or machine, the configuration may be tailored with a launch replace. However, it’s typically the case that the product now not has help, and even worse, the producer now not exists. Often, the machine may be changed by a brand new one, however this normally takes just a few days or can’t be applied so simply for price causes. To be certain that these units or software program can proceed for use, we should always reconfigure the Exchange group as hybrid, in accordance with Microsoft’s finest follow. I’ve described why this can be a Microsoft finest follow in another article.
Companies could not have a hybrid set up for a number of causes. On the one hand, it could be that the corporate was badly suggested by its IT companion. On the opposite hand, it could be that this was finished for price causes. In this tutorial, I’ll present an alternate so these present units or software program can nonetheless be used.
The various is to make use of the SMTP server that’s offered by the IIS (Internet Information Service). This article refers back to the Microsoft documentation on the subject of methods to arrange a multifunction machine or software to ship e mail utilizing Microsoft 365 or Office 365 (particularly, possibility 2).
Mail relay server necessities for Exchange Online
To use the SMTP service of the IIS, the next necessities should be complied with. Since that is an IIS (Internet Information Service) service, a Windows Server is required. It is beneficial to make use of a typical model like Windows Server 2016. However, Windows Server 2012 R2 and Windows Server 2019 are additionally supported. In widespread follow, a devoted server doesn’t essentially must be arrange. Often an present server, for instance, the print server, is used for this service.
Another vital level is that the server getting used has Internet entry and port 25 is enabled for sending emails to the Internet. Optionally, an SSL certificates can also be required if the connection needs to be configured through TLS. This level shouldn’t be coated on this article.
Installation roles and options
In step one, we have to outline an on-premises server that may present the relay performance to Exchange Online. Depending on the explanation for which it’s wanted, we will determine which on-premises server this might be. In my instance, I’ll use the native print server for this function, since my instance is primarily involved with multifunction units.
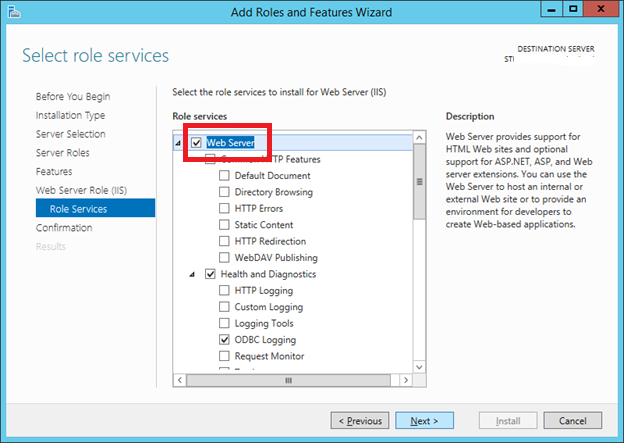
We have to pick the SMTP Server below Add Roles and Features.
In the following step below Roles, we choose the webserver for our set up.
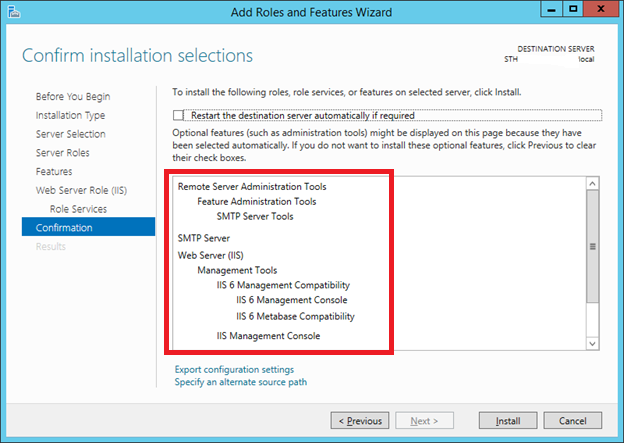
Under Confirmation, we test our settings once more.
Afterward, we set up them.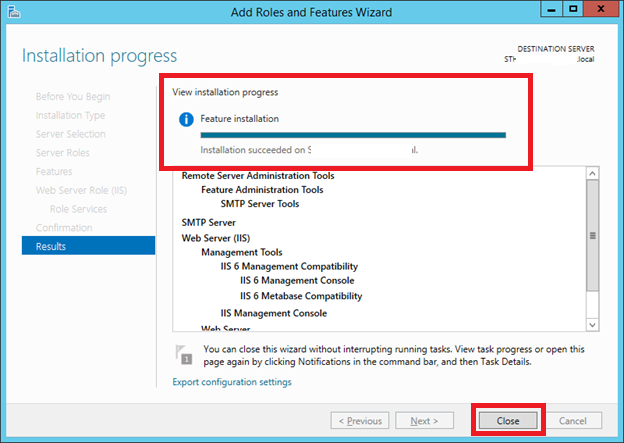
Configuration
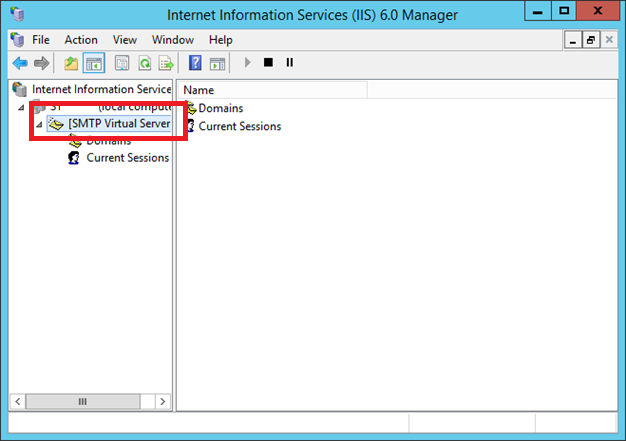
After opening the IIS 6.0 Manager, right-click on [SMTP Virtual Server].
After opening the settings, swap to entry.
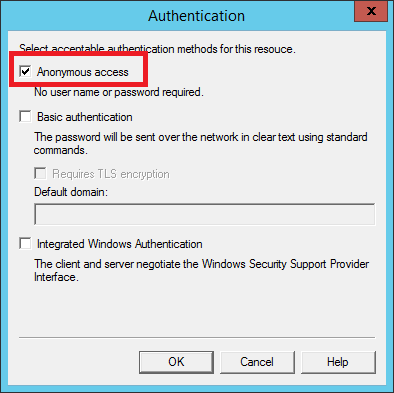
 Click Authentication.

Now we will outline the suitable settings. Since the principle purpose for this setup is the unauthenticated sending of messages, we have to allow nameless entry.
Now we swap to Connections in the identical tab. There are two choices right here: One, we will choose the choice Only the listing beneath. This signifies that we’ve to enter all Device IPs right here for which sending is allowed. I like to recommend this selection as a result of we will by no means make sure which different units or software program are attempting to ship messages.

The second possibility is that we permit sending for all IPs in our community. For this, we choose the choice All besides the listing beneath. This signifies that all IPs which are entered now don’t have any permission to ship messages through this relay.

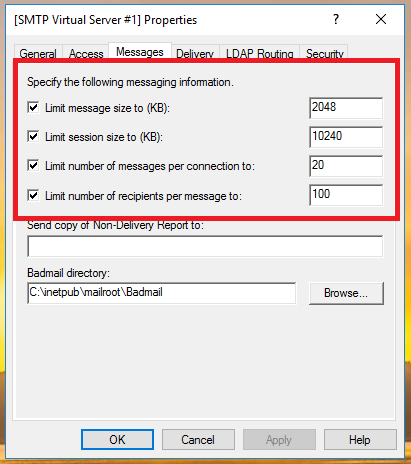
Remember additionally to set the limits as outlined by your tips. If nothing is outlined right here by your organization, I like to recommend the next settings:
Limit message dimension to (KB): 8192
Limit session dimension to (KB): 40960
Limit variety of messages per connection to: 20
Limit variety of recipients per message to: 100
These can, after all, be tailored individually. The fundamental suggestion is that the session restrict is normally 5 instances increased than the message restrict.
The subsequent step is to manage the outbound safety. This can also be set on the tab web page Delivery > Outbound Security. Alternatively, you can even work with a login to Office 365. A mailbox should then be configured in Office 365. This can also be the tactic beneficial by Microsoft.

You can see my instance within the picture beneath. You must adapt this to your setting.

Exchange Online inbound connector for SMTP relay
After the on-premises server is ready, a corresponding connector should be created on Exchange Online.
With this connector, we be certain that Exchange Online receives and processes the messages despatched by the SMTP server.
To do that, you should go browsing to the Exchange Admin Center using this link and comply with the steps beneath.
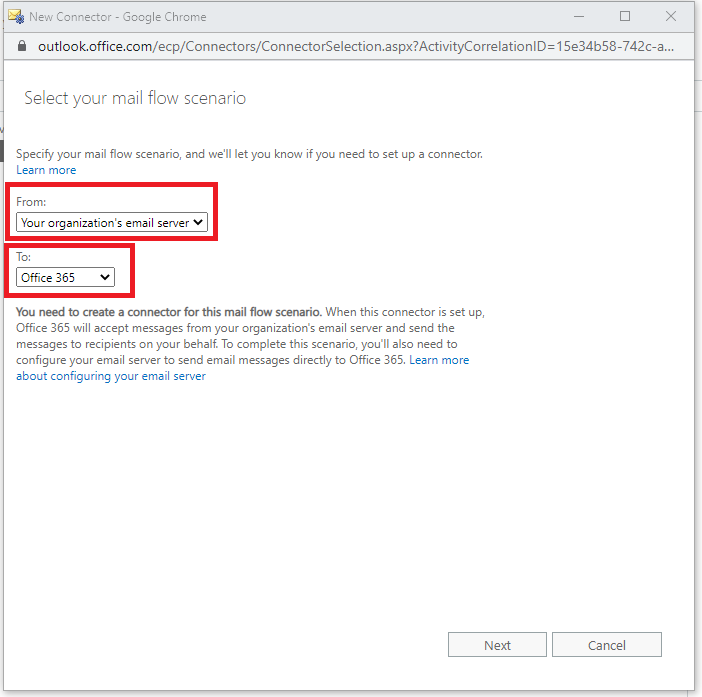
On the web page of Exchange Online, we now must create a brand new connector. To do that, we’ve to browse within the EAC (Exchange Admin Center) to mail circulate > connectors and create a brand new connector with the “+.”

In the following step, we choose “Your group’s e mail server” from the primary dropdown menu. In the second dropdown menu, we choose the choice Office 365. Click Next to proceed.
In the second step, we outline a reputation for our connector. If desired, an outline may be entered. Click Next to proceed.

Now we’ve to enter the general public IP of our on-premises server. This is vital so Exchange Online is aware of from whom it will possibly obtain messages. Alternatively, you can even enter complete networks or a number of IPs as described within the subsequent step.

As already talked about, the IPs may be adjusted or modified right here.

Finally, we’ve the abstract. Confirm with Save. Now the configuration is accomplished. From now on, you possibly can outline within the IIS SMTP — if not already preconfigured — which on-premises methods or applications can ship messages on-line through Exchange.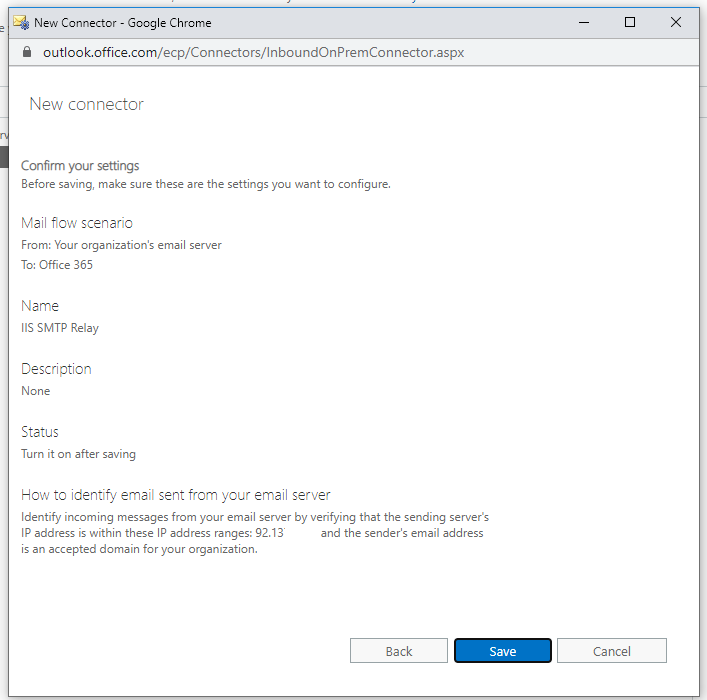
Featured picture: Unsplash / Jean-Frederic Fortier
Post Views:
3,736


:max_bytes(150000):strip_icc()/HowtoSpecifyaPreferredSMTPServerforaMacOSXMailAccount2016-01-04-568a7f403df78ccc153b7b78.png)