Credit: Fergus Halliday | IDG
While the preferred on-line titles now depend on matchmaking techniques and their very own servers, devoted servers are nonetheless a massive a part of the gaming expertise for a lot of PC players.
If you’re a fan of video games like ARK: Survival Evolved or Counter-Strike: Global Offensive, there are many causes to take a look at investing in setting up your individual everlasting private server from locking out griefers to putting in mods that modify the core expertise in a approach that higher fits the way in which you and your pals need to play.
Providers like OVH present a technique of doing this.
If you’re trying to set up an OVH private server for gaming, right here’s an easy-to-read, step-by-step, how-to information:
Step 1 – Select your Server
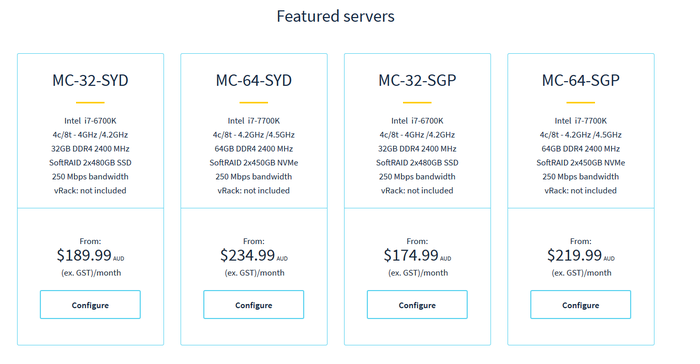
First issues first, you have got to choose the specs of your devoted server.
 Credit: Fergus Halliday | IDG
 Opting for the more-expensive choices right here is often the way in which to go with extra intensive experiences like ARK: Survival Evolved however for extra low-resolution experiences like Minecraft, the cheaper choices will in all probability do the job just-as-well.
Currently, OVH provide 4 server configurations – every with their very own specs and price-point.
Step 2 – Purchase It
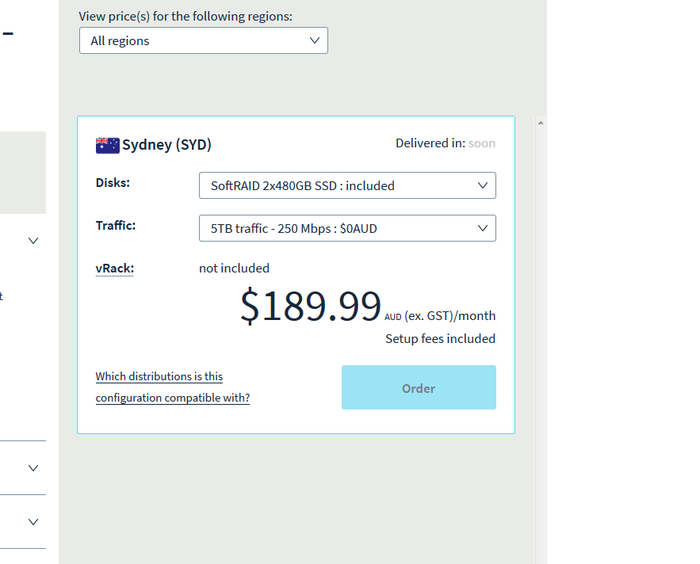
Once you’ve determined in your server bundle of selection, proceed to the acquisition display and lock in your selection.
 Credit: Fergus Halliday | IDG
 When you set up a devoted server by way of a firm like OVH, you’re primarily renting a PC, so the price is month-to-month.
Step 3 – Choose your recreation
The subsequent factor you’ll need to do is go to the Linux Game Server Manager website and discover the sport you need to set up a server for.
At the time of writing, Linux GSM helps the next recreation servers:
-
ARK: Survival Evolved
-
ARMA 3
-
BrainBread 2
-
Brainbread
-
Base Defense
-
Battlefield 1942
-
Black Mesa: Deathmatch
-
Ballistic Overkill
-
Blade Symphony
-
Battalion 1944
-
Codename CURE
-
Call of Duty 2
-
Call of Duty 4
-
Call of Duty
-
Call of Duty: United Offensive
-
Call of Duty: World at War
-
Counter-Strike: Condition Zero
-
Counter-Strike: Global Offensive
-
Counter-Strike 1.6
-
Counter-Strike: Source
-
Double Action: Boogaloo
-
Deathmatch Classic
-
Day of Defeat
-
Day of Defeat: Source
-
Day of Infamy
-
Don’t Starve Together
-
Eco
-
Empires Mod
 Credit: Fergus Halliday | IDG
 -
ET: Legacy
-
Factorio
-
Fistful of Frags
-
GoldenEye: Source
-
Garry’s Mod
-
Half-Life 2: Deathmatch
-
Half-Life: Deathmatch
-
Half-Life: Deathmatch: Source
-
Hurtworld
-
Insurgency
-
Just Cause 2
-
Just Cause 3
-
Killing Floor 2
-
Killing Floor
-
Left 4 Dead 2
-
Left 4 Dead
-
Minecraft
-
Multi Theft Auto
-
Mumble
-
No More Room in Hell
-
NS2: Combat
-
Natural Selection 2
-
Natural Selection
-
Opposing Force
-
Project Cars
-
Pirates, Vikings & Knights II
-
Project Zomboid
-
Quake 2
-
Quake 3 Arena
-
Quake Live
-
Quake World
-
Ricochet
-
Red Orchestra
-
Rust
-
Rising World
-
Grand Theft Auto San Andreas Multiplayer
-
Starbound
-
7 Days to Die
-
Squad
-
Serious Sam 3: BFE
-
Stationeers
-
Sven Co-Op
-
Terraria
-
Team Fortress 2
-
Team Fortress Classic
-
Teamspeak 3
-
Tower Unite
-
Teeworlds
-
Unreal Tournament 2004
-
Unreal Tournament 3
-
Unreal Tournament 99
-
Vampire Slayer
-
Wolfenstein: Enemy Territory
-
Zombie Panic! Source
For the needs of this information, we’re going to go with ARK: Survival Evolved.
Step 4 – Install the model of Linux you want
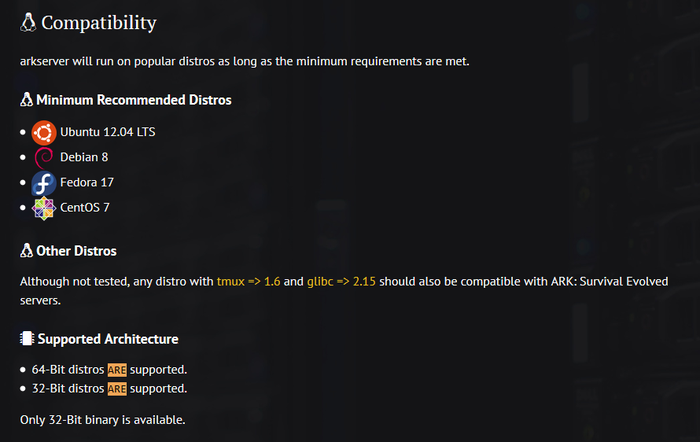
Once you’ve chosen, click on on the linked picture for that recreation and scroll down to the part marked compatibility and discover the variations of Linux that’s really useful on your recreation.
On the LinuxGSM web page for ARK: Survival Evolved, it lists Ubuntu 12.04 LTS, Debian 8, Fedora 17 and CentOS 7 because the minimal really useful Linux distributions.
 Credit: Fergus Halliday | IDG
 After you’ve chosen which model of Linux you’re going to go with, leap over to the management panel on your OVH Server.
 Credit: Fergus Halliday | IDG
 Click on Dedicated Servers and choose your server.
Then, underneath ‘General Information’, it’s best to see a subheader labelled ‘System (OS)’.
 Credit: Fergus Halliday | IDG
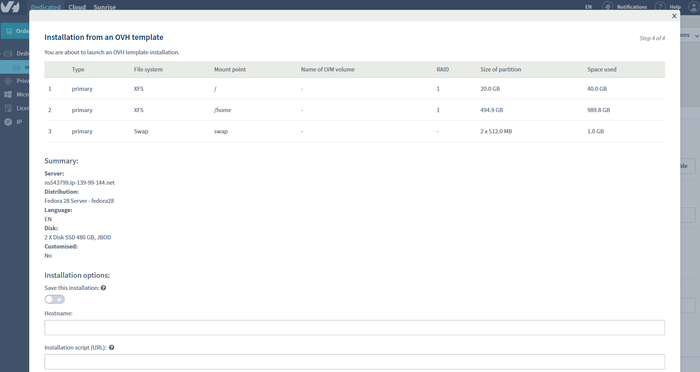
 Click on it and choose the model of Linux you need to set up. Make positive that meets the really useful distros.
For us, this implies Fedora 28.
Step 5 – Wait for the whole lot to be set up
Installing an working system onto your devoted server can take a while.
Once it’s finished, you’ll get an e-mail from OVH letting you recognize and offering the related IP tackle and admin login particulars.
If you don’t get this e-mail, be certain to examine your spam filters and ensure your OVH account is appropriately linked to your e-mail in your account settings.
Step 6 – Install a SSH consumer (putty)
Next, you’ll want to set up a SSH (safe shell) consumer.
In our case, we used PuTTY. However, there are greater than a few different SSH options on the market akin to:
-
KiTTY
-
MobaXTerm
-
mRemoteNG
-
XShell 4
-
Bitvise SSH Client
-
PuttyTray
-
Solar-PuTTY
-
ExtraPutty
-
SuperPutty
-
SmarTTY
-
Dameware SSH consumer
-
Terminals
-
OpenSSH
Once you’ve chosen your SSH consumer, obtain and set up it.
Step 7 – Connect by way of IP
Launch your SSH consumer and join utilizing the small print offered in your e-mail from OVH.
If you’ll be able to’t join, be sure to open up your OVH management panel and make sure that the standing of your server is regular.
 Credit: Fergus Halliday | IDG
 Assuming the whole lot is working appropriately, you ought to be in a position to log in utilizing the login/password mixture included in your e-mail from OVH.
Great work, you’ve now linked to your devoted server.
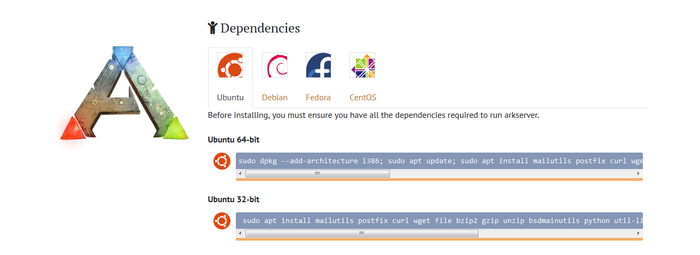
Step 8 – Install the related dependencies
Your subsequent activity is putting in LinuxGSM.
To begin with, leap again to the web page on your recreation of selection on the LinuxGSM web site.
Scroll down to the part labelled dependencies. Find the command line enter you want, based mostly on the Linux distribution you’ve put in, after which copy it into your SSH consumer.
 Credit: Fergus Halliday | IDG
 If you’re typing it out by hand, be sure to examine it over for typos.
Give it a minute, and your OVH server ought to set up the related dependencies.
For Fedora 28 machines like ours, this implies the next:
dnf set up mailx postfix curl wget file bzip2 gzip unzip python binutils bc jq tmux glibc.i686 libstdc++ libstdc++.i686
Step 9 – Install the server consumer
Then, scroll down additional to the part labelled ‘Install’.
Follow the directions there, beginning with creating a person and login.
If you’re enjoying alongside at dwelling and have chosen Fedora 28 like us, enter the next:
adduser arkserver
passwd arkserver
su – arkserver
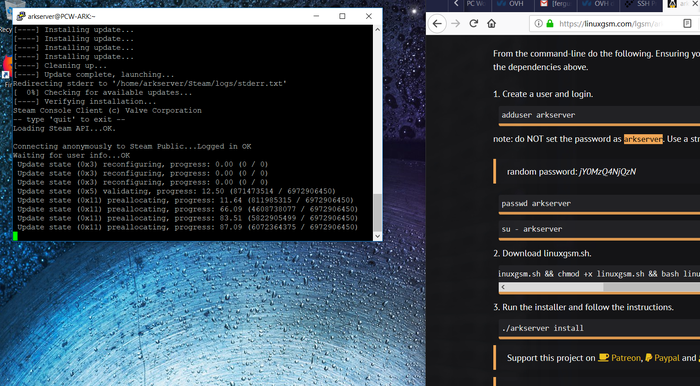
Next, obtain Linux Gameserver Manager.
wget -O linuxgsm.sh https://linuxgsm.sh && chmod +x linuxgsm.sh && bash linuxgsm.sh arkserver
Congratulations, you’ve now received a devoted server with Linux Game Server Manager put in on it.
Now all you’ve received to do is set up the ARKServer app itself.
To accomplish that, merely run the installer for ArkServer.
If you’re utilizing Fedora 28, enter the next into your SSH consumer:
./arkserver set up
Step 10 – Start server
The final thing you want to do earlier than you’ll be able to dive in is definitely get the server working.
To accomplish that, enter the next command in your SSH consumer:
./Arkserver Start
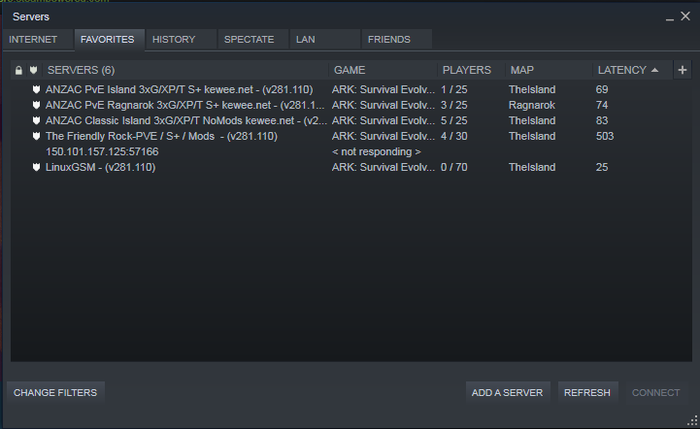
Step 11 – Connect and get enjoying
Connecting to your new private ARK server is so simple as going to Steam, clicking the ‘View’ drop-down menu on the top-left a part of the Steam app.
 Credit: Fergus Halliday | IDG
 Select the choices labelled Severs. Then, hit the Favorites tab and click on on the button labelled ‘Add Server’.
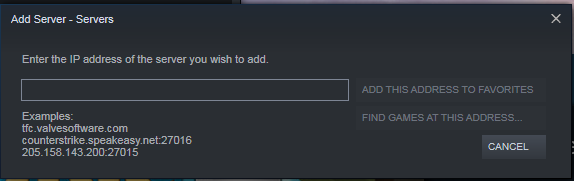
 Credit: Fergus Halliday | IDG
 Paste the IP tackle on your ARK server right here.
 Credit: Fergus Halliday | IDG
 Finally, launch ARK: Survival Evolved.
 Credit: Fergus Halliday | IDG
 When you’ve loaded into the principle menu, press the ‘Join Ark’ button. This will pull you into the sport’s server browser interface.
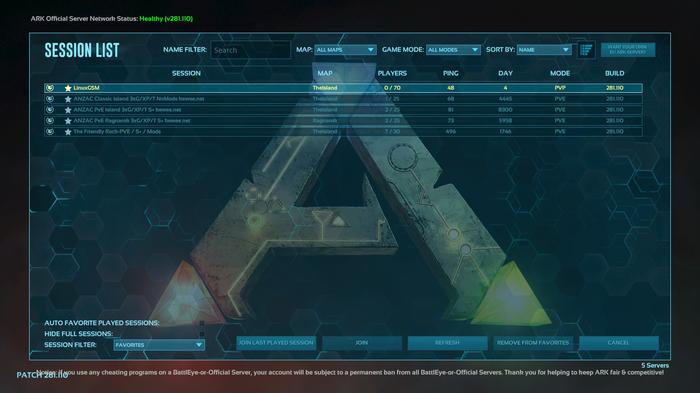 Credit: Fergus Halliday | IDG
 Down the bottom-left of the interface there can be a drop-down field labelled Session Filter. Click on this and choose favorites – and it’s best to see a listing with your private server on it.
Then, merely be a part of that server as you’ll every other ARK server.
 Credit: Fergus Halliday | IDG